Creating a Styling Sweep

This command is only available with the FreeStyle Profiler.

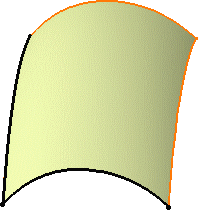
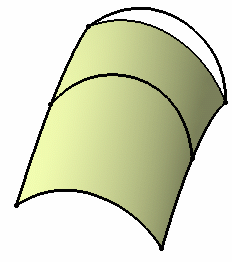
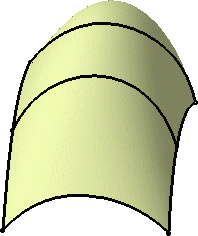
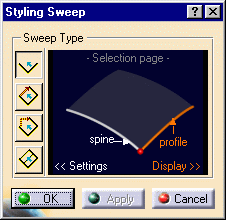
This task explains how to create a swept surface, based on a profile swept along a spine.

Open the StylingSweep1.CATPart document.

  1. Click the Styling Sweep icon


The Styling Sweep dialog box is displayed.

 
  1. Choose the sweep type by clicking on the icons on the left.


Four types are available:

  • Simple: creates a surface based on two curves (profile and spine).
    Example of Simple Sweep

    Resulting Sweep

  • Sweep & snap: creates a surface based on three curves (profile, spine and guide).
    The swept surface is relimited onto the guiding curve. There is no deformation of the swept profile according to the guiding curve.
    Example of Sweep & snap Sweep

    Resulting Sweep

    If the profile is extrapolated half its length, and is no longer in contact with the guide, then the calculation of the sweep stops.

  • Sweep & fit: creates a surface based on three curves (profile, spine and guide).
    The swept profile is deformed onto the guiding curve. There is no relimitation of the swept surface onto the guiding curve.
    Example of Sweep & fit Sweep

    Resulting Sweep

  • Sweep near profiles: creates a surface based on at least four curves (profile, spine, guide, and one or more reference profiles).
    The swept profile is deformed onto the guiding curve. Moreover, tangency conditions are taken into account at the contact points between the reference profiles and spine and guiding curve.

  1. Click the <<Settings text in the dialog box to view and select the settings: 


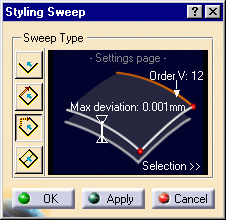
You can define the following parameters that will affect the quality of the resulting swept surface:

  • the maximum V order allowed for the resulting swept surface, ranging between two and sixteen, the U order being defined by the profile curve's order. This value is the maximum allowed, but not necessarily the resulting surface's order if the system finds a better solution.

  • the maximum deviation between the exact surface and the resulting surface, in order to decrease the number of control points and segments on the resulting swept surface.


Click the values in the dialog box to edit them.


Be careful not to over-constrain the surface by setting low values for both deviation and V order. This would result in an increase of segments for the generated swept surface.

  1. Click Selection>> then Display>> in the dialog box to view and select the display parameters: limits points, moving frame, and information.


When the texts are displayed in white, the corresponding parameter is visible in the 3D geometry.


  1. Activate the moving frame.


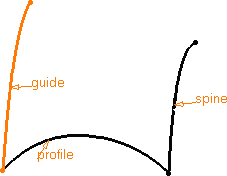
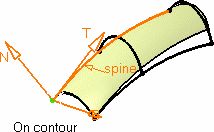
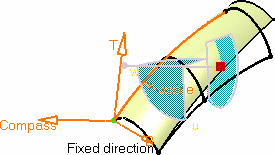
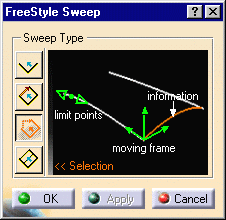
The moving frame is used to define how the profile is swept along the spine.


In the geometry, you can click the moving frame to change its type, press and hold Shift while clicking to move back, or right-click to display the contextual menu.


Four types of moving frames are available:

  • Translation: the profile is translated along the spine.

  • On contour: the profile translation is recomputed at every point of the spine, meaning the profile follows the spine contour.
    The spine should not have inflexion points.

  • Fixed direction: the profile is translated according to the compass orientation.

  • Tangent to contour: the profile translated according to the compass orientation, while constantly remaining tangent to the spine. In the moving frame representation:

    • T is the tangent to the spine at the current point.

    • B is the vectorial product between T and the compass direction.

    • N is the vectorial product between T and B.

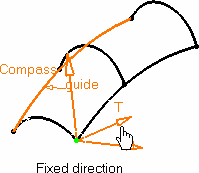
In the last two cases,

  • you need to drag and drop the compass onto the geometry, or use the quick compass orientation capability, to set the direction according to the compass orientation definition, see Managing the Compass.

  • the compass should not be tangent to the curve.


The current type is displayed when passing the pointer over the moving frame. You can move the frame along the spine using the manipulator at the moving frame's origin.

The moving frame is not available with the sweep near profile.

 
  1. Activate the limit points.


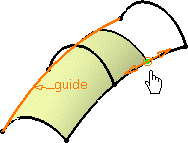
They allow you to redefine the surface limits on the spine/guide. These points show up only when the surface extends beyond the reference profile, when selected, and are limited by the spine or guide's length.


Capabilities are available from the contextual menu when right-clicking a limit point.

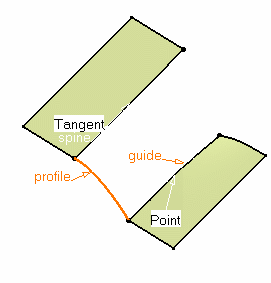
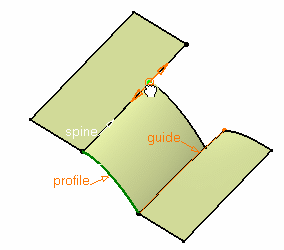
The Information option displays the role of the selected elements in the geometry: profile, spine, and guide.

  1. Click OK to create the styling sweep.


  • You can select surface edges as the spine and guide. In that case, provided the Continuity icon is active from the dashboard, you can set the type of continuity to be taken into account (point, tangency, or curvature continuity) using the contextual menu on the displayed information.
    Note that all continuities are not always available, depending on the chosen sweep type, and the geometry itself.

  • Similarly, you can use the Contact Points icon to display the manipulator on the surface and modify its limits.


In case the selected guide or profile lies on more than one support, the appears.
Refer to the Selecting a Support chapter for further information.

Styling sweeps cannot be created using canonical profiles.

Available capabilities from the dashboard are: datum creation, temporary analysis, auto detection, attenuation, continuity, contact points, and  furtive display.