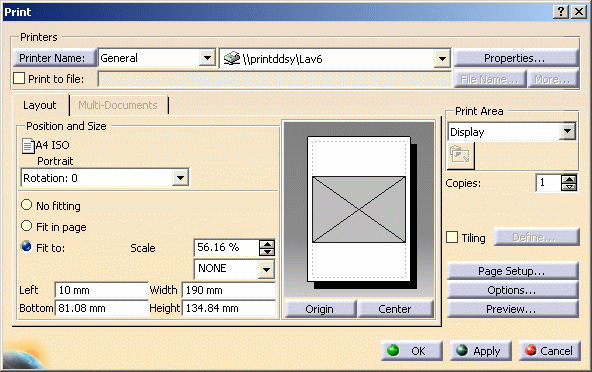
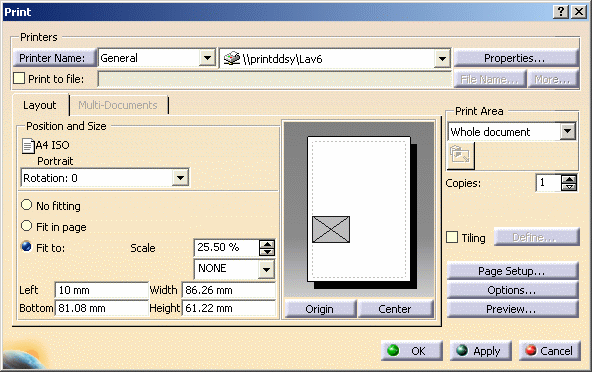
- Printer selection
- Page orientation
- Position and size
- Page setup
- Image orientation
- Print area
- Options (Color, Banner, Various)
- Preview
- Tiling.
The properties displayed in the Multi-Documents tab are relevant for Drafting documents, V4 documents (.model) and multipage image formats (such as TIFF, JPEG, BMP, etc.).
Access the Print Dialog Box
-
Select File > Print (or press Ctrl+P) to display the Print dialog box.
Select a Printer
-
Select a printer, or select the Print to file check box and enter the name of a file. Refer to Printing to a File for more information.
When selecting a printer on Windows, you can use the printers provided by Dassault Systèmes, these printers being managed with dedicated plot configuration files. Dassault Systèmes Printer Manager is part of the Version 5 Windows environment, combined with the native Microsoft printer manager. To choose a printer, you can also click Printer Name to search for a printer using a filter: 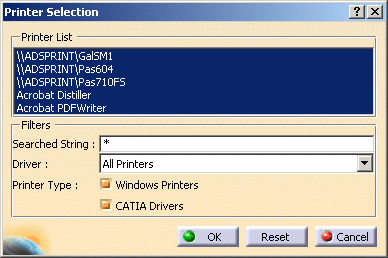
The list of printers that have been defined is displayed under "Printer List". By default, all the printers are highlighted. In the Filters area:
- the string to be searched for in the Searched String box. You can use the character * as a wildcard.
- select the driver on which you want to perform the search (e.g. CGM, HPGL, etc.) in the Driver list.
- you can also indicate a printer type by selecting the appropriate option: Windows Printers or CATIA Drivers.
When finished, press Enter to run the search: the list of printers is updated and displays only the printers corresponding to your search criteria.
If you are not satisfied with your search, you can click Reset to go back to the default options.
When satisfied, click OK to validate and close the Printer Selection dialog box. The list of printers is filtered according to your search criteria:
-
You can use the combo box displayed next to the Printer Name list to filter the list of printers according to groups that have been previously defined in the Printers tab.
To do so, just select a group in the list. The printer list to the right is automatically updated and displays only the printers included in the selected group:
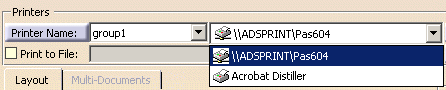
General is the default value and displays all the printers set up by your administrator. -
To set up your printer, click Properties... to access the printer properties. The look of the dialog box changes according to the driver. Modify the desired parameters then click OK to validate.
If the driver is provided by Dassault Systèmes, clicking Properties... displays the Printer Properties dialog box described in Adding a Printer.Note: HPGL, HP-GL2 and PostScript documents generated by Version 5 may look different from one release to another when previewing them whereas the printed result will be identical. Therefore, if you need to compare two files generated on two different releases, we recommend that you use a printed output and not a preview image. Previewing such files is relevant only for checking the file content.
Define the Page Orientation
-
The current page setup (page format and page size) set by clicking Page Setup... is displayed as a reminder. Below are three examples of orientation settings: Portrait: sets portrait orientation 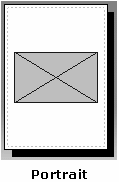
Landscape: sets landscape orientation 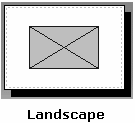
Best orientation: if you resize the image beyond the page margins (displayed in red in the image to the right), Best orientation keeps the image to
be printed at its original size, but automatically changes the page orientation (as displayed in the preview area on the right of the dialog box) to
fit the image into the page.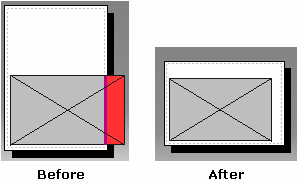
Orientation settings differ from one printer to another. For instance, some printers might offer a Rotated Landscape orientation in addition to
Portrait and Landscape.
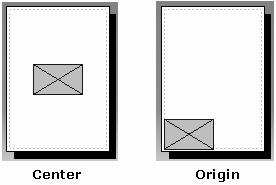
Define the Image Position and Size
-
Define the position and size of the image to be printed.
Define the Page Setup
-
Click Page Setup... to display the Page Setup dialog box, then click OK when finished.
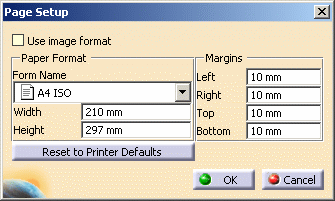
You can: - choose a standard paper format (where Width and Height indicate the paper format compliant with the ISO 216 standard. The Width/Height ratio defined in this format is constant, i.e. 1/√2)
- reset paper margins
- or reset printer defaults.

The Use image format check box is relevant for .CATDrawing documents only. Activating this option disables any further interaction defining the position, size and layout of the image to be printed. For more information, refer to Printing Documents with Multiple Sheets. For very large image formats, note that selecting the Use image format check box might lead to print on a too large paper. For instance, the resulting dpi might be too small, the resolution might reach the system limits and the required amount of memory might be too big for the printing process.
To prevent this, the Use image format check box is grayed out when the image format is too large and a short help message is displayed. The content of this message depends on the Rendering quality factor you set:- for Low, Medium or High quality factors, a non-null dpi value might exist that allows you to print the document. If such a dpi value exists, it is indicated in the help message
- for the Customized quality factor, you just need to set the corresponding dpi value to be able to select the Use image format check box.
To set the paper format, select the format from the Name list. If you set a new format, the image of the paper format and the image to be printed are resized accordingly. If the format selected is incompatible with the printer currently selected, a message informs you that the format cannot exceed the dimension for the printer. However, this does not prevent you from setting the paper format. In our example, the first image uses the A4 ISO format, and the second the A5 ISO format:
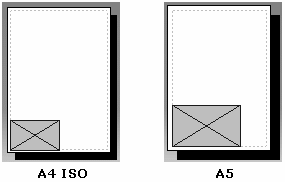
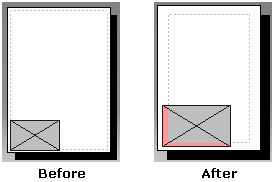
The new paper format and corresponding page size are displayed in the Position and Size area. To set the paper margins, enter values for the Left, Right, Top and Bottom margins, The example shows how the new margins (represented by dashed lines) affect the position of the image:
Define the Image Orientation and the Print Area
-
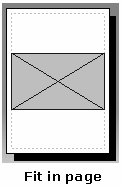
- Best Rotation: used in conjunction with Fit in Page, scales the image up to the largest size which still fits into the current paper format
- Rotation: 90º
- Rotation: 180º
- Rotation: 270º.
-
Select the Print Area from the list:
- Whole document: prints the entire image
- Display: prints the image as seen on screen. However, note that the visual clipping frame of a view in a CATDrawing is not printed. This exception applies to CATDrawings only. The visual clipping frame of 2D Layout documents is correctly printed.
- Selection: prints the area selected using
Select Mode
 .
For more information, refer to
Capturing Selected Areas of Images part in this guide.
.
For more information, refer to
Capturing Selected Areas of Images part in this guide. - Document area: this option is relevant for .CATDrawing documents only. Refer to Printing Documents with Multiple Sheets.
Define Color, Banner and Various Options
-
Click Options... to access the Options dialog box and set the Color options determining the type of color output:
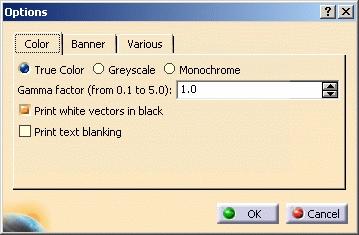
- Set the color type for the image to be printed:
- True color: true color image
- Greyscale: grayscale image (produces a smaller print file)
- Monochrome.
The gamma factor (between 0.1 and 5.0). A gamma factor of 0.1 produces a dark image, whereas a factor of 5.0 produces a lighter image.
- Select the Print white vectors in black check box
if you want to print white vectors as black on the resulting
printout.
 By default, this option is activated.
 - Select the Print text blanking check box if you want to print the text blanking (i.e. the white frame onto which the text is displayed).
- Set the color type for the image to be printed:
-
Click the Banner tab and set the banner options:
")
- to show a banner on the printed output, use the banner box to print information about the current print job in the banner ; this box contains the $USER, $DATE and $TIME variables which, by default, print your user name, and the current date and time in the banner at the bottom of the printed output. This box is editable: you can delete the variables if required and replace them with a text of your choice
- Position: setting the position to None removes the banner ; you can also position it Top horizontal, Bottom horizontal, Left vertical or Right vertical
- Use banner size: when
a banner is displayed on the printed output (i.e. when the
Position list has value other than None),
you can select this option then enter in the Banner text
height box the size to be applied to the banner's text. You
can enter a value comprised between 0.1 and 10.0 millimeters.
If you only select Use banner size without specifying any value, the text is displayed with the default size (2.4 mm) - Insert logo: select this check box to
insert a graphic logo in the banner then, click the button to the
right to navigate in your file system and select the graphic file
to be used as the banner.
This option is activated when a value other than None has been defined in the Position list.
The banner option is also available when using the Generative Drafting application. -
Click the Various tab and set the various options:

Set the Rendering mode to be used for printing: - Default: lets you generate pixel or vector images.
The output depends on the rendering
style defined in the
View Mode Customization dialog box and on the document type (for instance, if
a part is
displayed in Wireframe, using the Default
rendering mode will generate a vector image)
For a Drafting document, a vector plot is performed.
For a Part Design, Assembly, V4, or 2D Layout document when the print area is Display:
- if the window's rendering style is Shading, the print is performed in Rasterization mode (pixel)
- if the window's rendering style is Hidden Line Removal, the print is performed in Hidden Line Removal mode (vector).
- otherwise, the print is performed in Shading with Triangles mode (vector).
For a 2D Layout document when the print area is Whole Document or Selection:
- if Display all elements using Z-buffer depth is activated, then the print is performed in Rasterization mode.
- otherwise, if the window's rendering style is Shading, the print is performed in a mixed Rasterization and Wireframe mode: it superimposes a pixel image and a vector image. Refer to the Version 5 - 2D Layout for 3D Design User's Guide for more information.
- if the window's rendering style is Hidden Line Removal, the print is performed in Hidden Line Removal mode (vector).
- otherwise, the print is performed in Shading with Triangles mode (vector).
Consequently, the image displayed on screen and the printed image are not necessarily exactly the same. In case of the mixed Rasterization and Wireframe mode for a 2D Layout window,a pixel image and a vector image are superimposed. The fitting precision of both images depends on the requested rendering quality or dpi. The higher the dpi, the better the fitting.
Note that to allow a quick preview, the dpi used when previewing the image is often lower than the requested dpi. The requested dpi is used only when printing the document. This is illustrated by the pictures below:
Visualization 
Preview (notice the approximate fitting due to a low dpi) 
Actual print to an HPGL2 printer with a proper DPI - Wireframe: lets you generate vector images. This
is a wireframe mode applied to the rendering style used to
visualize the object. In this mode, you only print the object's
edges.
For instance, the All edges, No smooth edges, Half visible smooth edges, All points, No vertices and Outlines rendering styles of the window are taken into account while generating the plot - Hidden Line Removal: lets you generate vector
images. This mode corresponds to the Hidden Line Removal
(HLR) style you apply by selecting Tools > Customize
then the Commands tab and the All Commands
category.
It prints the viewed edges and outlines of the 3D objects.
Occluded edges and outlines are discarded. The Hidden edges and points
and No vertices rendering styles of the window are
taken into account when generating the plot.
Refer to the HLR topic for more information about this printing mode. - Shading with Triangles: lets you generate vector
images. This is a triangle mode applied to the rendering style
used to visualize the object. In this mode, you only print the
triangles on the object's faces.
The No smooth edges and No vertices rendering styles of the window are taken into account when generating the plot. - Dynamic Hidden Line Removal: lets you generate
vector images. This mode and the
Dynamic
hidden line removal mode available in the View Mode
Customization dialog box generate similar results but use
different technologies. Therefore, even though the results look
similar, they might not be absolutely equivalent.
The color used is the dominant color of the surface onto which Dynamic Hidden Line Removal is applied.
Dotted hidden edges are always printed whatever the window rendering style.
The No smooth edges and No vertices rendering styles of the window are taken into account while generating the plot. - Rasterization: lets you
generate pixel images (like if you use Tools > Image >
Capture to capture an image in Pixel Mode then
print it afterwards). This rendering mode is especially relevant
for 2D and 3D documents with a shading.
You can then print a realistic rendering of your document in a large format.
For operating systems older than Windows XP (Windows NT, Windows 2000, etc.), do not forget that GdiPlus.dll must be installed before using this rendering mode. To do so, browse the following Internet site then follow the instructions:http://www.microsoft.com/downloads/details.aspx?FamilyId=6A63AB9C-DF12-4D41-933C-BE590FEAA05A&displaylang=en

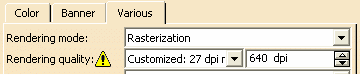
Set the Rendering quality factor which determines the quality of the printed output: - Low (screen): the quality of the printed output matches the screen resolution. This is the default.
- Medium
- High
- Customized: selecting this factor lets you define
precisely the print quality by indicating the desired dpi value.
The maximum value you can enter for:- A4 format is 2565 dpi on Windows and 855 dpi on UNIX
- A0 format is 640 dpi on Windows and 213 on UNIX
- User format 4*A0 is 150 dpi on Windows and 50 dpi on UNIX.
The higher the setting, the longer the print time and the larger the print file, the higher the image quality. This option does not impact print previewing.
A maximum dpi value is computed and displayed next to Customized. If the dpi value is higher than the recommended value displayed in the dialog box, a warning symbol appears:
You can also choose to scale or not the text to be printed by selecting or clearing the Text scaling check box. Set the Line width specification: - Absolute: original line width specifications are preserved
- Scaled: the print image scale is applied to the line width
- No thickness.
Set the Linetype specification:
- Absolute: original line types are preserved
- Scaled: the print image scale is applied to line types.
Linetypes are visualized with a pattern in pixels and are printed with a pattern in millimeters.
When you zoom the object onto which the linetype has been applied, the visualization algorithm applies the pattern as many times as there are zooms which means that, the linetype always looks the same:
Linetype 3
Before zoomingLinetype 3
After zoomingBut when you print the object, the pattern is applied according to the geometry's length. Therefore, if the geometry's length is lower than the pattern's size, the pattern is only partially applied.
In Absolute mode, as the pattern size is preserved, the applied pattern count depends on the print scale. The pattern is applied with respect to the paper size.
In Scaled mode, as the pattern is scaled, the applied pattern count does not depend on the print parameters. The pattern is applied with respect to the model size.
For instance, a 200% print scale in Absolute mode means that the number of patterns applied is two times greater than
the number of patterns applied in Scaled mode:


Linetype 3 - Zoom: 200%
Absolute modeLinetype 3 - Zoom: 200%Scaled mode Use the Line end list to choose how line ends are drawn (useful for drafting objects): - Flat
- Square
- Round.
This option does not impact print previewing.
You can select the Linetype overlapping check box to get a correct plotting when lines overlap.
This option is especially relevant when working with .CATDrawing documents.Below are two examples:
Linetype overlapping is activated Linetype overlapping is deactivated The Use 3D accuracy check box is activated only when working in Hidden Line Removal rendering mode.
Selecting this option lets you use a polyhedral HLR mode instead of an exact HLR mode, which means that you obtain a simplified result (i.e. polygonal segments) instead of an exact result. - Default: lets you generate pixel or vector images.
The output depends on the rendering
style defined in the
View Mode Customization dialog box and on the document type (for instance, if
a part is
displayed in Wireframe, using the Default
rendering mode will generate a vector image)
Tile Images
-
Select the Tiling option if you want to tile the image and print it on several pages.
Once the Tiling option is selected, you can define more precisely the tiling options for your image by clicking Define... to open the following window:
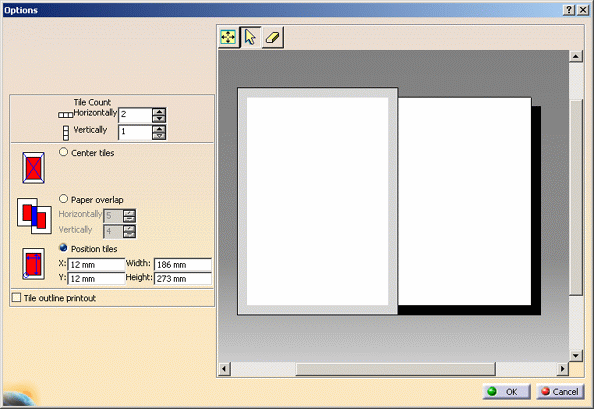
- Tile Count lets you specify the number of tiles to be used to cut the image horizontally or vertically (enter the desired number in the corresponding box)
- Center tiles allows you to center the tile on the paper
- Paper overlap enables you to define the horizontal and vertical paper overlap using the appropriate boxes
- Position tiles lets you indicate the position of the tile on the paper by entering its coordinates in the X and Y boxes. You can also specify the tile size by entering its dimensions in millimeters in the Width and Height boxes
- The Tile outline printout check box enables you, when activated, to print the outline of each tile.
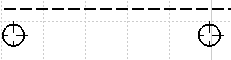
When Selection Mode  is activated, you can click any tile in the preview window to
display the corresponding part of the document:
is activated, you can click any tile in the preview window to
display the corresponding part of the document: 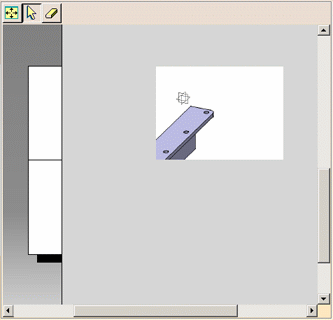
Note that you can click Fit All In ") and use zooming commands inside the preview window.
and use zooming commands inside the preview window.
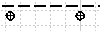
Remove Tile Mode lets you select the tiles to be removed from the printout. The
selected tiles are then identified in the preview window by a red
cross as shown below:
lets you select the tiles to be removed from the printout. The
selected tiles are then identified in the preview window by a red
cross as shown below: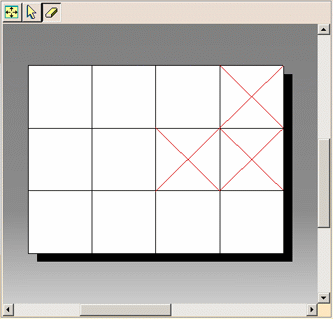
Clicking Remove Tile Mode
grays all the boxes displayed to the left. When the tiles have been
removed, click Selection Mode
to activate the boxes and go on defining your tiling options. -
Select OK successively in each dialog box to confirm all your print settings then in the Print dialog box click:
-
Apply to print the document without closing the Print dialog box
-
OK to print the document and close the Print dialog box.
-
About the Log Output File
Each time you print a document, a log output file is generated. The traces contained in the file give you information on the printing date and time, the user name, the log file name, the printer name along with the print mode (i.e. to a file or a device).
By default, this file is named Print.log and is located in a temporary directory:On Windows
C:\Documents
       and Settings\user\Local
       Settings\Application
       Data\DassaultSystemes\CATTemp
On UNIXPrint.log is also located in the
CATTempdirectory, in your home directory.However, the default location and name may be modified by your administrator using the CATPRINTLOG external variable.
For instance, setting
CATPRINTLOG='c:\test\MyPrint.log'means that the log file named "MyPrint.log" will be located in the directory "test"...
...whereas
CATPRINTLOG=NONEmeans that the log file will keep its default name and location.
Here is a log output sample:
<Start Print

       User: AJT

       Date: 04/14/2005

       Time: 16:31:17

       Host: MYMACHINE

       Printer: \\Printer1

       Document: C:\Manipulators3.CATPart

       Result: 1

       End Print>
![]()