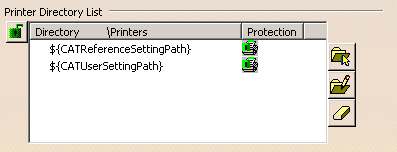
Printer Directory List
Protecting Printers
When logged as administrator, you can right-click the desired directory
from the list then select Protect Printers to protect the access
to this directory (the green symbol
![]() under the Protection column
turns red).
under the Protection column
turns red).
Inversely, once a directory has been protected, you can make it accessible
by right-clicking it then selecting Free Printers (the red
symbol ![]() turns green).
turns green).
Once a printer directory has been protected by your administrator, you can still add printers from this directory but you cannot modify them.
For detailed information on lock mechanisms, refer to Locking Settings.
![]()
Editing Variables
Please note that you can use variables other than
${CATReferenceSettingPath} or ${CATUserSettingPath} ; user-defined
variables are supported.
To edit a user-defined variable, click the
![]() button then enter the new value in the Printer Directory dialog
box that opens:
button then enter the new value in the Printer Directory dialog
box that opens:

Adding a Directory
To add a directory to the list, click the
![]() button then browse your
filetree.
button then browse your
filetree.
If no directory has been added, ${CATUserSettingPath} and ${CATReferenceSettingPath} are automatically added to the list. These two variables reference in the Version 5 environment the directories where setting files are stored:
- CATReferenceSettingPath: points to the directory (or directories) where administrator settings are stored
- CATUserSettingPath: points to the directory where user settings are stored.
Note that any directory you add must have a father directory named
"Printers". This father directory must be located at the end of the path,
for instance e:\users\Printers. If no such directory
exists, the application automatically adds it to the path.
Removing a Directory
To remove a directory from the list, select it then click
the
![]() button.
button.
![]()
Printer Creation Directory

By default, 3DPLM Printer configuration files are stored in the permanent setting files which are created in a location referenced by the CATUserSettingPath environment variable. This location is:
- $HOME/CATSettings/Printers/PLOTxxxx.xml (on Windows)
- $HOME\CATSettings\Printers\PLOTxxxx.xml (on UNIX).
where "$HOME" represents the CATUserSettingPath variable.
If no directory has been specified, the box displays ${CATUserSettingPath} to indicate that the default location will be used.
Once a directory has been specified in the Printer Creation Directory box, any new 3DPLM printer you add afterwards (refer to Adding a Printer for detailed information) is added to this directory.
When an environment variable references several concatenated paths, the
new printer is added to the last added path and not to the first anymore.
This change has been made in order to match the settings files' behavior.
However, if you want to go back to the previous behavior, i.e. add the
printer to the first path, you can export the
PRINTER_CREATION_DIR_FIRST variable but do not forget that this
method is not recommended:
set PRINTER_CREATION_DIR_FIRST = 1 (on Windows)
or
export PRINTER_CREATION_DIR_FIRST = 1 (on UNIX)
"1" is just taken as an example, you can put any other value because it has no impact.
A better method is to work with a user-defined variable. To learn how to define your own variable, refer to Customizing Your Environment on Windows or on UNIX.
Note: any printer creation directory you specify must have a father directory named "Printers". If no such directory exists, the application automatically adds it to the path.
![]()
Driver Configuration Path

Enter the path to the configuration file where your driver settings are
stored or click the ![]() button
to navigate to the desired location.
button
to navigate to the desired location.
This file is identified by the suffix *.cfg.
By default, the external driver configuration file is stored in:
- $HOME/CATSettings/Printers/Drivers.cfg (on Windows)
- $HOME\CATSettings\Printers\Drivers.cfg (on UNIX).
where "$HOME" represents the CATUserSettingPath variable.
If no path is specified, the box displays ${CATUserSettingPath}\Printers\Drivers.cfg to indicate that the default location is used.
![]()
Printer Group Definition
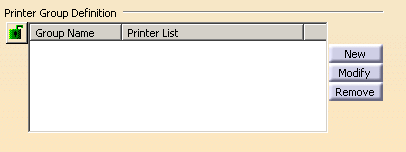
Note that the printer groups you define in this tab are saved in the Printers.CATSettings file (stored in the CATSettings directory).
-
Click the New button to open the Printer Group dialog box:
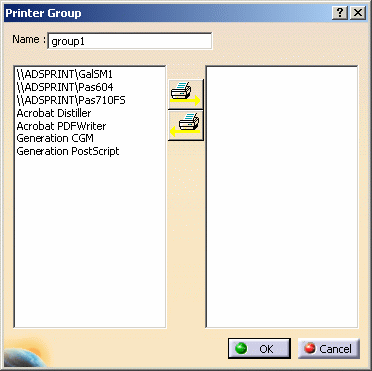
The left column displays the printers that have already been set up.
The group name is displayed in the Name field and can be modified if needed. The group number is incremented for each new group you create.
-
In the left column, select the printers to be added to the new group then click the
 button to add them to the right column of the dialog box.
Once a printer has been added to a group, you can remove it by selecting it in the right column then clicking the
button: in that case, the removed printer reappears in the left column.
Note: you use the multi-selection to select your printers in the left and right columns.
-
Click OK to close the Printer Group dialog box.
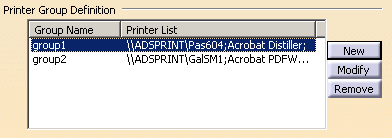
The Printer Group Definition area now looks like this:
-
You can then carry out the following actions on the created groups:
modification: select a group then click Modify. This opens the Printer Group dialog box detailed above and you can then add or remove printers
removal: select a group then click Remove to remove it from the group list.
Once printer groups have been defined, you can use them to filter the printers displayed in the Print dialog box using a specific combo box.
![]()