| |
Before you start
In order to take full advantage of this scenario, you need to be
familiar with the basic vocabulary:
- "Viewer" is the screen area in which 3D objects are drawn
- "View" is a part of the viewer. Usually, the viewer has one single
view but it can also be divided into 4 parts representing a different
view each. When a viewer is split into several views, it is identified as
a "multi-view" viewer
- "Viewpoint" is the set of parameters required for defining a 3D view
volume, i.e. the eye of the user, the view direction, the focus point and
the axis system defining the position of the user. It can be defined as
the position in model coordinates at which the eye is looking
- "Layout" defines how the viewer is divided into different areas (=
views) and how these areas are located
- "Configuration" is a layout made up of views, each of them being
defined with a viewpoint.
Bear in mind that the multi-view configuration remains active throughout
the whole Version 5 session but it is not saved when selecting File >
Save As. For instance, if you apply a multi-view configuration then
save and close your document before reopening it, this document is
displayed in a single-view configuration using the last active view before
the save.
However, the configuration is stored in the CATSettings directory and
therefore, you can reuse it from one session to another by clicking
Create Multi-View
 in the View toolbar. If no customization has been defined, the
default configuration is applied.
 |

|
-
Select View > Navigation Mode > Multi-View Customization
to open the Views and Layout dialog box then select the
Automatic tab:
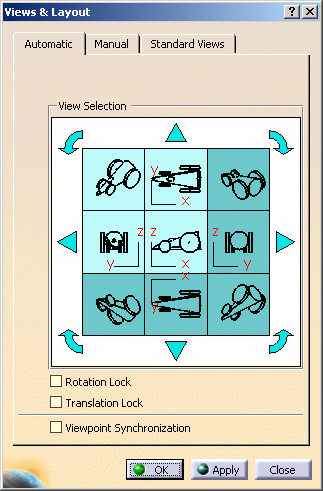 |
This dialog box is made up of three areas:
- View Selection lets you select a group of views as well as
their location and orientation
- Viewpoint Manipulation lets you manipulate the viewpoint
using the following options:
- Rotation Lock: locks the viewpoint rotation
- Translation Lock: locks the viewpoint
translation
- Viewpoint Synchronization: imposes a
synchronization between the views when a viewpoint
transformation (rotation, translation or zoom) is made in one
of them. Note that you cannot activate both Translation
Lock and Viewpoint Synchronization
- Confirmation: lets you validate or cancel the configuration.
|
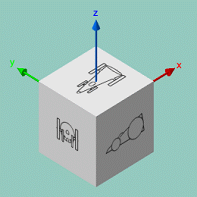
| For any 3D object, there are six standard views
according to the coordinate system of the object. These views
mapped onto a cube, each face of this cube being perpendicular to
one of the directions of the 3D axis. Whatever the orientation of
the cube, the observer can see three faces (i.e. three standard
views) as shown below: |
 |
| An isometric view can be added to these views. The
direction of this isometric view starts from the vertex formed by
the three faces towards the center of the cube. |
The View Selection area represents the unfolded
cube of standard views: each square represents a standard view and
the one placed at the center is the base view around which adjacent
views are automatically generated.
In the default configuration displayed below, the base view is the
standard Left View: |
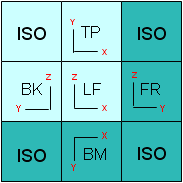 |
ISO = Isometric View TP = Top View
BK = Back View
LF = Left View
FR = Front View
BM = Bottom View |
|
-
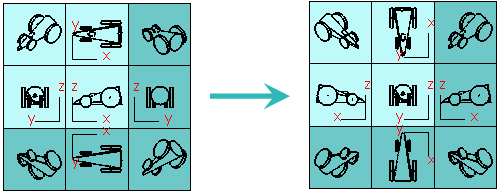
Select the standard view to be used as base view using
one of these two methods:
- select directly in the View Selection area the view to be set
as the base view: the selected view is placed at the center and
all the adjacent views are regenerated accordingly.
In the example below, Back View is selected:
|
 |
- click the right translation arrow
 to shift Back View
to the center (or any other translation arrow depending on the
standard view you want to set as base view). to shift Back View
to the center (or any other translation arrow depending on the
standard view you want to set as base view).
Clicking a translation arrow shifts the views in the arrow's
direction.
|
-
Click Apply to apply the configuration to the
current 3D viewer and keep the Views and Layout dialog box
displayed:
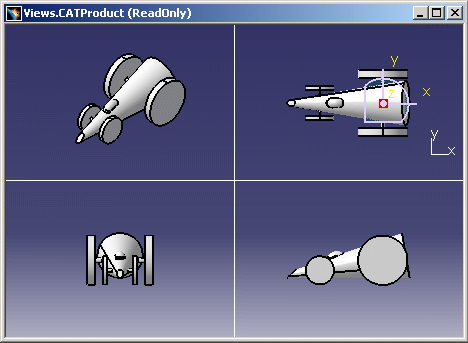 |
As soon as you apply a configuration to the current
viewer, Create Multi-View
 in the View toolbar changes to
 to indicate that
the multi-view mode is now active. to indicate that
the multi-view mode is now active. |
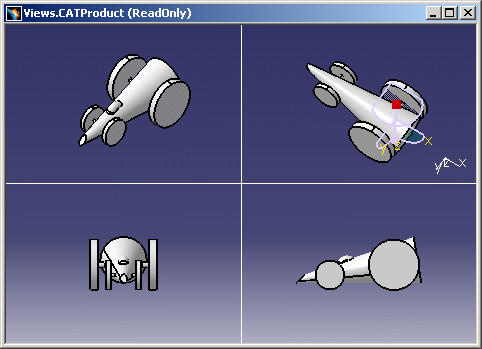
| When you manipulate a viewpoint in one of the four
views, the other three viewpoints are not modified and you can
manipulate them independently: |
 |
-
Select a group of views by clicking an Isometric
View in one of the four corners of the View Selection area.
-
Click the  arrow
repeatedly and check the result in the View Selection area. Below is an
example with starting position displayed to the left: arrow
repeatedly and check the result in the View Selection area. Below is an
example with starting position displayed to the left:
-
Activate the lock options (+ click Apply) if
needed:
-
Rotation Lock locks the rotation in
all the views, except the Isometric View
-
Translation Lock locks the translation
in all the views, except the Isometric View.
|
-
Select the Viewpoint Synchronization check box
then click Apply if you want the other three viewpoints to be
modified simultaneously when you manipulate one of them.
-
When satisfied with your configuration, click OK
(or Apply then OK) to validate and close the
Views and Layout dialog box.
|