 |
-
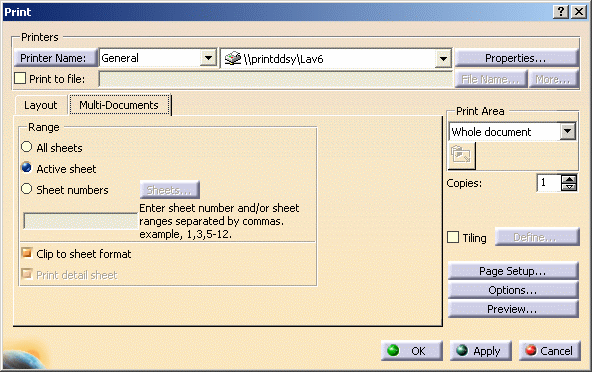
Select File > Print (or press CTRL+P) to display
the Print dialog box.
-
Click the Multi-Documents tab:
-
If you want to print to a file instead of a printer,
select the Print to file check box then enter a file name or
click File Name...
|
This file will contain your image printout and will be saved with a .prn extension. |
|
When printing
multiple sheets to a file, click More... to open the
File Name Selection dialog box which displays the file
name you have entered in step 3: |
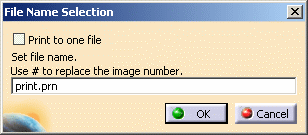 |
You have two options:
- if you want to print all your sheets to a single file, you
just have to select the Print to one file check box.
Selecting this option automatically grays the field below since
it is not relevant anymore.
You can then click OK to validate and close the
File Name Selection dialog box.
- if you prefer storing each image printout in a separate
file, i.e. generate as many .prn files as there are sheets, use
the Set file name box.
This box lets you specify the name of the .prn file (if not
already specified). It also lets you indicate the position of
the number in the file name by inserting the #
character where desired. The "#" character is used as a
wildcard and is incremented for each .prn file generated.
For instance, printing 3 sheets using the following syntax:
print#.prn
creates 3 .prn files named "print1.prn", "print2.prn" and
"print3.prn".
Whereas printing 3 sheets using the syntax:
#print.prn
creates 3 .prn files named "1print.prn", "2print.prn" and
"3print.prn".
Bear in mind that you have to print each generated .prn file
individually. Refer to
Printing to a
File for detailed information on printing .prn files.
|
 |
If you do not use
the "#" character in the .prn file name, a single .prn file is
created even if the Print to one file check box has
not been selected and only the last sheet is printed (whichever
option has been selected in the Range area). |
|
When finished, click
OK to validate and close the File Name Selection
dialog box.
After clicking OK, the Print to file box
reflects the changes you have made as shown below: |
 |
| The location ("E:\users"
in our example) and name ("print${CATPRT_DOC_SHEETS_NUM}"
where "${CATPRT_DOC_SHEETS_NUM}"
represents the file number) of the .prn files is indicated. The
number of documents to be printed is stored in the variable. |
-
In the Range area, indicate
whether you want to print All sheets or only the Active
sheet by sleecting the appropriate option.
| If you want to print a given number/range of
existing sheets, click Sheet numbers before entering
the corresponding sheet numbers in the field below. |
-
If you clicked
Sheet numbers, you can click Sheets... to open the
Image Selection dialog box which lets you select the sheets
you wish to print:
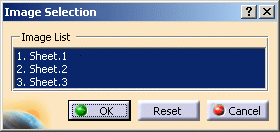 |
| By default, all the sheets are selected but you
can deselect the sheets you do not want to print by clicking them
in the list. Reset lets you re-select all the sheets
displayed, if needed. |
| You can select the Clip to Sheet Format
check box if you want the drawing representation to be clipped to
the sheet format. |
| You can also select the
Print Detail Sheet check box if you intend to print
sheets of type Detail. |
-
Select the number of Copies as well as the
area to print.
-
Click Preview... to display the Print
Preview window. For more information, refer to
Previewing Document Prior to Printing in
this guide.
-
Click Options... to access the Options
dialog box and set the Color options determining the type of
color output, then click Page Setup... to display the
Page Setup dialog box:
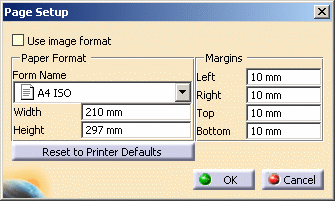 |
| You can select the Use Image Format
check box to automatically adapt the printer format to the
current format of the CATDrawing document to be printed. This
option is especially useful when printing sketches. Selecting
this check box automatically activates No Fitting (in
the Position and Size area under the Layout tab) in
order to leave the document to be printed to its original size.
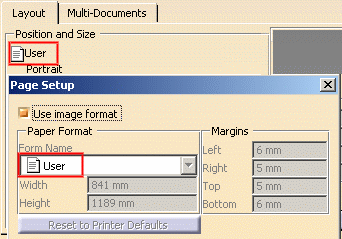
Once the option is selected, all the fields are grayed out in
the dialog box and the Form Name list displays the
value User to indicate a specific format.
In the Print dialog box, the printer format changes to
the current document format: |
 |
|
Note that activating this option disables any further interaction
defining the position, size and layout of the image to be
printed. |
-
Click the Layout tab to select the required
options. For detailed information about defining layout, page setup and
options refer to Customizing Print Settings
Before Printing Documents in this guide.
-
Select the Print Area:
-
Whole Document: prints the entire
image
-
Display: prints the image as seen on
screen
-
Selection: lets you define on screen
a rectangular zone to be printed with respect to the drawing
scale.
Click Select Mode
 then drag and drop the mouse to define the clipped zone. For
more information, refer to Capturing
Selected Areas of Images in this guide
-
Document Area: prints the area that has been
previously defined for each sheet of your .CATDrawing document
in the Drafting workbench.
This area is defined using the Print Area option
displayed in the sheet properties. For detailed information,
refer to "Editing Sheet Properties" in the
Version 5 - Interactive Drafting User's Guide.
Note that:
-
if you did not define any print area prior to
accessing the Print dialog box, Document Area
does not appear in the list
-
the sheets for which no print area has been
defined are printed according to the options set in the
Position and Size area (under the Layout tab).
|
-
Click Tiling to tile the image to be
printed. Once this option is activated, you can click Define...
to set the tiling options. Refer to
Customizing Print Settings Before Printing Documents for more
information.
-
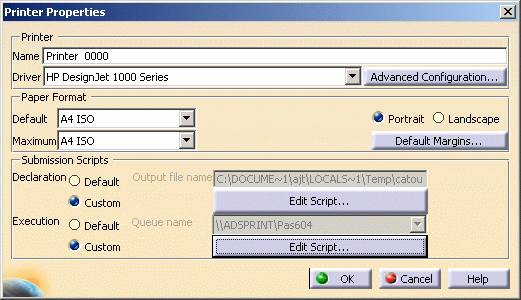
If you print to a 3D PLM
printer (refer to Adding a
Printer for detailed information), you can click Properties...
to access the printer properties:
-
In the Submission Scripts area, click Custom
next to "Declaration" to specify the default output file name: each
time you print a document, an output file is created at the location
you specify in the text box.
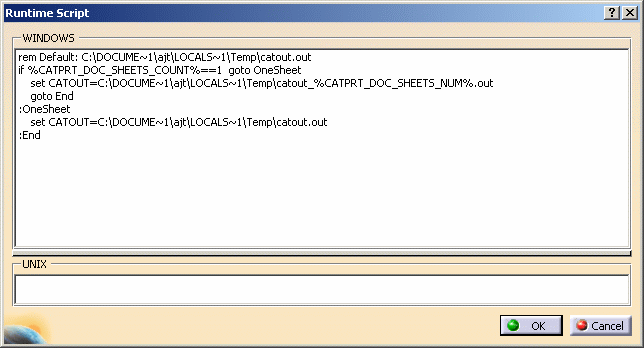
-
Click Edit Script... which is now activated.
This button lets you access the default Runtime Script
displayed in the window below:
-
You can use the following two environment variables
contained in the default script to create your own script:
-
Click OK to close the Runtime Script
window then Apply to validate your print settings and print
the document without closing the dialog box.
 |
Clicking OK also validates your
settings and print the document but closes the dialog box. |
|
