| The administration of document environments based on the DLName mechanism is detailed in Administrating Data Using the DLName Mechanism in the Version 5 - Installation and Administration User's Guide. |
Document Environments
An example of the integration of DLNames in your Version 5 session is also provided.
What is a document environment?
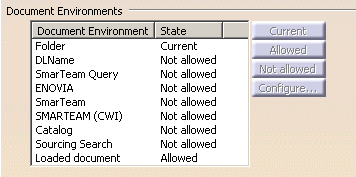
A document environment is a way of accessing your documents. When you access the Document tab, the following document environments are displayed:
- Folder: default document environment in which the dialog access any folder containing the documents
- DLName: document
environment which lets you restrict the access to specific folders
referenced by logical names referred to as "DLNames". Each folder is
assigned a logical name.
In this mode, the different file opening and saving commands only allow end users to access documents in directories referenced by DLNames.
Any modification of a path impacts the DLName once, thus avoiding to search for and modify manually any occurrence of this path.
The administrator may also define the folders in which users are allowed to work - SmarTeam Query: lets you access documents stored in SMARTEAM - CATIA Integration using queries
- SmarTeam: lets you access documents stored in SMARTEAM - CATIA Integration
- SMARTEAM (CWI): lets you access documents stored in SMARTEAM CATIA Web Integration
- Enovia: lets you access documents stored in ENOVIA V5
- Catalog: lets you access documents stored in catalogs
- Sourcing Search: lets you access documents stored in Sourcing for Direct Material (SDM)
- Loaded document: lets you access documents loaded in the
current session.
- Current: sets the selected environment as the current document environment and defines the dialog box (i.e. File > Open, File > Save, Edit > Links, etc.) displayed when accessing your documents
- Allowed: indicates that the environment may be set as Current or Not allowed. Setting a document environment as Allowed means that you can access documents related to this environment via the Browse window which opens when you select File > Open:
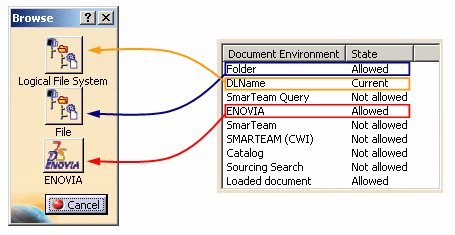
The picture above shows that in addition to the current DLName environment, two other environments have been allowed: Folder and ENOVIA. You are thus allowed to access DLNames, files (such as CATParts, CATProducts, etc.) or ENOVIA V5 documents.
- Not allowed: indicates that the environment may not be set as Current. You have to assign it the Allowed state before selecting it as your Current environment.
Current vs. Allowed
When you open documents:
- the Current document environment is the default selected environment
- Allowed document environments may be also used.
When you save or send documents or use File > New from:
- only the Current document environment can be used.
| Command | Usable document environment |
| Open | Current + Allowed |
| Save | Current |
| Send To | Current |
| New from | Current |
There is only one exception to this rule: when working with PDM data, you can use File > Save As.
More about document environments
- The Catalog and Loaded document environments cannot be set as Current
- If document environments have been locked by your administrator, Allowed and Not allowed are grayed out and thus cannot be selected by the user. Only Current and Configure... are active.
![]()
Setting the DLName environment as "Current"
-
In the Document Environments column, select DLName.
-
Select successively Allowed and Current.
DLName is now defined as your current document environment as indicated by the Current value in the State column.
Defining DLNames
Once you have set the DLName environment as your current environment, you have to create the DLNames you will use.
-
Click Configure... to open the Configure dialog box which lets you add or remove DLNames:
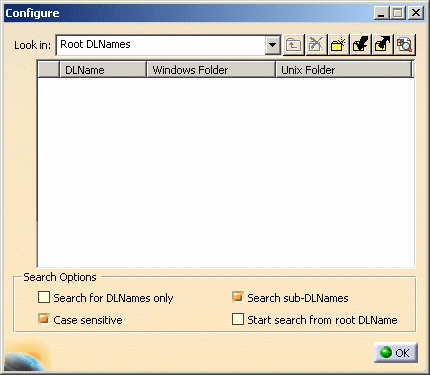

The UNIX Folder column is displayed on Windows only when running Version 5 in administrator mode. On UNIX, only the Windows folder is displayed.
When running Version 5 in user mode, only the column corresponding to your operating system is displayed (for instance, "Windows Folder" when working on Windows).The Lock column (next to the DLName column) appears in both administrator and user modes and can display the following lock symbols:  means "locked"
(in user and administrator mode)
means "locked"
(in user and administrator mode) means "locked
at administrator level" (in administrator mode)
means "locked
at administrator level" (in administrator mode) means "no lock"
(in administrator mode). In user mode, there is no lock symbol.
means "no lock"
(in administrator mode). In user mode, there is no lock symbol.
-
Click the
 button or right-click then select New to create a new DLName.
A default name and a default folder are assigned to the new DLName as shown below (you can create as many DLNames as necessary): 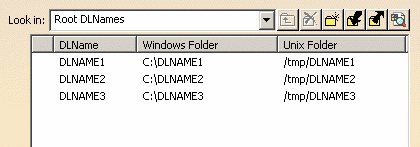
-
If you are authorized by your administrator (i.e. when no lock appears opposite the DLName), you can modify the values displayed. To do so, click the desired value to be able to edit it then type the new data.
In administrator mode, you can modify the DLName and the associated paths as you wish.
In user mode, you can create a root DLName. However, do not forget that some rules apply if you want to modify names and folders:
- when changing the folder of a sub-DLName, the new folder must correspond to a folder of the father DLName
- the name of the last folder (on UNIX and Windows) is always
the one of the DLName.
If you change the name of a DLName, the modification is automatically applied to the folder: if you have DLNAME2 as a sub-folder of C:\DLNAME1 then rename DLNAME2 in DLNAMEA, the path displayed in the Folder column will automatically change fromC:\DLNAME1\DLNAME2toC:\DLNAME1\DLNAMEA.
Therefore, be very careful when renaming a DLName since this modification impacts the name of the folder and of the sub-folders, if any!
Any modification of a root DLName path is controlled by the administrator which may prevent you from doing so.
As far as sub-DLNames are concerned, you cannot modify the path of a sub-DLName because this path contains the name of the sub-DLName and depends on the location of the parent DLName.To modify the Windows folder of a DLName, right-click the folder to be modified in the Windows column then select Browse: this opens a dialog box that lets you navigate to the new folder. After clicking OK, this new folder then replaces the former folder in the Windows column:

You can include variables in DLNames using the syntax ${VARIABLE}.For instance:
C:\users\${MODEL}\publishwhere${MODEL}is a user-defined variable. -
If you are running in administration mode, you can lock or unlock each DLName individually simply by clicking the green symbol opposite the DLName.
Locking a DLName changes its state from to
(and inversely when you
unlock the DLName). As an administrator, you can also click the general lock to prevent end users from defining and modifying DLNames. Therefore, the following commands are not available: New, Browse, Delete, Import and Export.
-
When finished adding DLNames to your list, you can then click the
 button (or right-click and
select Export) to save your list of DLNames as a .txt file in
the appropriate location using the Export DLNames dialog box.
button (or right-click and
select Export) to save your list of DLNames as a .txt file in
the appropriate location using the Export DLNames dialog box.
You can make as many lists as you like and, for further use, import the list whenever you want to. To do so, click the  button (or
right-click and select Import) then select the list to
be imported in the Import DLNames dialog box.
button (or
right-click and select Import) then select the list to
be imported in the Import DLNames dialog box. -
If you want to remove a DLName from the list, select it then click the
 button (or
right-click it and select Delete).
button (or
right-click it and select Delete).Once DLNames have been created, they are displayed in the Look in list:
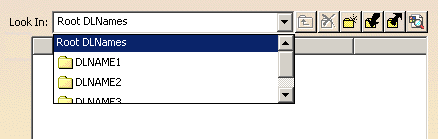
You can then use this list to display sub-DLNames, if any. In our example, selecting "DLNAME 1" in the list shows that it contains a sub-folder "DLNAME4": 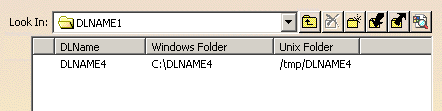
Note that you can also display sub-DLNames either by double-clicking the father DLName in the DLName column or by right-clicking the father DLName (still in the DLName column) then selecting Down. To re-access the upper level, click the
 button.
 -
Click OK to close the Configure dialog box then OK to exit the Document tab.
Once you have defined your DLNames, you are allowed to put them in a search order. For more information, refer to Localizing Linked Documents further in this task.
The Configure dialog box also lets you search for the DLNames you defined. For more information, refer to Searching for DLNames.
Defining DLNames also impacts the commands in which they are integrated. Refer to the DLName Integration section for detailed information.
![]()
Searching for DLNames
This search functionality can be accessed:
- from the Configure dialog box (detailed in this section)
- from any file selection dialog box when working in a DLName environment (see the DLName Integration section for an example)
- from the DLName Chooser dialog box (see Running the Downward Compatibility Batch for an example).
-
Click Configure... to open the Configure dialog box.
-
Click the
button (or right-click and select Import) then select
DLNAME_search.txt from the samples folder. -
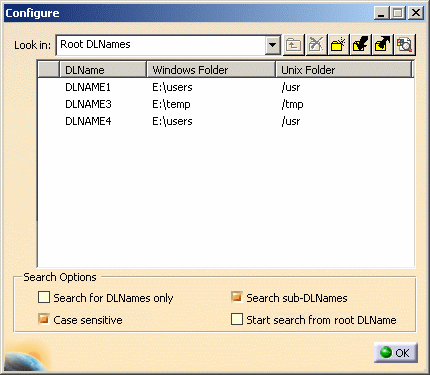
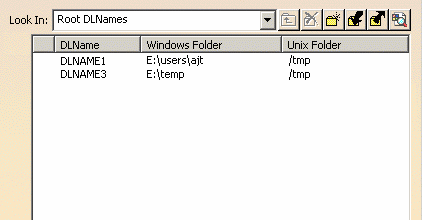
In our example, three root DLNames (DLNAME1, DLNAME3 and DLNAME4) have been defined, each of them containing sub-DLNames:
The options displayed at the bottom of the Configure dialog box are relevant for the administrator only. This provides an additional administration level by enabling the administrator to make one or many search options unavailable for end users when they access the Search Results dialog box, either from the Configure dialog box, or from any other command in which DLNames are integrated. In administrator mode, lock symbols are displayed next to each option. To lock one or many search options, the administrator clicks the green lock symbol
to change it to the orange lock symbol
 . When end users
will then access the Search
Results dialog box, they will not be able to activate search
options that have been locked. For more information on these
search options, refer to
About Search Options.
. When end users
will then access the Search
Results dialog box, they will not be able to activate search
options that have been locked. For more information on these
search options, refer to
About Search Options.This administration is stored in permanent setting files identified by the suffix: *.CATSettings, and created in a location referenced by the CATUserSettingPath variable.
-
Click the
 button to open the
Search Results dialog box:
button to open the
Search Results dialog box:
Note that for performance reasons, the look of the Search Results dialog box might not be the same on all operating systems. This dialog box lets you search for DLNames (either root DLNames or sub-folders) using two criteria:
- the name, by entering a search string in the Name box
- the location, by selecting the DLName in which you will run your search from the Look in list.
-
Leave the default values (which means that you are going to search for all DLNames created in the root) then click Search to run the search:
The three root DLNames (DLNAME1, DLNAME3 and DLNAME4) as well as all their sub-DLNames are found. 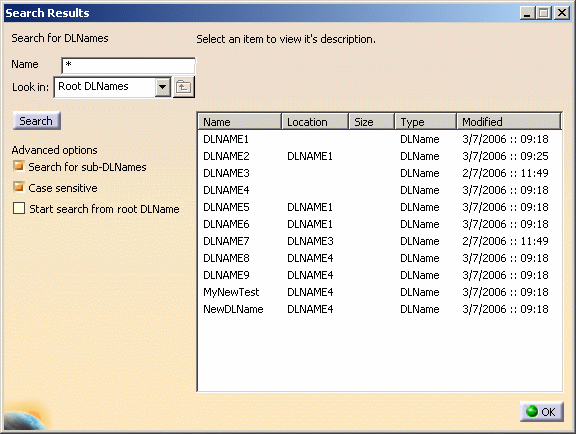
The five columns next to the Search button give you the following information about the search results: - Name: gives the name of the search result.
In our example, eleven DLNames have been found in the root DLName - Location: gives the path of the search result.
In our example, among the eleven DLNames found, you can see that some DLNames are sub-folders of other DLNames. For instance, DLNAME1 contains three sub-folders named DLNAME2, DLNAME5 and DLNAME6 - Size: gives the size of the search result.
This column is relevant only when searching for files, i.e. when you access the Search Results dialog box from the Open documents dialog box - Type: gives the type of the search result.
When you access the Search Results dialog box via the Configure dialog box, you always search for DLNames. However, when you access the Search Results dialog box from the Open documents dialog box, you can also search for files which means that your search results can be of type "CATPart", "CATProduct", etc. - Modified: gives the last modification date of the search result.
If needed, you can sort the search results by clicking the desired column title. For instance, clicking "Modified" sorts the search results by their last modification date (in ascending order).
- Name: gives the name of the search result.
-
Now, select "DLNAME1" in the Look in list, still with
*in the Name box, then click Search. This means that you are going to search for all DLNames created in "DLNAME1":
-
Select a DLName in the list of search results (you cannot select multiple files in the list but only one file at a time).
You can see that the name and type of the selected item are displayed on top of the dialog box: 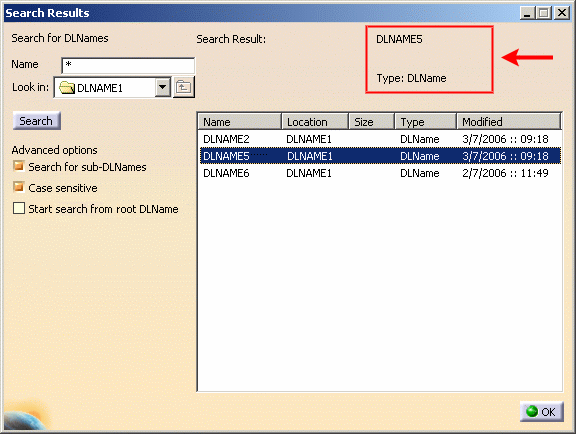
-
Select "Root DLNames" in the Look in list and enter
*New*in the Name box to search for all DLNames in the root whose names contain the string "New".The asterisk (*) is used as a wildcard to replace any number of characters.
The question mark (?) is used to replace one character only.Suppose the following example with two DLNames, DLName1Test and DLName2Test:
DLName*Testfinds DLName1Test and DLName2TestDLName?Testfinds DLName1Test. -
Click Search.
Two DLNames are found: 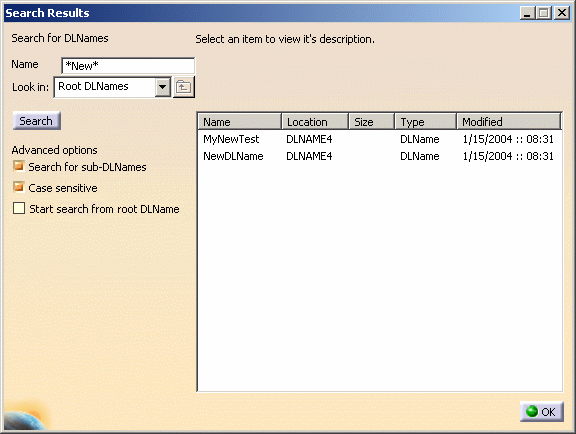
-
When finished, click OK to close the Search Results dialog box.
About Search Options
-
Case sensitive
By default, the search is case sensitive and therefore, entering*new*instead of*New*does not give the same result.
To run a search that is not case sensitive, clear the Case sensitive check box. -
Start search from root DLName
You can select this check box to run the search from DLNames created in the root. This avoids selecting the Root DLNames item from the Look in list (which can be very time-consuming when there is a great number of DLNames). When the check box is selected, the Look in list is grayed out:
-
Search for sub-DLNames
To search for DLNames that are sub-folders of other DLNames, select the Search for sub-DLNames check box.
For instance, if you run the following search (in which the Search for sub-DLNames check box is activated), all the DLNames, including those located in other DLNames, are found:If you run the same search with the Search for sub-DLNames check box cleared, only the root DLNames are found: 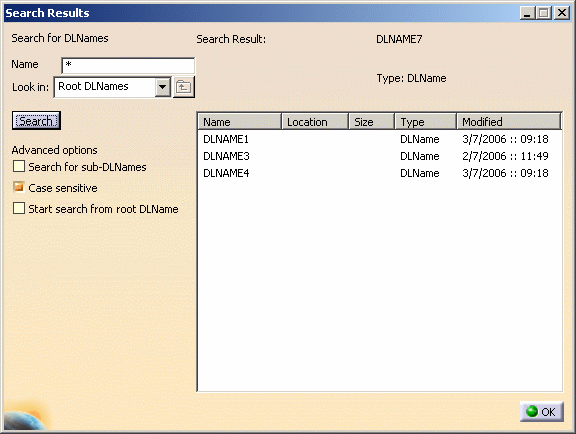
- If an option is locked:
- it is grayed out when end users open the Search Results dialog box.
- its value is the one stored in the settings and preference files are not used.
- If no option has been locked, end users can interactively activate or deactivate the desired search options and the values assigned are stored in preference files.
The values assigned to these options are kept from one session to another, whether they are stored in settings or preference files.
DLName Integration
-
Click Open
 in the Standard toolbar or select File > Open. Instead
of the usual File Selection dialog box, the following dialog
box opens:
in the Standard toolbar or select File > Open. Instead
of the usual File Selection dialog box, the following dialog
box opens:
The Open document dialog box opens simultaneously with the Browse window. For more information on this window, refer to Opening Existing Documents Using the Browse Window. In case no DLName has been previously defined, a warning dialog box opens when running the command. To see the preview of a file, click its name in the list.
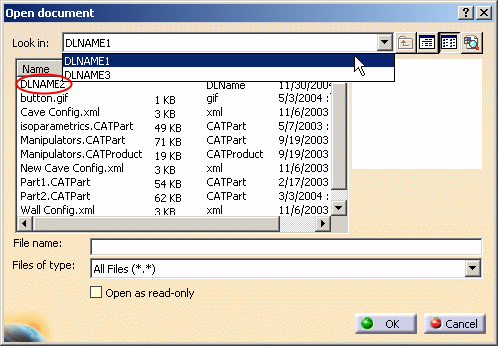
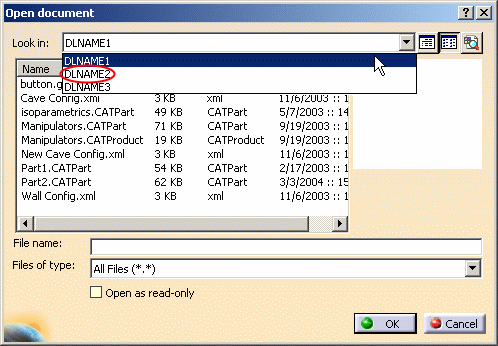
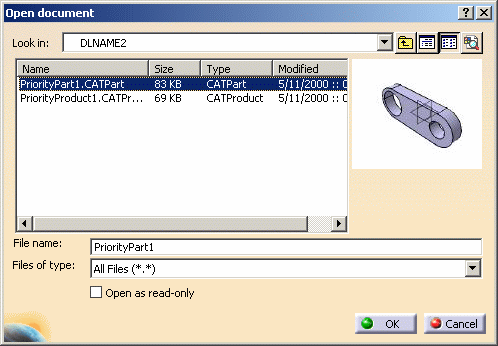
You can also click the black arrow next to "DLNAME1" to display a list containing the DLNames you have defined, then select the desired sub-DLName to access its content: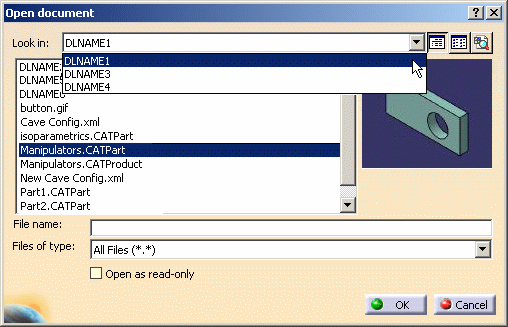
About the Look in list: - if the option "Activate logical filetree for DLNames" is activated, the Look in list shows only the root DLNames. Their sub-DLNames are displayed in the Name column. In the picture above, "DLNAME1" contains three sub-folders named "DLNAME2", "DLNAME5" and "DLNAME6"
- if the option "Activate logical filetree for DLNames" is not activated, the DLNames are displayed in "flat" mode, i.e. all the DLNames you have defined are displayed in the "Look in" list.
By default, the List display mode is activated. This display mode only shows the file names.
If you want to display your files in Details mode (which gives you information on the file size, the file type and the last modification date and time), click the Details button: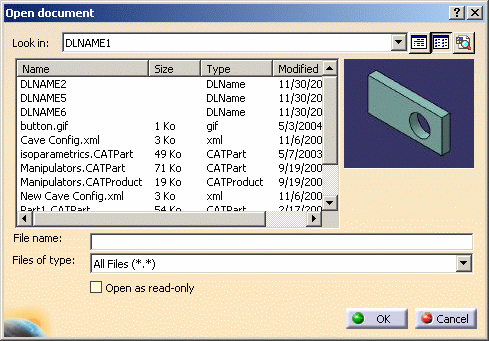
You can also rename files. To do so, right-click the file to be renamed then select Rename. This opens the Rename File dialog box that lets you enter the new file name. However, note that in a DLName environment: - CATIA files cannot be renamed with a non-CATIA extension (such as .xls, .doc, etc.). If you try to do so, then the original CATIA extension is added to the new extension (for instance, let's suppose you want to rename a file named "MyPart.CATPart" in "MyPart.doc": this would give "MyPart.doc.CATPart")
- non-CATIA files can be renamed with any type of extension, whether CATIA or non-CATIA.
When finished renaming the file, click OK to validate and close the Rename File dialog box.
-
Select the desired file name and type from the list.
-
Click the
button to open the
Search Results dialog box:
This scenario takes the Open command as an example but the contents of the Search Results dialog box is identical in all the commands in which DLNames are integrated. This behavior of this dialog box is identical to the one of the Search Results dialog box you access when configuring DLNames, except that:
- you can search DLNames and for files stored in DLNames as well
- an additional search option named Search for DLNames only is available. This option lets you restrict your search to DLNames. For more information about the other advanced options, refer to About Search Options.
-
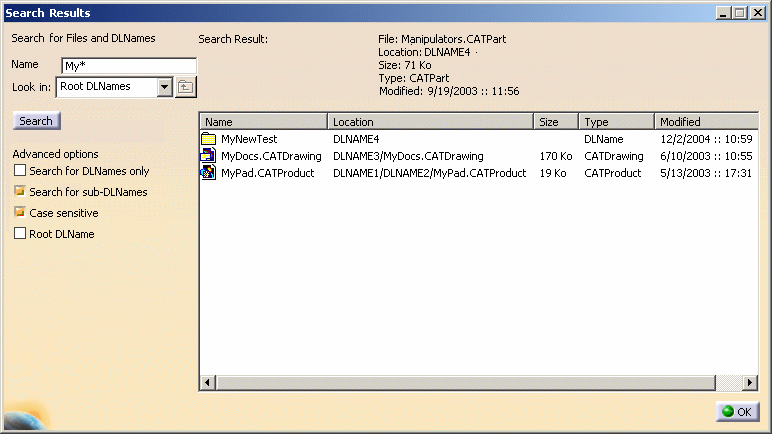
In the Name box, enter the string to be searched for.
For instance, entering
My*searches for any files or DLNames whose names start with the string "My".The asterisk (*) is used as a wildcard to replace any number of characters.
The question mark (?) is used to replace one character only.Suppose the following example with two items, teston.CATPart and testoff.CATPart:
testo*.*finds teston.CATPart and testoff.CATParttesto?.*finds teston.CATPart. -
Use the Look in list to select the DLName in which you want to run your search.
-
Click Search to open the following dialog box (click the thumbnail below to see the full-size picture):
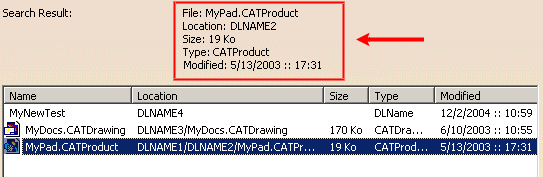
In our example, three items have been found: a DLName ("MyNewTest") and two files (a CATDrawing and a CATProduct). -
Select an item other than a DLName. The data contained in the Name, Location, Size, Type and Modified columns are displayed on top of the dialog box:
If you select a DLName, only the Name and Type are indicated. Note that you can select multiple search results. In that case, the total number of items selected and the total file size are indicated as follows:
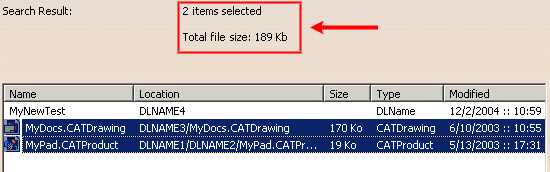
For detailed information on this dialog box, refer to Searching for DLNames. -
When you have found the desired document, click OK to close the Search Results dialog box: the name of the document is displayed in the File name box of the Open documents dialog box.
-
Click OK to open the selected document.
Note that the above example also applies to any command allowing you to perform a file selection.
DLNames are also integrated in the following commands:
- File > Save (included Save As..., Save All and Save Management...)
- File > Desk
- File > New from
- File > Send To
- Edit > Links
- Other folders option
- Browse another catalog (refer to the Version 5 Component Catalog Editor User's Guide - "Browsing a Catalog using the Catalog Browser" for detailed information)
- Save in catalog (refer to the Version 5 Generative Shape Design User's Guide - "Saving PowerCopies into a Catalog" for detailed information)
For more information on these commands, refer to the corresponding task in this guide by clicking one of the above hyperlinks.
![]()
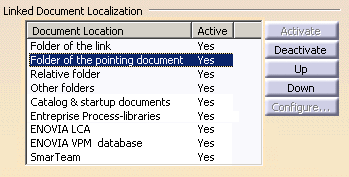
Linked Document Localization

This section shows you how to define a personal strategy for link resolution.
Bear also in mind that when using a link resolution strategy, you are not allowed to open two documents with the same name in your session.
The Active column indicates whether a strategy has been activated (Yes value) or deactivated (blank value).
-
Choose a strategy from the proposed list:
-
Folder of the link: provides the absolute path which was saved in the link, i.e. the path used when you saved your document.
-
Folder of the pointing document: provides the current folder of your document
-
Relative folder: provides a sub-folder with the same starting path. Note that choosing this strategy does not make sense if you are working in a DLName environment since the hierarchy used to store documents is different from the one used when working in a Folder environment (there is no "sub-folder" notion). Use the Folder of the link strategy instead
-
Other folders: provides a user-defined list of folders. Do not forget to insert a carriage return at the end of each line
-
Catalog & startup documents: provides the absolute path to catalogs and documents saved in the startup installation folder (for instance
c:\Dassault
               Systemes\B17\$OS\startup\...
). When migrating from one release level to another, any link to a catalog or document located in the installation folder is automatically updated to match the new startup path -
Entreprise Process-libraries: provides the path to folder containing process libraries (.act files)
-
ENOVIA LCA (appropriate license is required) for documents stored in ENOVIA LCA
-
ENOVIA VPM database (appropriate license is required) for documents stored in ENOVIA VPM
-
SmarTeam (appropriate license is required) for documents stored in SmarTeam database.
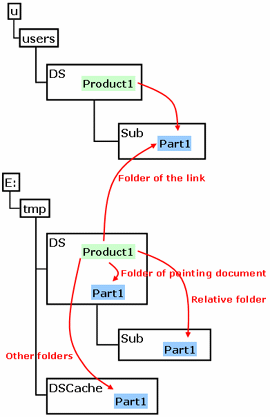
The following example illustrates more precisely the behavior of the first four strategies: First of all, we created a product named "Product1.CATProduct" in the folder
/u/users/DS/.
This product is linked to "Part1.CATPart", which is stored in the folder/u/users/DS/Sub/.Then, we moved "Product1" to another folder, i.e.
E:\tmp\DS\. As this product is linked to "Part1.CATPart", you need to select a link resolution strategy. Depending on the strategy you select, the behavior is:
-
Folder of the link:
tries to locate Part1 in/u/users/DS/Sub -
Folder of the pointing document:
tries to locate Part1 inE:\tmp\DS -
Relative folder:
tries to locate Part1 inE:\tmp\DS\Sub -
Other folders:
tries to locate Part1 in user-defined folders.
-
-
Once the strategy is selected, click one of the buttons displayed in the right part of the dialog box. These buttons are grayed out depending on the strategy you selected:
-
Activate lets you activate a strategy that has been deactivated
-
Deactivate enables you to deactivate a strategy
-
Up and Down let you customize the strategy order
-
Configure is available for the Other folders strategy only.
Whichever action you choose for the strategy, you must restart your Version 5 session to take this modification into account. A warning message is displayed after clicking one of the above buttons.
Here is a comparison between the former Search Order command and "Linked Document Localization":
Search Order Linked Document Localization 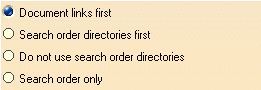
Folder of the link first Other folders first deactivates Other folders only Other folders is activated Note: Relative folder is used for catalog component links. When you click Configure..., a dialog box appears with a user interface depending on your current document environment. In our example, we are working in a Folder environment.
For more information on managing document environments, refer to the Document Environments part in this task.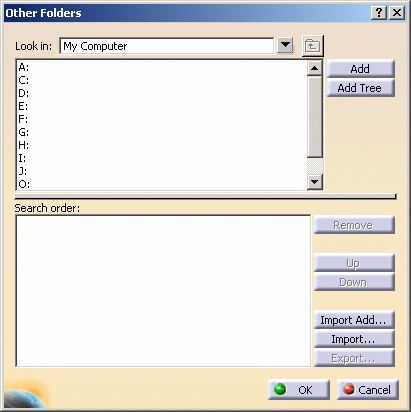
-
-
Select a directory in the Look in list then click Add.
In case at least one document is already opened in your current session, a warning window is displayed to ask you to close then reopen the documents to take into account your modifications.
Thus, it is recommended to close any opened documents before modifying the Other folders strategy.You can also click Add Tree to add the folder tree underneath the specified directory. However, bear in mind that the more elements, the longer the duration.
This button is available for the Folder environment only. When working in a DLName environment, you can copy a DLName but not its folders.This puts the directory into the Search order list as shown below: 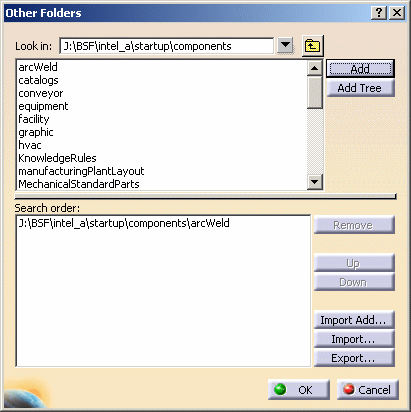
The
 button lets
you access your various directories and the
button lets you move up in the directory's hierarchy.
button lets
you access your various directories and the
button lets you move up in the directory's hierarchy.You do not need to enter the whole path in the Look in box. Enter the main directory and press Enter. Any subdirectories are then displayed in the list and you can then select the appropriate subdirectory before clicking Add.
Note that you can use the multiselection to add your folders to the search order: 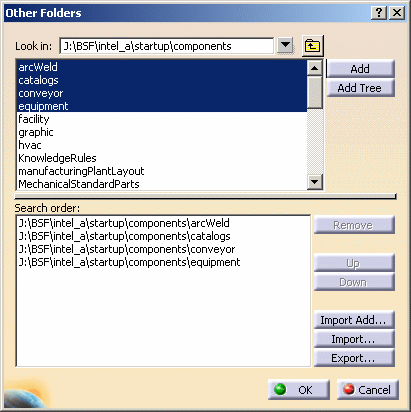
The Search order list is intended to contain the directories in which your linked documents are saved. You may wish to use different search order lists for particular uses and for different circumstances. -
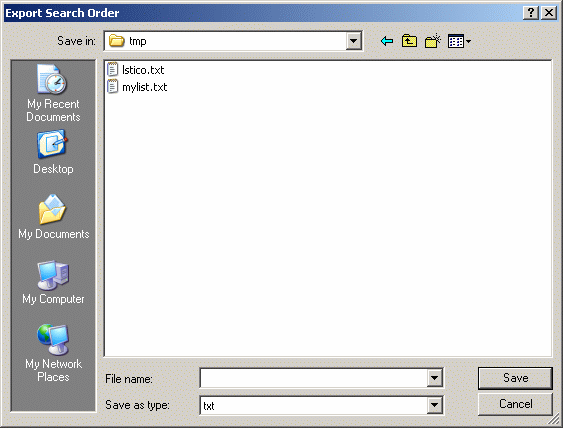
Continue adding your most frequently used directories to the list. When you have finished, click Export... and save the list as a .txt file in the appropriate location using the Export Search Order dialog box:
-
You can make as many lists as you like. When you want to use one of these lists, click Import.... The Import Search Order dialog box appears.

Right-clicking on any of the .txt files allows you to edit these files. If you then click Open, the contents of the .txt file you chose is placed in the list and replaces the elements previously contained, if any.
Import Add... lets you import and add a search order contained in a text file to the current Search order list. -
The search order lists can easily be updated. To change the priority of a directory i.e. move it up or down in the list, select it then click the appropriate button: Up or Down.
Note that the multi-selection is also allowed. -
To remove a directory, select it and click Remove.
Remove, Up and Down are activated only when at least one item in the list is selected.
File Options

Upper case for document names
If this option is selected, it means that files names are converted to
upper case when saving documents.
This conversion is taken into account when using the following commands:
- File > New
- File > Save As
- File > Save Management
- File > Send To > Mail/Directory.
- on Windows, a message appears and asks you to overwrite the file. The reason is that the file system is not case-sensitive and therefore, Aaa = aaa = AAA
- on UNIX, no message is displayed since the file system is case sensitive.
Activate logical filetree for DLNames
If this option is selected, it means that DLNames are organized in a logical way. The following scenario explains how to organize your DLNames in a "logical tree" so that they are easier to access and how this impacts all commands providing access to DLNames through file or folder selection.
- each DLName has a unique name inside the whole logical structure
- each DLName has one logical DLName "father", which can be an already defined DLName or the abstract "Root DLName"
- there is no relation between the logical structure and the physical
one. When working in administrator mode, you can place the DLName
wherever you want and give it the name of your choice.
However, in user mode, bear in mind that when you decide to define a DLName as a sub-DLName of another existing DLName:- the name of its physical sub-folder is the one of the sub-DLName
- the location of its physical folder is a sub-folder of the parent DLName's physical folder.
-
Open your .txt list to define your structure using the following format:
- one line per DLName
- each line has four fields separated each with a semi-colon as shown: Logical Name;Windows Folder;UNIX Folder; Father Logical Name. The first three fields correspond to the first three fields displayed when configuring DLNames
- each field ends with a semi-colon
- no data between the last two semi-colons means that the Father Logical Name is the "Root DLName".
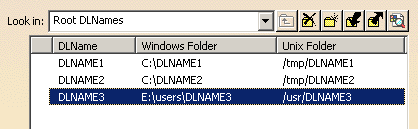
Let's have a look at the following example... DLNAME1;E:\users\ajt\;/tmp;;
DLNAME2;E:\users\ajt\DLNAME2;/tmp/DLNAME2;DLNAME1;
DLNAME3;E:\temp;/tmp;;... and more precisely at the meaning of each line:
DLNAME1;E:\users\ajt\;/tmp;;- the logical name is named "DLNAME1"
- the logical name is located in "E:\users\ajt" on Windows
- the logical name is located in "/tmp" on UNIX
- the logical father name is "Root DLName".
DLNAME2;E:\users\ajt\DLNAME2;/tmp/DLNAME2;DLNAME1;- the logical name is named "DLNAME2"
- "DLNAME2" is a sub-directory of "DLNAME1". This sub-directory is named "DLNAME2" after the DLName it corresponds to. As a consequence, the logical name is located in "E:\users\ajt\DLNAME2" on Windows
- "DLNAME2" is a sub-directory of "DLNAME1" and thus, the logical name is located in "/tmp/DLNAME2" on UNIX
- the logical father name is "DLNAME1".
DLNAME3;E:\temp;/tmp;;- the logical name is named "DLNAME3"
- the logical name is located in "E:\temp" on Windows
- the logical name is located in "/tmp" on UNIX
- the logical father name is "Root DLName".
-
Save your .txt file.
-
Select Tools > Options > General > Document then click Configure....
-
Click the
button to import the logical structure you created in step 1. -
Navigate to the .txt file to be imported then click Open. The logical structure is imported:
-
Click OK to validate.
-
Select the Activate logical filetree for DLNames check box.
-
Click Open
in the Standard toolbar or select File > Open. The Open document dialog box reflects the hierarchical organization: only root DLNames are displayed in the Look in list and their sub-DLNames appear in the Name column.
This differs slightly from the Open document dialog box displayed when the logical filetree is not activated: all the DLNames and sub-DLNames defined are displayed in the Look in list.- Logical filetree is activated - Hierarchical organization:
- Logical filetree is not activated - DLNames are displayed in "flat" mode:
The Open document dialog box opens simultaneously with the Browse window. For more information on this window, refer to Opening Existing Documents Using the Browse Window. In our example, the check box Activate logical filetree for DLNames is selected.
-
To access the sub-directory "DLNAME2", double-click it in the list. You can, of course, display the preview of the desired element by selecting it:
When you are in a sub-directory as this is the case in our example, you can click the
button to move up in the hierarchy. In our case, we can use it to
access the father directory "DLNAME1".
Remember that this icon is displayed only when the check box Activate logical filetree for DLNames is selected. -
Clicking the black arrow next to Look in displays a list containing the hierarchical structure from which you can click the directory you want to access:

By default, the List display mode is activated. This display mode lists the file names only: 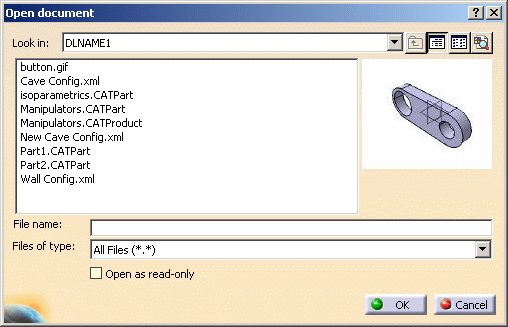
If you want to display the file size, the file type and the last modification date and time of your files, activate the Details display mode. -
Click OK to open the selected document.
![]()
Apply Save to editor scope only
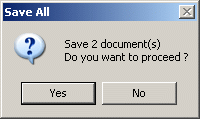
If this option is selected, it means that when you select File > Save All or only the documents linked to the current editor are saved. Other documents are not impacted by the save.
Let's suppose a drawing document (CATDrawing) which points to a loaded and modified CATPart (Part1). Then, activate the CATDrawing editor, modify the drawing then select File > Save All:
- when the Apply Save All to editor scope check box is selected, the following message is displayed:

If you click Yes, you can see that only CATDrawing has been saved, even though Part1 has also been modified, because the CATDrawing editor was the active editor at the time the Save All command was run.
- when the Apply Save to editor scope option is cleared, the following message is displayed:
If you click Yes, all the documents modified in the session (CATDrawing and Part1 in our example) are saved.
![]()