-
Click OK and exit your session.
-
Move the document CHC.CATPart to another folder.
-
Restart your session, then reopen the document Links.CATProduct.
The Open dialog box appears, explaining that the document CHC.CATPart was not found: 
Whenever a document is opened and one or more of its links are invalid, the Open dialog box appears along with the document opened and a broken link icon appears in the specification tree. There are several reasons why a link might no longer work: - the files were not found which means that they have been moved, renamed or deleted
- or the files contain the wrong information which means they still have the same name but a content different from the files originally pointed to.
-
At this point, you have two options:
-
if you click Close, you can then select Edit > Links and the dialog box displays the following information in the Pointed documents tab:
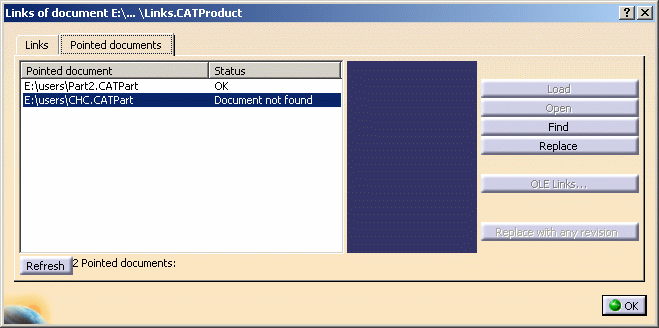
Just select the element that has not been found then click Find to access the missing file via the File Selection dialog box. 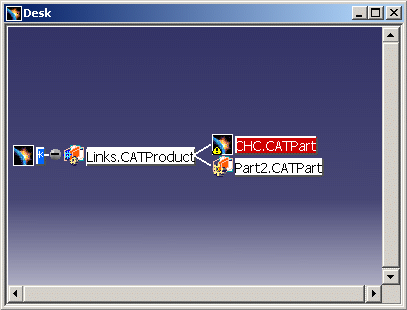
You can check link validity at any time using this command. In our scenario, we click Desk.
-
-
Click the document shown in red in the Desk window.
-
Right-click then select Find.
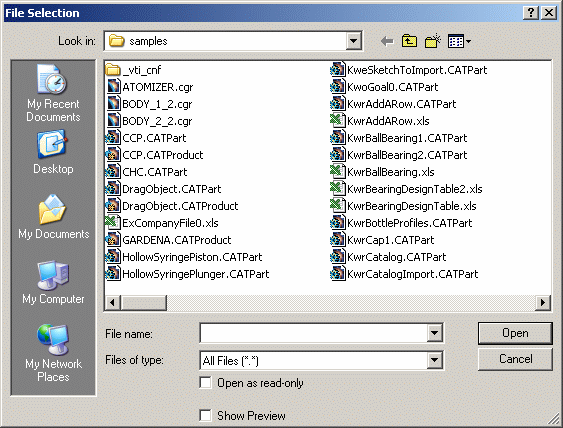
The File Selection dialog box opens:
-
Explore your file system to find the file, select it, then click Open.
The File Selection dialog box disappears and the file CHC.CATPart, i.e. the file pointed to by Links.CATProduct is now displayed in white. 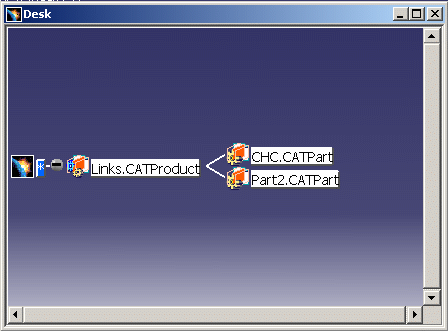
-
If you want to open the CHC.CATPart from the Desk, right-click it then select Open:
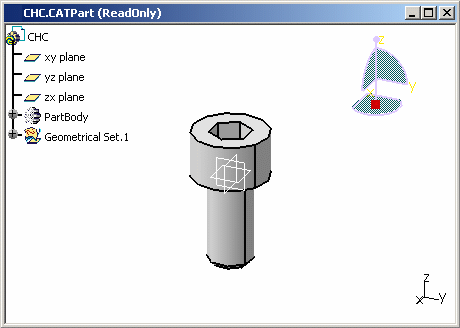
For more information on the Desk, refer to the Using the FileDesk Workbench in this guide. -
If you now select Edit > Links, the Links dialog box indicates that the right file has been found and loaded ("OK" in the Status column).
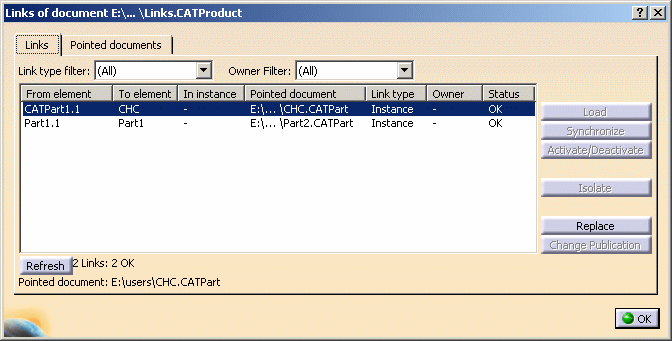
The Links tab lets you manage individually each link you select from the list:
-
Load lets you load parts (and parts only) that are not loaded. If you do so, the status changes from "Document not loaded" to "Loaded"
-
Synchronize lets you update links in your document.
For instance, suppose you have copied then pasted As Result with link a pad from one document to another document. You have then two pads linked together in two different documents.
When you modify the original pad, the status of its copy changes to "Not Synchronized" to indicate that there is a discrepancy between the two pads.
If you want the copy to be applied the changes you have made to the original, you need to click Synchronize. The status of the copy then changes from "Not synchronized" to "OK".
However, be careful when replacing elements because not all element types are compatible. For example, a line cannot be replaced by a circle or curve as their specifications are different, and the synchronization will not be allowed -
Activate/Deactivate lets you avoid or allow the synchronization of linked elements during part update. A symbol in the specification tree identifies any "activated" (
 )
or "deactivated" (
 )
element.
For instance, if you do not want a linked object to be synchronized, click Activate/Deactivate: the "Activate" status of the linked object changes to "Deactivated" which means that it will not be impacted by the changes made to the parent element when performing an update.
Inversely, if you want a deactivated linked element to be synchronized during a part update, click Activate/Deactivate: the status of the linked element changes to "Activated" and you will be able to synchronize it.Note that this command is also available from the contextual menu by right-clicking the object to be activated/deactivated then selecting xxx object >
 Activate
or xxx object >
 Deactivate
 -
Isolate lets you remove a link. The status of the linked element changes to "Isolated" to indicate that the link to the pointed element is broken. This means that the pointed element cannot be synchronized anymore.
Note that this command is also available from the contextual menu by right-clicking the object to be isolated then selecting xxx object > Isolate -
Replace lets you replace the selected link with another one. This button opens the File Selection dialog box to let you navigate to the desired file. Once the element has been replaced, the new element name and its status are displayed in the Links dialog box.
Note that when working with .catalog documents, this command is relevant only for replacing a link from one catalog to another. You cannot use it to replace a link to a part pointed to by a catalog, for instance.
If you want to replace the link to a part or a product pointed to by a catalog, you need to modify the catalog description. For more information, refer to "Creating a Catalog Using the Catalog Editor (paragraph entitled "Adding a Component to a Family") in the Version 5 - Component Catalog Editor User's Guide-
Change Publication lets you replace the pointed publication by a new one. Clicking this button closes the Links dialog box so that you can select the new publication to be used, either in the geometry area or in the specification tree.
If the publication you select is not valid, then the selection is stopped and a message appears in the status bar to explain why the publication is not valid.
Once the new publication is selected, the information displayed in the To element, Pointed document and Publication columns is modified accordingly. Do not forget that an update will also be required.
To be able to use this command, the following three conditions must be fulfilled:
-
only one link must be selected in the Links dialog box
-
the selected link must correspond to a link between two references without any context notion (e.g. a link bewteen two parts)
-
the selected link must be a link to a publication.
For detailed information on how to publish elements, refer to "Publishing Elements" in the Version 5 - Part Design User's Guide.
Depending on the document environments you allowed in the Document tab, an additional window may appear simultaneously to the File Selection dialog box to let you access your documents using alternate methods.
For detailed information, refer to Opening Existing Documents Using the Browse Window.
Refresh lets you update links related to the document without having to close then reopen the Links dialog box.
This is especially useful when trying to re-access pointed documents that are not found (for instance, after a network disconnection): in that case, clicking Refresh avoids re-selecting Edit > Links to display an updated view of the links. -
-
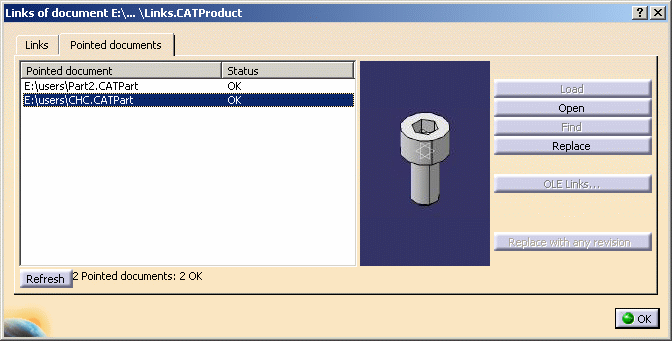
Access the Pointed documents tab which also enables you to edit links but this time, you manage a list of documents and not a list of links:
-
Replace lets you replace a pointed document with another one and reroute any links that may exist to this document.
To do so, select the pointed document to be replaced from the list, click Replace to open the File Selection dialog box, navigate to the desired file then click Open: the selected file opens and the links from all pointing documents loaded in session are rerouted to the replacing document. Pointing documents which are not loaded in session still point to the replaced document.
If a problem occurs during the replacement, a diagnosis window is displayed.
However, bear in mind that a replacement needs to be performed under certain conditions to succeed:
-
the names of the replaced document and of the replacing one must be different
-
the links to the replacing document must allow the replacement, i.e. they can be modified to match the path of the replacing document.
Do not forget that the replaced and replacing documents must have the same internal identifier (UUID), which means that the replacing document must have been created as a copy of the original document using File > Save As. Otherwise, an error message is displayed.
However, note that this do not apply to links between two references (e.g. a link between two parts) based on publications.More about the Replace command:
- If you are working with a standalone CATIA V5 and try to replace a file-based .CATPart document with another file-based .CATPart document having a different UUID, an error message is displayed to indicate that the link is refused
- If you are working in an ENOVIA V5 document environment and try to replace a file-based .CATPart document with another .CATPart document having a different UUID and saved in ENOVIA V5, an error message is displayed to indicate that the referenced instances cannot be found in the new document.
- Find is relevant for broken links only: clicking this button opens the File Selection dialog box to let you browse your file system and find the missing files.
Note: depending on the document environments you allowed in the Document tab, an additional window might appear simultaneously to the File Selection dialog box let you access your documents using an alternate method. For detailed information, refer to Opening Existing Documents using the Browse Window.
-
Load lets you load pointed documents which have been found but not loaded in your current session
- Open lets you open a pointed document in a new window. To do so, select the document to be opened from the list then click Open.
You can also open a pointed document using xxx object > Open the Pointed Document contextual command.
For detailed information on this command, refer to Opening Existing Documents.As far as temporary documents are concerned, you cannot open them in a new window. For instance, you cannot open in a new CATIA V5 window a Product Root Class created in ENOVIA V5.
- OLE Links... lets you manage links to OLE (Object Linking and Embedding) applications (e.g. Microsoft Office). For more information on using Version 5 Data in OLE-compliant applications, refer to About Object Linking and Embedding (OLE).
- Replace with any revision lets you replace the pointed document with another revision of this document. For more information on this property, refer to the Version 5 - Product Structure User's Guide - Modifying Component Properties.
-
![]()