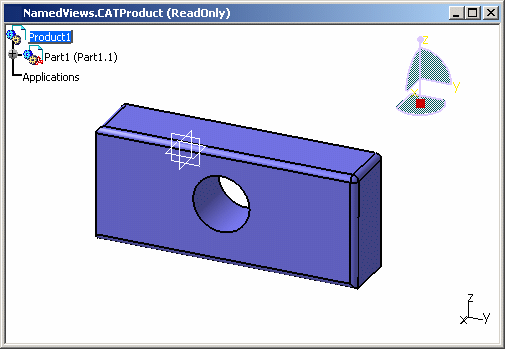
The original document looks like this, with a part loaded:
-
Select Tools > Options.
-
In the General category, select the General tab, clear the Load referenced documents check box, then click OK.
-
Close then reopen the same document.
The part is no longer loaded (indicated by a special symbol in the specification tree): 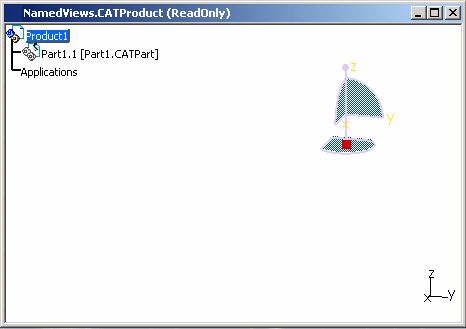
-
Select File > Desk. The Desk window appears (the document stays open):
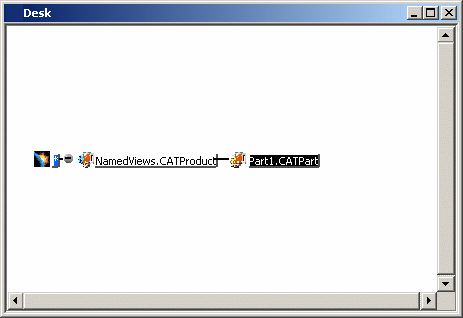
As you can see, the relationships between the document opened and any others are clearly shown. You might have to click Fit All In  in the View toolbar to see everything, especially with
complex relationships. All types of V5 data and V4 models can be
viewed this way.
in the View toolbar to see everything, especially with
complex relationships. All types of V5 data and V4 models can be
viewed this way. 
Only relationships between documents with a File persistency can be shown. Therefore, dependency links between ENOVIAVPM or ENOVIA V5 documents are not displayed in the Desk window.
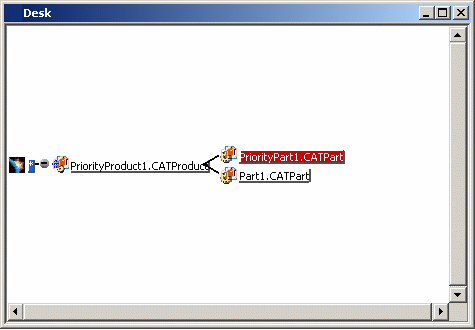
To visualize dependency links between objects, you have to use the Impact Graph workbench provided in the VPM Navigator product. For detailed information, refer to "Using the Impact Graph Workbench" in the Version 5 - VPM Navigator User's Guide (on the ENOVIA V5 VPM/LCA Documentation CD-ROM).You can leave the Desk window open when you modify the relationships, or add or delete any of the documents in the view. As the view is automatically updated, you can see the changes as you make them. The relationship in our sample document includes a child document that has not been loaded (see Load Referenced Documents). Unloaded documents are shown in reverse video. The colors used to identify the various document types are the following ones:
- white for loaded documents
- black (reverse video) for documents that are not loaded in the current session
- red for documents that have not been found.
The example below illustrates a document including a child document that has not been found.
You can also display the Desk toolbar by selecting View > Toolbars > Desk: 
Most of the commands provided in this toolbar are available in the contextual menu as well and will be detailed further in this task. -
In the Desk window, right-click the document Part1.CATPart, then select Load or click Load
 in the Desk toolbar.
 -
If you want to see the properties of any loaded or unloaded document, right-click the document then select Properties.
The Document Properties dialog box below appears: 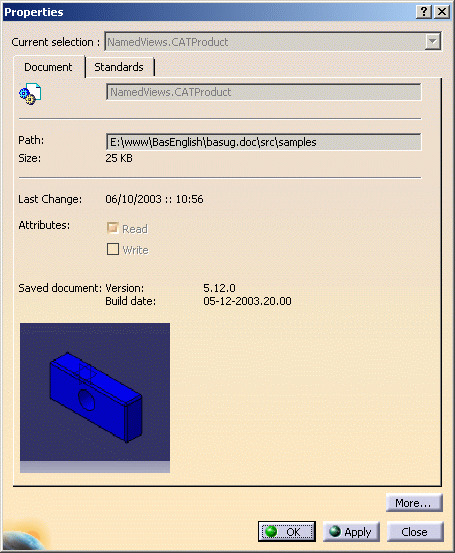
Refer to Displaying Document Properties for detailed information on the Document tab. You can also click the Standards tab to display the standards which may have been defined for your document.
The Standards tab is used mainly to display drafting and generative standards (when working with .CATDrawing documents) but it can also be used to display standards defined for general parameters such as graphic properties or layers and filters.
Refer to Displaying Document Properties for detailed information on the Standards tab. -
If you want to open a loaded or unloaded document, right-click it then select Open. This opens the document in a new window.
As far as temporary documents are concerned, they cannot be opened in a new window. For instance, you cannot open in a new CATIA V5 window a Product Root Class created in ENOVIA V5.
-
You can also unload loaded documents. Unloading a document means that this document is not stored in memory anymore.
Select the documents to be unloaded in the Desk window then click Unload  ,
or right-click then select Unload. This opens the
following dialog box:
,
or right-click then select Unload. This opens the
following dialog box: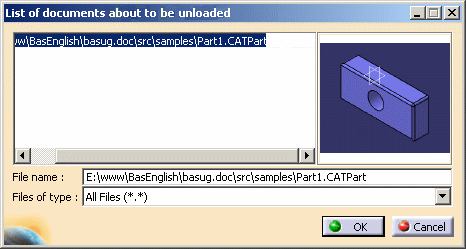
The List of documents about to be unloaded dialog box gives you information on the documents you are going to unload. Selecting an item from the list displays its preview to the right.
Click OK to validate the unload and close the dialog box or Cancel to close the dialog box without unloading the documents.If one of the documents to be unloaded has been modified, no document can be unloaded and an error message appears instead of the List of documents about to be unloaded dialog box.
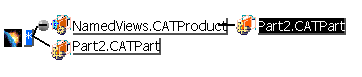
The documents that are unloaded appear in black (reverse video) in the Desk window to indicate that they are not loaded in the current session anymore:
Once a document has been unloaded, you can load it again by clicking Load. Additional information is provided in the following sub-topic: More About the Unload Mechanism. You can also use the Desk File Management toolbar... 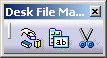
... to move, rename and delete documents. Note that this toolbar can be used either in Folder or DLName document environment. -
To move one or several documents, you can either:
-
select the desired documents from the Desk then click Move
 .
.
A warning window informs you that only the persistent file names will be moved. This means that the selected documents will be physically moved to the location of your choice but the links to these documents will not be relocated and thus, may no longer work.
Click OK to close the warning window then use the dialog box that opens to navigate to the target directory:
After clicking OK to close the dialog box, a pop-up message prompts you to validate the new location and warns you that some links might be broken. Bear in mind that the Move command neither check nor relocate links between documents, you have to do it manually using Edit > Links.
Note: the content of the moved documents remains unchanged.
-
or click directly Move
to browse your file tree and select the documents to be moved.A warning window informs you that only the persistent file name will be moved. This means that the selected documents will be physically moved to the location of your choice but the links to these documents will not be relocated and thus may no longer work.
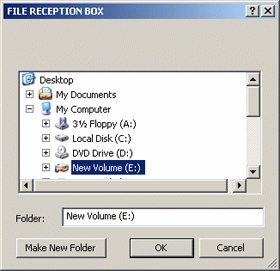
Click OK to close the warning window then use the File Selection dialog box that opens to access the directory from which the documents will be moved:

Select the desired documents then click Open to access the FILE RECEPTION BOX which lets you navigate to the target directory:
After clicking OK to close the dialog box, a pop-up message prompts you to validate the new location and warns you that some links might be broken. Bear in mind that the Move command neither check nor relocate links between documents, you have to do it manually using Edit > Links.
Note: the content of the moved documents remains unchanged.
-
-
To rename a document, select the document to be renamed then click Rename
 or click directly Rename
then use the File Selection dialog box to navigate to the file
to be renamed.
or click directly Rename
then use the File Selection dialog box to navigate to the file
to be renamed.In both cases, a warning window informs you that only the persistent file name will be modified, the name of the loaded document will not be impacted. This means that the new document name will appear in your Explorer window, for instance, but the original name will still be displayed when loading your document in a Version 5 session. As a consequence, links may no longer work.
Click OK to close the warning window then enter the new name in the Rename dialog box that opens: 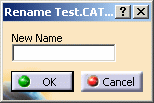
Bear in mind that this command neither check nor relocate links between documents. If links are broken, you have to relocate them manually using Edit > Links.
Note: the content of the renamed documents remains unchanged.
-
To delete one or several documents, select the documents to be deleted then click Delete
 or click directly Delete
then use the File Selection dialog box to navigate to
the files to be deleted.
or click directly Delete
then use the File Selection dialog box to navigate to
the files to be deleted. Be careful not to select any loaded or open document, otherwise a warning message will inform you that the removal is not allowed.
After selecting the files to be deleted, a warning window informs you that some links might no longer work.
Bear in mind that this command neither check nor relocate links between documents, you will have to do it manually using Edit > Links. -
To find a document, select it then click Find
 in the Desk toolbar to open the File Selection
dialog box which lets you navigate to the desired document.
in the Desk toolbar to open the File Selection
dialog box which lets you navigate to the desired document. -
To upgrade or check a document, right-click it then select CATDUAV5
 .
This opens the Data Upward Assistant in your Version 5
session.
.
This opens the Data Upward Assistant in your Version 5
session.For detailed information on how to use the Data Upward Assistant, refer to Using CATDUA V5 in Interactive Mode in this guide.
-
To reconcile a document, right-click it then select
 Launch Document Reconciliation. This opens the Reconcile
Window that enables you to exchange CATIA designs stored in a VPDM:
ENOVIAVPM, ENOVIA LCA, or
SmarTeam.
Launch Document Reconciliation. This opens the Reconcile
Window that enables you to exchange CATIA designs stored in a VPDM:
ENOVIAVPM, ENOVIA LCA, or
SmarTeam.For detailed information on how to use the reconciliator, refer to the Version 5 - Work Package Exchange documentation.
The FileDesk workbench also lets you use the following commands:
- File > Send To > Directory once you have selected a document in the Desk
- Edit > Links once you have selected a document shown in white (i.e. loaded) in the Desk then the Links contextual command or Link Edition
in the Desk toolbar.
Note that while using the Links command, you can select other documents from the Desk to display their related items interactively in the Links dialog box- File > Save All
- File > Save Management.
More About the Unload Mechanism
Cache system
When working with the cache system, do not forget to activate the Design
mode (by default, you are in Visualization mode), otherwise you will not be
able to use the Unload command.
For detailed information on
the Design mode, refer to "Setting Up The Design Mode" in the
Version 5 - Product Structure User's Guide.
Linked documents
- When an unloaded document points to other documents, the pointed documents are also unloaded.
- When unloading a part that belongs to several products, the command applies to all the products containing this part.
UI-Activation
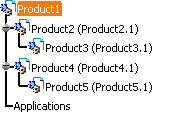
A document that is UI-active or that belongs to the UI-activation group cannot be unloaded. Let's have a look at the two examples below.
In the first example, no product can be unloaded since Product1 is UI-active and all the objects located under Product1 belongs to the UI-activation group:
![]()