The information in this section will help you create and edit Multi-Axis Flank Contouring operations in your manufacturing program.
Select the Multi-Axis Flank Contouring operation
![]() icon then select the geometry
icon then select the geometry
![]() to be machined.
to be machined.
A number of strategy parameters
![]() are available for defining:
are available for defining:
Specify the tool to be used
![]() ,
feeds and speeds
,
feeds and speeds
![]() ,
and NC macros
,
and NC macros
![]() as needed.
as needed.
The following user tasks illustrate some of this operation's capabilities:
|
Machining tolerance Specifies the maximum allowed distance between the theoretical and computed tool path. |
|
Maximum discretization step Defines the maximum allowed distance between two points on the tool path. It is used to ensure linearity between points that are far apart. Default value is 100 m. |
|
Maximum discretization angle Specifies the maximum angular change of tool axis between tool positions. It is used to add more tool positions (points and axis) if value is exceeded. Default value is 180 degrees. |
|
Note: The Maximum discretization step and Maximum discretization
angle influence the number of points on the tool path. The values
should be chosen carefully if you want to avoid having a high
concentration of points along the tool trajectory. These parameters also apply to macro paths that are defined in machining feedrate. They do not apply to macro paths that do not have machining feedrate (RAPID, Approach, Retract, User, and so on). |
|
Close tool path For a closed contour, specifies that the first drive is also to be used as the last drive. |
|
Maximum distance between steps Specifies the maximum distance between points. It is used to detect the end of drive elements. |
|
Manual direction Specifies the direction on the first drive. Otherwise, it is determined automatically depending on the reference position. |
|
Finishing mode Indicates whether or not finish passes are to be generated on the sides and bottom of the area to machine. Side finishing can be done at each level or only at the last level of the operation. |
|
Side finish thickness Specifies the thickness used for side finishing. |
|
Side finish thickness on bottom Specifies the thickness used for the last side finish pass at the end of the operation. |
|
Bottom finish thickness Specifies the thickness used for bottom finishing. |
|
Bottom finish path style Defines the bottom finish path style: Zig zag or One way. |
|
Spring pass Indicates whether or not a spring pass is to be generated on the sides in the same condition as the previous Side finish pass. The spring pass is used to compensate the natural `spring' of the tool. |
|
Tool axis guidance Specifies how the tool axis is to be guided. |
|||
|
|||
|
|
|||
|
|
|||
|
|
|||
|
|
|||
|
|
|||
|
|
|||
|
Contact height Determines a point on the drive surface where the tool must respect tangency conditions. The Contact height is measured from the tool tip along the tool axis. The point on the drive is computed such that its projection normal to the drive onto the tool axis respects the Contact height value. |
|||
|
Leave fanning distance Specifies a distance at the start of a motion over which tool fanning takes place. |
|||
|
Approach fanning distance Specifies a distance at the end of a motion over which tool fanning takes place. |
|||
|
Disable fanning For operations with Combin Tanto, Combin Parelm and Mixed Combin tool axis guidance, it is possible to disable fanning at Start element, at Stop element, or at both these limiting elements. |
|||
|
Control fanning using tool parameter When this option is selected, a Useful cutting length can be defined on the current tool. This parameter is helpful for controlling tool fanning or the offset distance when approaching drive surfaces with negative draft angles, without needing to modify the tool chosen in the database. Otherwise, the default standard cutting length value (Lc) of the tool will be used. |
|||
|
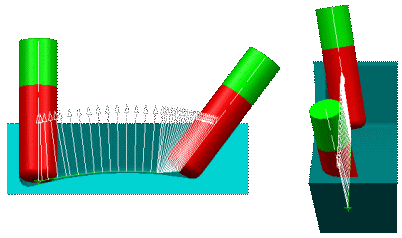
An auxiliary guide curve can be
selected in order to modify the tool axis strategy. It is mainly
used to avoid collisions at the top of drive elements or to
keep a safety distance on these elements. The following parameters
can be used if a guide curve is selected the guide curve.
Position on guide curve
Offset on guide curve
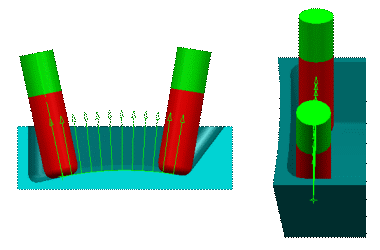
Use of guide curve For example, for the following geometry:
|
|||
A collision occurs if top auxiliary guide curve is not defined: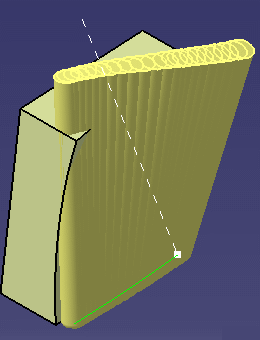 |
Collision is avoided if top auxiliary guide curve is defined: |
||
In a Multi-Axis Flank Contouring, cornering for HSM applies to all corners for machining or finishing passes. It does not apply to macros or default linking and return motions.
|
Cornering Specifies whether or not cornering is to be done on the trajectory for HSM. |
|
Corner radius Specifies the radius used for rounding the corners along the trajectory of a HSM operation. Value must be smaller than the tool radius. 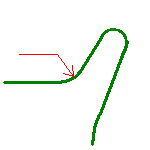 |
|
Cornering on side finish path Specifies whether or not tool path cornering is to be done on side finish paths. |
|
Corner radius on side finish path Specifies the corner radius used for rounding the corners along the side finish path of a HSM operation. Value must be smaller than the tool radius. |
In the Machine Editor, the Compensation tab contains options for:
If the options are set as follows, compensation can be managed at machining operation level.

In this case a Compensation tab appears in the Strategy page of the machining operation editor, and the following options are available.
|
Compensation output Allows you to manage the generation of Cutter compensation (CUTCOM) instructions in the NC data output: The following options are proposed: You can generate 3D radial compensation data (Vector <P,Q,R>) in the APT output. The Radial compensation data output can be activated or not on each Multi Axis Flank Contouring cycle of a program. For all tool positions of the machining passes, for the last
motion of each approach macro, and for the first motion of each
retract macro, the <PQR> vector is added to the APT statement
(which contains the Tip position and the Tool Axis. These PQR statements are supported and can be translated by Multi-Axis Post Processors provided NC manufacturing Workbenches. A sample APT output is given below:
A sample of NC data file is given below:
The tool tip will be visualized during tool path replay.
Cutter compensation instructions are automatically generated
in the NC data output. An approach macro must be defined to
allow the compensation to be applied.
Cutter compensation instructions are not automatically generated in the NC data output. However, CUTCOM instructions can be inserted manually. For more information, please refer to How to generate CUTCOM syntaxes. |
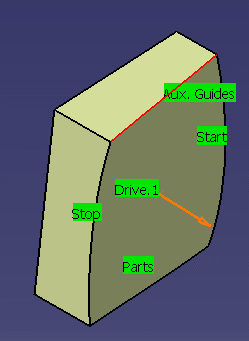
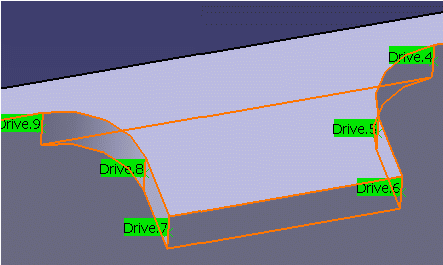
You can specify the following Geometry:
Surfaces or planes can be selected and they are taken into account according to their order of selection. The tool path starts on the first drive and ends on the last drive, except when Close tool path is set (in this case, the first drive is also used as the last drive).
The Face Selection toolbar appears to help you select faces or belts of faces.
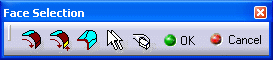
Please refer to Face Selection for a description of these commands.
Drives can be adjusted using the Local Modifications contextual command. For example, this allows you to make the following local modifications to a drive:
The program automatically determines the stopping and restarting conditions between contiguous drives. If drives are not adjacent, those values must be set manually with the Local Modifications capability. The program automatically detects fillets and joggles (features comprising 3 contiguous drives) to manage the choice of suitable elements for stopping.
You can select edges that are boundaries of the drive elements as part elements. To do this, right click the part surface area in the sensitive icon and select the Use Curves as Part contextual command.
You can select vertices, edges, planes and faces as limiting elements. If a vertex or edge is selected, a virtual plane is computed on the vertex or at the middle of the edge perpendicular to the current drive and part.
You can right click the start or stop element in the sensitive icon and select the Switch contextual command to swap the Start and Stop labels on the selected elements. This does not reverse the direction of the tool path.
A typical start element is a plane/almost planar surface that is normal to the drive, and normal to the part. This allows the program to use an automatic reference point.
It is recommended to select an edge or vertex that will automatically simulate a correct plane.
In the case of a manually selected reference point, you have to imagine that the tool makes a virtual move from a Reference position to the Start position, which is the end position of that move. The Reference position is defined by the reference point and the tool axis at that point.
The tool move moves from the Reference position to an intermediate position then on to the Start position when Part, Drive and Check surfaces are specified.

The intermediate position is defined as being the normal projection of the Reference point on the Drive surface.
Reference position is not taken into account for tool path computation of the machining operation. It is only a reference location that helps to specify the Start position related to the Part, Drive and potentially Check surfaces that are specified by the user.
Expected results are obtained by respecting a reference position close to this end location (but at a distance greater than the tool radius value).
Selecting the fillet of the joggle as starting element is not a good choice. Because the elements are always seen as infinite, the extension of this fillet is parallel to the first drive. If these two elements do not have a common boundary, select a starting element whose extensions are not parallel to the drive (drive also seen as infinite).
Local Restarting direction: Auto / Left / Right / Forward. This is a relative direction, seen from a cutter point of view. You should set the value according to the direction of the cutter at the end of the previous motion. In Auto mode, the program applies either Left, Right or Forward according to local geometry conditions.
Local Stopping condition: Auto / To / On / Past / Tangent DS. You should set the value according to how you want the cutter to reach the next drive. In Auto mode, the program applies either To, Past or Tangent DS according to local geometry conditions. In some cases, the stopping condition may be ignored (for example, if the drive to reach is located after the Past position of the current drive).
Local Tool side on drive: Same as first / Swap / On. You should keep in mind that the reference side is the one set on the first drive as indicated by the displayed arrow. This parameter is predominant compared the local Stopping condition.
Stopping and Restarting conditions must be defined on non contiguous drives.
User defined settings may lead to bad tool paths. So you should ensure the consistency of the chosen collection of drive surfaces. For example, a gap between the end of a motion and the beginning of the next motion would generate a simple straight-line path, which is generally not suitable.
In order to machine some gaps, you may have to create extra geometry. A typical example is two drive elements that are tangent but not contiguous, lying on the same surface.
Keep in mind that a geometric element is always extended to infinity, vertically and horizontally.
The cutting length of the tool should not be too great compared to the height of the drives. This can lead to bad results or failure in corners.
For negative draft angles the top of the cutting part of the tool is taken into account to define the fanning areas, if necessary along the vertical extension of the drive.
It is preferable to specify the cutting length of the tool in the Useful cutting length parameter.
Do not set the Close tool path option if the first drive is not to be machined as the last drive also.
Do not use a manual reference point if its use is not clearly defined. Prefer an automatic reference point, using a plane/planar surface as start element, normal to the drive1 and normal to the part (select an edge or a vertex that will simulate this plane without geometry creation).
Use a cutter whose cutting length (Lc) is nearly the height of the drive elements (use the Useful cutting length parameter, do not modify the tool).
Always keep in mind that all geometrical elements are seen as infinite elements, extended in all directions: horizontal and vertical. Also drive elements are machined in the order of selection, one after another.
Select the OUT condition to end after a joggle, or use a plane/edge/vertex as end element.
If a negative part offset is used and its absolute
value is bigger than the tool body radius,
this is not compatible with collision checking on checks.
If you really want to perform collision checking on checks you must use a smaller
negative offset on parts.
Otherwise unselect check elements.
Recommended tools for Multi-Axis Flank Contouring are End Mills and Conical Mills.
In the Feeds and Speeds tab page, you can specify feedrates for approach, retract, and machining as well as a machining spindle speed.
Feedrates and spindle speed can be defined in linear or angular units.
A Spindle output checkbox is available for managing output of the SPINDL instruction in the generated NC data file. If the checkbox is selected, the instruction is generated. Otherwise, it is not generated.
Feeds and speeds of the operation can be updated automatically according to tooling data and the Rough or Finish quality of the operation. This is described in Update of Feeds and Speeds on Machining Operation.
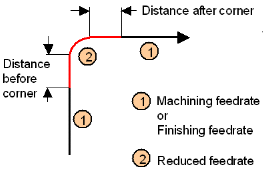
You can reduce feedrates in corners encountered along the tool path depending on values given in the Feeds and Speeds tab page: reduction rate, maximum radius, minimum angle, and distances before and after the corner.
Feed reduction is applied to corners along the tool path whose radius is less than the Maximum radius value and whose arc angle is greater than the Minimum angle value. Corners can be angled or rounded.
For Multi-Axis Flank Contouring, feedrate reduction applies to inside corners for machining or finishing passes. It does not apply to macros or default linking and return motions.
If a cornering is defined with a radius of 5mm and the Feedrate reduction in corners is set with a smaller radius value, the feedrate will not be reduced.
If the Feedrate reduction in corners option is selected and local Slowdown rates are applied to drives, the general rule is that the corner feedrate Reduction rate is applied after the local Slowdown rate on the current feedrate. For a machining feedrate the feedrate will be equal to (machining feedrate * local Slowdown rate * corner Reduction rate).
For example if the local Slowdown rate is 80% on the first drive, 40% on the second drive and the corner feedrate Reduction rate is 50%, the feedrate sequence is:
Feedrate reduction in corners with no Local Slowdown on drives:
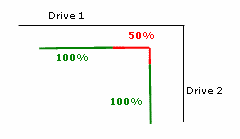
Feedrate reduction in corners combined with Local Slowdown on drives:

You can define transition paths in your machining operations by means of NC Macros. These transition paths are useful for providing approach, retract and linking motion in the tool path.
An Approach macro is used to approach the operation start point.
A Retract macro is used to retract from the operation end point.
A Linking macro may be used in several cases, for example:
A Return on Same Level macro is used in a multi-path operation to link two consecutive paths in a given level.
A Return between Levels macro is used in a multi-level machining operation to go to the next level.
A Return to Finish Pass macro is used in a machining operation to go to the finish pass.
A Clearance macro can be used in a machining operation to avoid a fixture, for example.
You can modify the parameters of several Multi-Axis Flank Contouring operations in one shot as follows: