A number of geometry selection commands are available for selecting parts, check surfaces, drives, and so on. Please note that any hidden geometry selected using these commands is not taken into account in subsequent tool path computations. For more information, please refer to the rules described in Tool Path Computation when Hidden Geometry is Present.
The Edge Selection toolbar contains commands to help you select edges of contours when specifying geometry in machining operations. Please note that the commands in the toolbar varies according to the type of machining operation.
|
|
The Face Selection toolbar and Tools Palette appear when face selection is necessary for machining operations.
The Face Selection toolbar contains commands to help you select faces when specifying geometry in machining operations. Please note that the commands in the toolbar varies according to the type of machining operation.
 |
Navigate on Belt of Faces allows you to select all faces that are adjacent to the one you have selected.
- Select two adjacent faces and click the icon. All adjacent face are selected.
Navigate on Faces Until a Face allows you to select all faces that are adjacent between start faces and a stop face.
- Select two faces that are adjacent (to give the direction of selection) and then click the icon.
- Select a third face where you want selection to end.
Navigate on Faces allows you to select all faces which are tangent to a selected face.
- Select a face and then click this icon.
Preview the Contour allows you to highlight the contour of selected faces. Select Faces in a Polygon Trap allows you to select all faces that are situated entirely within a polygon.
- Select the icon.
- Click the places in the viewer where you want the corners of the polygon to be. Double-click to end corner definition.
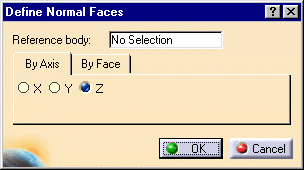
Select Normal Faces lets you select faces that are:
- normal to a main axis.
- parallel or perpendicular to a face that you select as reference.
The Define Normal Faces dialog box appears when you click the icon.
The By Axis tab allows you to select all of the flat faces that are normal to a main axis.
- The Reference body is No selection. Make sure it is selected (as in the image) and click on the part to machine in the viewer.
- Choose an axis then click OK.
The faces normal to the axis you chose in the viewer are selected.- Click OK in the Face Selection toolbar to confirm your selection.
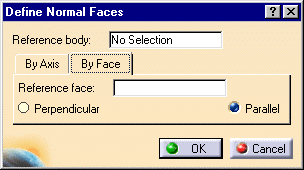
The By Face tab allows you to select flat faces with reference to a face that you choose.
- Select a part as the Reference body.
- Click in the Reference face box the select the face on the part that you want to use as reference.
- Choose whether you want to select faces that are perpendicular or parallel to that face.
- Click OK to select these faces.
- Click OK in the Face Selection toolbar to confirm your selection.
Retrieve Faces of Same Color allows you to select all faces of a given color.
- Select a face of a given color and then click the icon. All faces of that color are selected.
Note that you can define the color of a face via the Edit/Properties menu item when the face is selected.
Selection Sets allows you to select faces belonging to previously created selection sets. This action is a shortcut to the Selection Sets item in the Edit menu.
- Click on the icon and select the selection set you want to use in the displayed dialog box.
- Press Close.
Reset All Selections.
- Click the icon to reset all selections made with the Face Selection toolbar.
Accept Geometry Selections allows you to accept selected geometry and exit selection mode. Cancel Geometry Selections allows you to refuse any already geometry and exit selection mode.
The Tools Palette toolbar contains commands to help you multi-select face elements. See Using the Selection Traps for more information.
 |

Selection Trap on Geometry allows you to start the trap on a specific element and not on an empty space as this is the case for the other selection trap modes. 
Rectangle Selection Mode lets you select objects by drawing a rectangular trap. Drag using the left mouse button to define the rectangle until the objects you want to select are completely inside. Then, release the mouse: the objects are highlighted to indicate they have been selected. 
Intersecting Rectangle Selection Mode lets you select objects by drawing a rectangular trap just like Rectangle Selection Mode but this time, any objects intersected by and inside the trap will be selected. 
Polygon Selection Mode lets you select objects by drawing a closed polygon. Drag using the left mouse button to define the polygon around the object to be selected, then double-click to close the polygon. 
Free Hand Selection Mode lets you select objects by simply drawing a paint stroke across them. Drag using the left mouse button to create the paint stroke: any objects crossed by the paint stroke will be selected. 
Outside Rectangle Selection Mode lets you select objects by drawing a rectangular trap just like Rectangle Selection Mode but this time, any objects located strictly outside the trap will be selected. 
Outside Intersecting Rectangle Selection Mode is different from the Intersecting Rectangle Selection Mode since it lets you select objects intersecting the rectangular trap as well as objects located outside the rectangular trap. Drag using the left mouse button: any objects out of the trap or intersecting the trap are selected.
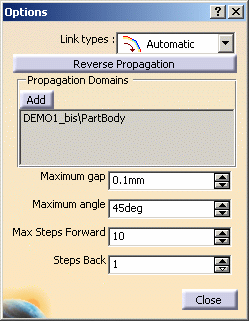
In some cases when automatic propagation is interrupted, a label appears at the extremity of the last selected edge. For example: