This task explains how to edit material lighting properties. The modification of texture properties is detailed in Modifying Material Texture Properties.
-
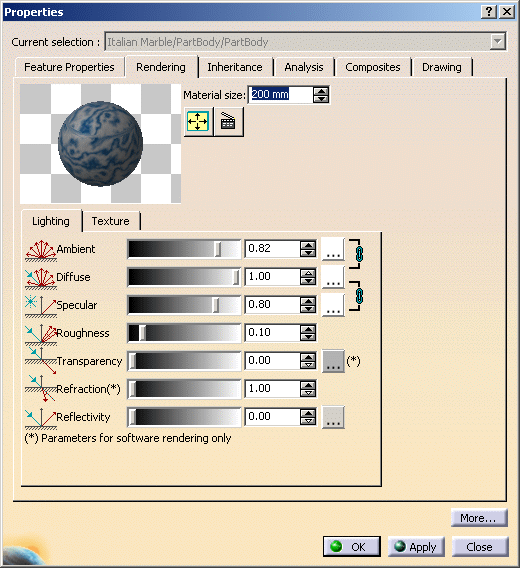
Select the Italian Marble material in the specification tree.
-
Select Edit > Properties (or use one of the other methods detailed in About Material Properties).
-
Make sure the Rendering tab is active.
Using this dialog box, you can edit the lighting and texture parameters of the material you are currently editing. 
Material specifications defined via Real Time Rendering are shared with other Version 5 products. For information on the Drafting and Analysis tabs, see the Version 5 - Generative Drafting and the Version 5 - Generative Part Structural Analysis User's Guides, respectively.
Appropriate licenses are required to use these products. -
Modify the Lighting parameters: Ambient, Diffuse, Specular, Roughness, Transparency, Refraction (*) and Reflectivity. You can either use the slider or enter the desired value directly in the box.
-
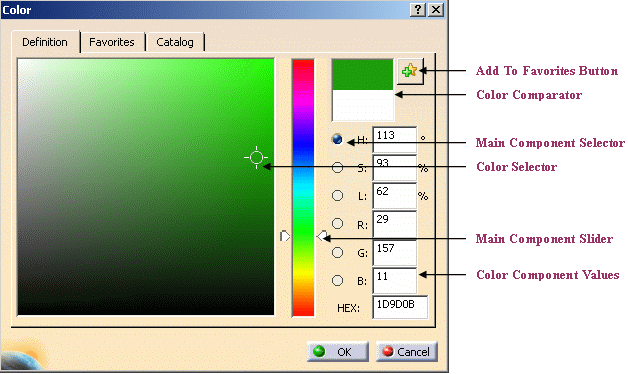
By default, the ambient, diffuse, specular and transparency colors are set to the basic color. You can, however, click... and choose the color to be used for the material texture.
-
Set the other material parameters:
Parameter Set to 0
(or 1 for Refraction)Set to 1
(or 3 for Refraction,
(0.5 for Transparency)Ambient: the intensity of light diffused in any direction by the object, even if not lit by any light source.
The ambient light is essentially used to show objects or parts of objects that are not illuminated directly by the light source.This parameter affects the whole object, including the shadowed area.
The intensity is defined by a coefficient (with a value between 0 and 1).


Diffuse: the intensity of light diffused by the object when lit by light sources. Typically, a shiny metal surface would have a diffuse reflectance value close to 0, while a piece of cardboard would have a value probably above 0.9.
The intensity is defined by a coefficient (with a value between 0 and 1).


Specular: intensity and color of light reflected in one particular direction (highlights) Set the value to a minimum to generate very sharp highlights on very shiny surfaces. Set the shininess to a higher value to generate large specular spots creating a duller effect.
Typically, a polished object would have a high value for the specular reflectance coefficient, while a more mat surface would have a lower one.


Roughness: dullness of an object (size of the reflecting zone) Set the value to a minimum to generate very sharp highlights on very shiny surfaces. Set the shininess to a higher value to generate large specular spots creating a duller effect on rougher surfaces.


Transparency: degree of transparency of an object and color of the filter interfering with the light passing through an object. The transparency color acts like a photographic filter which modifies artificially the light rays received by an optical lens.
It is generally identical to the ambient and diffuse color but when it is different, the shadows cast by the object are colored accordingly. For instance, a blue object with a red transparency color will cast slightly red shadows.The higher the value, the more transparent the object (in the example the value is 0.75), the lower the value, the more opaque the object.

Refraction: degree of light passing obliquely through an object. The refraction is defined by a coefficient (value between 1 and 2).
Set to 1, the transparent object will show no light distortion.
As an example, water has a 1.2 coefficient.This parameter is relevant for software rendering only.
Reflectivity: degree of reflectivity of an object. Set to a high value, the object reflects its environment.
Set this parameter to 0.2 in order to see the reflections when a texture is applied. Otherwise, set this parameter to a value greater than 0 to see the texture. More info...

When setting the Reflectivity parameter, you can also set advanced reflection settings if you wish to use a customized environment image for environment reflections. For more information, refer to Defining Reflection Settings in this guide. A reflecting material lets you visualize the environment image it reflects. As you can use images of various origins for your environment, here is the priority order in which they are seen: 1. material reflectivity image defined in the Advanced Reflection Settings dialog box (for Real Time Rendering 2 users only)
2. environment image defined in Tools > Options > Material Library > Material
3. default environment image provided with Version 5.
All values can be defined either using the scroll bar, the arrows or directly in the box.
If several values are to be modified, better skip from each box to another by pressing Tab: in this case, the preview icon is updated only once. -
Click Apply to validate the material lighting definition.
The material icon reflects the material as defined.
More about lighting properties
- All lighting parameter values range from 0 to 2
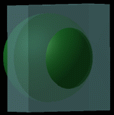
- As explained above in this scenario, any amount of reflectivity, however small, means that you can no longer visualize the mapped texture simultaneously with the reflected scene. If you want to see the texture, make sure you set the Reflectivity parameter to 0 in the Lighting tab. Otherwise, the result is as follows:
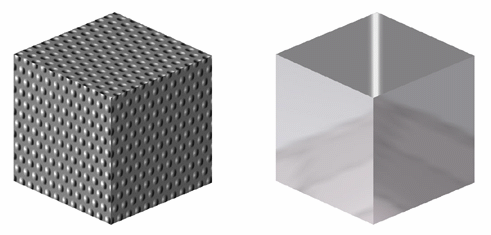
Picture 1
Reflectivity = 0
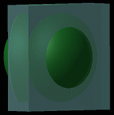
Picture 2
Reflectivity = 1
As of V5R16 and provided that your hardware configuration supports it, this is no longer the case if you can take advantage of the CgFX technology which lets you visualize a material with both a texture and reflections.
Below are two pictures showing a material onto which a texture has been applied. In Picture 2, you can see that the material texture can still be seen even though reflections are activated:
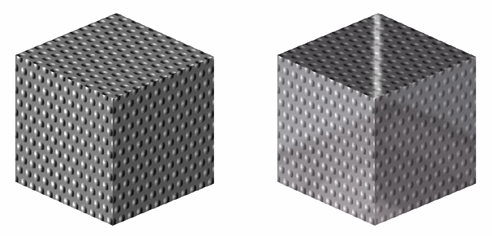
Picture 1
Reflectivity = 0
Picture 2
Reflectivity = 1
![]()