| |
This task describes the cgFX materials and deals with the following:
Integration in Version 5
CgFX is a material specification and
interchange format enabling you to combine textures with bump and
reflectivity effects to produce more realistic images. This powerful
technology does not apply only to standard Version 5 materials but also to
user-defined materials.
The other major benefits are the ability to compute rendered images with
the Photo Studio product and the upward compatibility guaranteed by
Dassault Systmes.
CgFX functions are integrated in Version 5, provided that your hardware
configuration supports it and that you activate the required option in the
Version 5 settings as explained below. These functions are available on
Windows and require the latest NVidia drivers as well as specific graphic
cards compliant with CgFX technology.
Below is an example with the Shiny Wood advanced material
provided with Version 5 (click the thumbnail to see the full-size picture): |
| |
 You do not need to download the Cg toolkit
because the files that you need to use Cgfx functions are included with the V5 media. For
detailed information, refer to
OpenGL Shaders and CgFX on Windows in the Version 5 -
Infrastructure Installation Guide.
Then, select Tools >
Options > General > Display > Performances then select the
Enable OpenGL Shader check box in the Miscellaneous area: |
| |
 Once CgFX functions are activated, the
visualization of materials with reflections
or with a bump effect is automatically
and significantly enhanced. |
 |
Dealing with .fx Files
For very complex rendering effects, e.g.
Fresnel effect or Anisotropic effect, you have to create your own .fx
files. If you do not have any sample file ready, you can use sample files
delivered in Version 5.The following scenario shows you how to use one of the
sample files provided. However, bear in mind that the CgFx language is not
developed by Dassault Systemes
and therefore, it is up to you to to make the necessary updates for .fx
files other than those delivered with Version 5. |
 |
Open the
Chess.CATProduct document. |
 |
-
Select the Italian Marble material in the
specification tree.
-
Select Edit > Properties or right-click and select
 Properties to open the Properties dialog box.
|
The material properties can also be accessed by
right-clicking the object onto which the material has been applied,
then selecting Material > Edit Material. This avoids
selecting the material in the specification tree and is especially
useful when working in Full Screen mode, for instance. You can manipulate the object (i.e. zooming in or
out, etc.) directly in the geometry area while displaying the
Properties dialog box either by double-clicking the material
in the specification tree or by right-clicking the material then
selecting xxx object > Definition. |
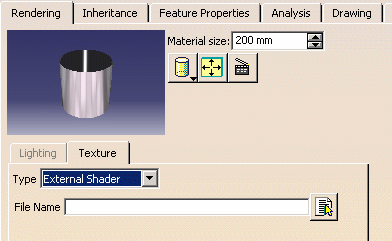
-
Click the
Texture tab then select External Shader from the
Type list:
-
Click
 which lets you browse your file tree to select a .fx file, then click
Open. This displays the parameters declared in the .fx file,
each box corresponding to one parameter.
which lets you browse your file tree to select a .fx file, then click
Open. This displays the parameters declared in the .fx file,
each box corresponding to one parameter.
|
In our scenario, we use the sample
file named BrushedMetal.fx delivered in
$CATStartupPath\startup\materials\shaders.
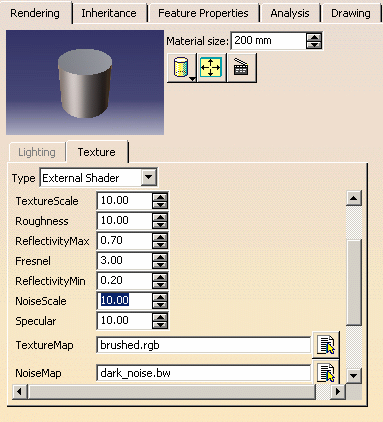
The external shader is applied to your model as
shown below: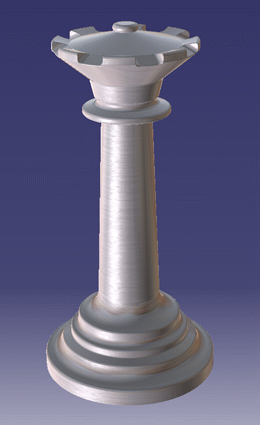
|
-
Adjust the parameters displayed as desired. The
modifications you make are automatically applied to your model to let you
check the result.
-
Click OK or Apply then OK
to validate your parameters and close the Properties dialog
box.
| The parameters are stored in the model with the material and
not in the .fx file.
If you edit the material parameters using a non-Version 5
application then re-access the material properties in Version 5, a
warning window pops up to inform you that the parameters declared
in the .fx file supersede any other data you may have stored in the
material (and thus, these data are lost). |
-
If you want to modify the parameters declared in the .fx
file, just open this file in any text editor such as WordPad, Notepad,
etc.
|
Each effect file contains one or more techniques,
each of these techniques describing how the effect is achieved.
Below is an extract of the sample file used in our
scenario: 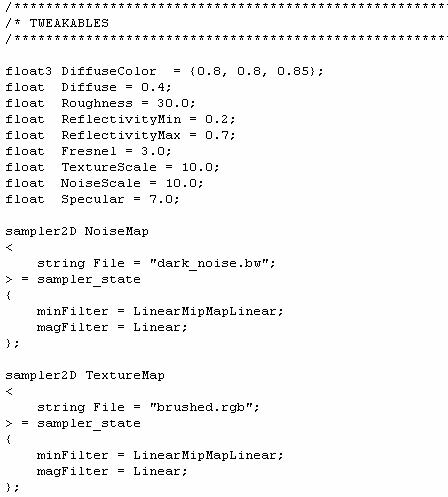
You can then edit the text as you wish to modify
existing parameters or create new ones.Making complex
modifications implies that you are familiar with the CgFX language.
If this is not the case, you can still make basic changes which do
not require particular knowledge of the CgFX language.
|
Note: all image formats are supported for texture files. |
|
-
Save your .fx file when finished then go back to your
Version 5 session to apply this shader to your object.
 |
It is recommended that for the
sake of convenience you save your texture file and your .fx file in
the same location. |
|
| |
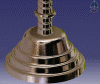
Below is another example with a bumpy metal. Click the thumbnail to
see the full-size picture:
|
| |
OpenGL Materials and CgFX Materials
Note that as of V5R17, CATIA no longer supports .isl* files (*files
where OpenGL materials are stored) creation. However, .isl files created prior R17 level can be visualized and manually converted to .fx files. To do so, use a sample file named
template.fx. Refer to
How to convert .isl files to .fx files?
for more information. |
|
 |