![]()
This task shows how to create section planes and orient the normal vector of the plane.
Insert the following cgr files: ATOMIZER.cgr, BODY1.cgr, BODY2.cgr, LOCK.cgr, NOZZLE1.cgr, NOZZLE2.cgr, REGULATION_COMMAND.cgr, REGULATOR.cgr, TRIGGER.cgr and VALVE.cgr.
They are to be found in the online documentation filetree
in the common functionalities sample folder cfysm/samples.
About Section Planes
The plane is created parallel to absolute coordinates Y, Z. The center of the plane is located at the center of the bounding sphere around the products in the selection you defined.
|
|
Note: In clash context, the plane is not created parallel to absolute coordinates Y, Z as it is collinear to the penetration vector of the clash specification. The penetration vector is identified by a white arrow in the 3D area:
|

-
Line segments represent the intersection of the plane with all surfaces and volumes in the selection. By default, line segments are the same color as the products sectioned.
-
Points represent the intersection of the plane with any wireframe elements in the selection.
A section plane has limits and its own local axis system. U, V and W represent the axes. The W-axis is the normal vector of the plane. The contour of the plane is red.
You can dynamically re-dimension and reposition the section plane. For more information, see Manipulating Section Planes Directly.
Using the Tools > Options... command (DMU
Sectioning tab under Digital Mockup > DMU Space Analysis,
you can change the following default settings:
-
Location of the center of the plane
-
Orientation of the normal vector of the plane
-
Sectioning of wireframe elements.
Creating Section Planes
Before you begin
When dealing with CATProducts containing a large amount of sections, for gain performances purposes, read carefully the Customization recommendations (follow the described procedure).
-
Select Insert > Sectioning from the menu bar, or click Sectioning
 in the DMU Space Analysis toolbar to generate a section plane.
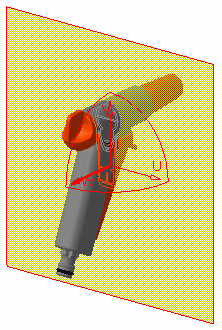
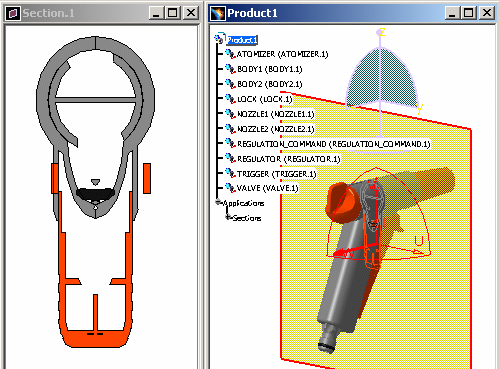
The section plane is automatically created. If no selection is made before entering the command, the plane sections all products. If products are selected, the plane sections selected products.

P1 Functionality
In DMU-P1, you cannot select products to be sectioned: the plane sections all products.
-
Click the Selection box to activate it.
-
Click products of interest to make your selection, for example the TRIGGER and BODY1.Products selected are highlighted in the specification tree and geometry area.

Note: Simply continue clicking to select as many products as you want. Products will be placed in the active selection. To de-select products, reselect them in the specification tree or in the geometry area.
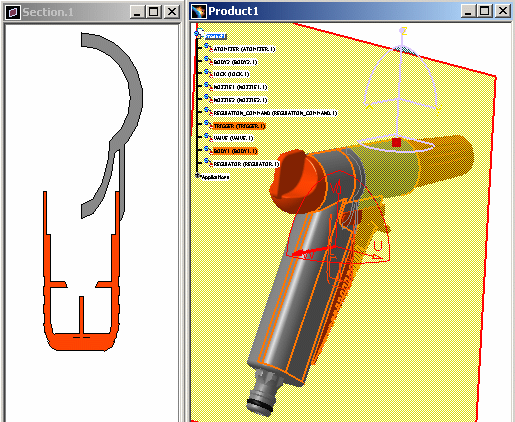
The plane now sections only selected products
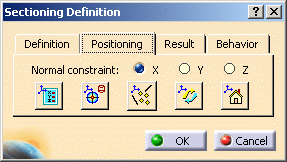
You can change the current position of the section plane with respect to the absolute axis system of the document: -
Click the Positioning tab in the Sectioning Definition dialog box.
-
Select X, Y or Z radio buttons to position the normal vector (W-axis) of the plane along the selected absolute system axis. Select Z for example. The plane is positioned perpendicular to the Z-axis.
-
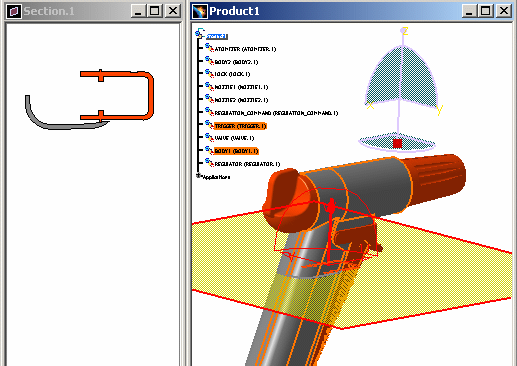
Double-click the normal vector of the plane (W-axis) or click Invert Normal
 to invert it.
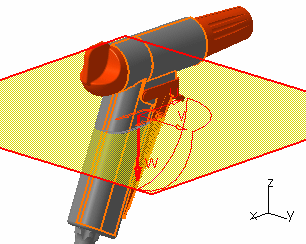
-
Click OK when done. The section plane definition and results are kept as a specification tree feature.
-
Click Close.
 By default, the plane is hidden when exiting the command. Use the
Tools > Options, Digital Mockup > DMU Space Analysis command (DMU
Sectioning tab) to change this setting.
By default, the plane is hidden when exiting the command. Use the
Tools > Options, Digital Mockup > DMU Space Analysis command (DMU
Sectioning tab) to change this setting.-
To show the plane, select Hide/Show the plane representation in the contextual menu.
Note: In this case, you cannot edit the plane. -
To edit the plane again, double-click the specification tree feature.
-
Results
Window
A Section result window appears alongside the document window. If you want the Section result window to be tiled vertically alongside other document windows, go to Tools > Options > Digital Mockup > DMU Sectioning tab and select the appropriate option in the Results window area.
The section result window displays a front view of the generated section and is by default, locked in a 2D view.
Notice that the section view is a filled view. This is the default option. The fill capability generates surfaces for display and measurement purposes (area, center of gravity, etc.).
|
|
Sectioning Definition Dialog Box
|
|
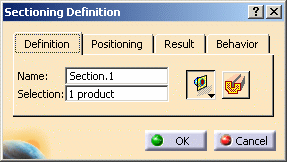
The Sectioning Definition dialog box appears.
This dialog box contains a wide variety of tools letting you position, move and rotate the section plane as well as create slices, boxes and section cuts. For more information, see Positioning Planes with respect to a Geometrical Target, Positioning Planes Using the Edit Position Command, Creating Section Slices, Creating Section Boxes and Creating 3D Section Cuts.
P2 Functionalities
In DMU-P2, you can create as many independent section planes as you like.
Creating section slices and section boxes are DMU-P2 functionalities.
![]()