In addition to manipulating the plane directly in the geometry area, you can position the section plane more precisely using the Edit Position and Dimensions command. You can move the plane to a new location as well as rotate the plane. You can also re-dimension the section plane.
In the case of section slices and boxes, it is the master plane that controls how the slice or box will be positioned.
![]()
This task illustrates how to position and re-dimension the section plane using the Edit Position and Dimensions command.
![]()
Insert the following cgr files: ATOMIZER.cgr, BODY1.cgr, BODY2.cgr, LOCK.cgr, NOZZLE1.cgr, NOZZLE2.cgr, REGULATION_COMMAND.cgr, REGULATOR.cgr, TRIGGER.cgr and VALVE.cgr.
They are to be found in the online documentation filetree
in the common functionalities sample folder cfysm/samples.
-
Select Insert > Sectioning from the menu bar, or click Sectioning
 in the DMU Space Analysis toolbar and
create a section plane.
in the DMU Space Analysis toolbar and
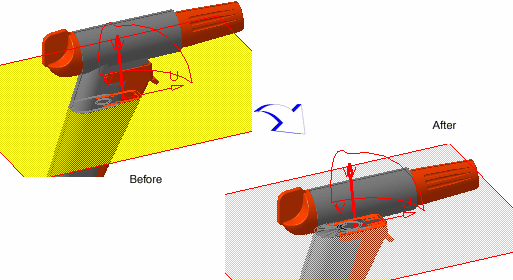
create a section plane.A Section viewer showing the generated section is automatically tiled vertically alongside the document window. The generated section is automatically updated to reflect any changes made to the section plane.
The Sectioning Definition dialog box is also displayed.
-
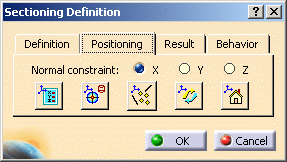
Click the Positioning tab in the Sectioning Definition dialog box.
-
Click the Edit Position and Dimensions
 to enter parameters defining the position of the plane.
The Edit Position and Dimensions dialog box appears.
-
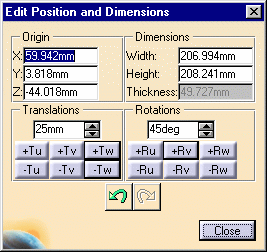
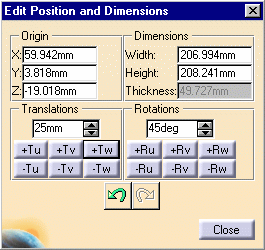
Enter values in Origin X, Y or Z boxes to position the center of the plane with respect to the absolute system coordinates entered.
 By default, the center of the plane coincides with the center of the
bounding sphere around the products in the current selection.
By default, the center of the plane coincides with the center of the
bounding sphere around the products in the current selection. Notes:
-
Using the Tools > Options... command (DMU Sectioning tab under Digital Mockup > DMU Space Analysis), you can customize settings for both the normal vector and the origin of the plane
-
Units are current units set using Tools > Options.
-
-
Enter the translation step directly in the Translation spin box or use spin box arrows to scroll to a new value, then click -Tu, +Tu, -Tv, +Tv, -Tw, +Tw, to move the plane along the selected axis by the defined step.
Note: Units are current units set using Tools > Options (Units tab under General > Parameters and Measure). -
Change the translation step to 25mm and click +Tw for example. The plane is translated 25 mm in the positive direction along the local W-axis.
-
Enter the rotation step directly in the Rotation spin box or use spin box arrows to scroll to a new value, then click -Ru, +Ru, -Rv, +Rv, -Rw, +Rw, to rotate the plane around the selected axis by the defined step.
-
Enter new width, height and/or thickness values in the Dimensions box to re-dimension the plane. The plane is re-sized accordingly.
-
Click Close in the Edit Position and Dimensions dialog box when satisfied.
-
Click OK in the Sectioning Definition dialog box when done.

-
Click Undo and Redo in the Edit Position and Dimensions dialog box to cancel the last action or recover the last action undone respectively.
-
Click Reset Position
 in the Positioning tab of the Sectioning Definition
dialog box to restore the section plane to its original position.
in the Positioning tab of the Sectioning Definition
dialog box to restore the section plane to its original position. -
You can also view and edit plane dimensions in the Properties dialog box (Edit > Properties or via the contextual menu).
This command is not available when using the sectioning command.
|
|

![]()