Licensing
Measure objects are updated only if you turn on Design Model Updates. For more information see Turning On/Off Design Model Updates.
Analysis Feedback on the Geometry
- to receive no data (Off)
- to have the geometry highlighted (Highlight)
- to receive a message window (Verbose, which consists of both the message window and highlighting), or
- to interrupt the simulation (Interrupt, which consists of both the interruption plus the information provided by Verbose).
Analysis Feedback in Data Windows
Configure the Analysis
-
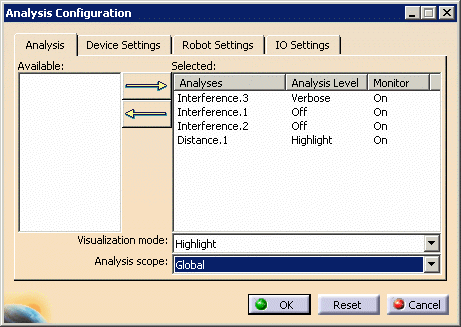
Click Analysis Configuration
 .
.The Analysis Configuration dialog box appears: 
-
Are the available analysis objects (e.g., Interference.1), if any, what you want to use?
- If YES, go to this step.
- If NO, without exiting the Analysis Configuration
dialog box, you can:
- select one of the commands to create an analysis command
(e.g., Clash
 ),
),
- create one or more analysis objects
- see the analysis objects in the Analysis Configuration dialog box.
- select one of the commands to create an analysis command
(e.g., Clash

For more information, see: -
From the Available box, select the analysis definition you want performed (e.g., Analysis.1), and press on the arrow pointing to Selected.
The requested analysis appears in the selected area. This is referred to as binding the analysis.
The default value for Analysis Level is initially set to Off. You can alter the default value for the Analysis Level by modifying the Analysis Level on the Analysis tab at Tools > Options > DELMIA Infrastructure. 
The default value for Monitor is set to Off. If you set Monitor to On, but set the Analysis Level to Off, monitoring does not occur. If you wish to alter any of the analyses' definitions, you can double-click on the name. The dialog boxes you used to set up the analysis in the first place appear, and you can modify the details of the analysis you are requesting accordingly. The example above shows that measure between and measure edge objects have already been created. In addition, a clash check (Interference.1) has been created. You can use the Shift or Ctrl keys for multiple selection. You can use the arrow pointing to Available to transfer an analysis definition from Selected to Available (after you have selected). -
Select Interference.1 and keep selecting the value underneath Analysis Level until you find the desired level. (With each click, the value toggles among the four possible levels.)
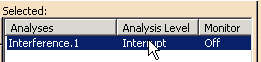
The table below explains the options:
Level Meaning Off (default) Selecting this mode means that you do not receive any notification during a simulation or jog about any of the checks you have set. Setting this mode to Off overrides the Analysis Status
 when it is set to On, as described in
Setting Analysis Status.
when it is set to On, as described in
Setting Analysis Status.Highlight The analysis objects on the Selected list are checked during the simulation or jog: - If a clash violation occurs, the parts involved appear highlighted during the simulation or jog.
- If a distance check is selected, the distance is displayed during simulation or jog.
- If a band width analysis check is selected and a band width violation occurs, the band width will be displayed in green/red and collision curves.
- Otherwise the distance is displayed during simulation or jog.
Verbose The analysis objects on the Selected list are checked during the simulation or jog. - If a clash violation occurs, the parts involved appears highlighted and a message is displayed. You can also use the message window to see more detailed information about the violation.
- For distance analysis and band width, each step in a simulation results in a message for the user because there is always a minimum distance to report. You can also use the message window to see more detailed information.
Interrupt The analysis objects on the Selected list are checked during the simulation or jog. - If a clash violation occurs, the parts involved appear highlighted, a message is displayed, and the simulation or jog stops. You can also use the message window to see more detailed information about the violation or about distance or band width checks.
- For distance and band width checks, the behavior is the same as the Verbose mode.
-
Move the cursor under the Monitor value and select Off so that it toggles to On.
Monitor supports the interference and distance analysis objects, not the measure analysis objects. -
From Visualization mode list, select the desired mode.
The table below shows the options:
Mode Meaning Highlight The clash object's edges are highlighted in orange. 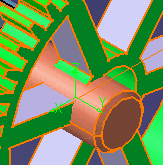
Curves The curves in clash are highlighted in red. 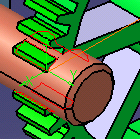
-
-
Do you want to also select device, robot, or IO setting checks?
- If you want also to select device setting checks, go to Configuring the Device Settings.
- If you want also to select robot setting checks, go to Configuring Robot Settings.
- If you want also to select IO setting checks, go to Configuring IO Settings.
- If you want only select analysis checks, click OK.
A pop up window will ask if you want to turn on Analysis Mode.
You can either click Yes, or you can later turn on analysis mode (to do so, see Setting Analysis Status).
The pop up window can be controlled through the settings in Tools > Options > Infrastructure > DELMIA Infrastructure >Analysis. Please check the Analysis Mode Activation section of the Customizing documentation for the Analysis tab.
When you run the process, the global monitor shows the output of the analysis. The example below shows the output of a bandwidth analysis and interference analysis. 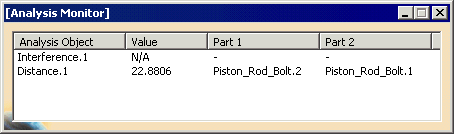
In case of an interference object, the Analysis Monitor dialog box only displays the type of clash. In the case of multiple clashes, the worst significant case is displayed. For example: - If there is clash and contact, then the clash is displayed.
- If there is clash and clearance, then only clash is displayed.
- If there is contact and clearance, then only contact is displayed.