What Is Instant Collaboration?
Instant Collaboration enables instant collaboration between all participants across the extended enterprise to promote the sharing of data and ideas that can result in a faster time to market and an increase in overall product innovation.
Instant Collaboration can operate in either peer-to-peer mode, or in client/server mode, and requires neither an ENOVIA V5 VPM server nor a vault, but can operate optionally with both if required.
Instant Collaboration requires a web application server: in this section, we describe how to integrate the product within a WebSphere application server.
You need:
- to deploy the Instant Collaboration code in a configuration containing at least VPM Navigator, for example the VDM configuration, on the same machine as the web application server
- to install on the clients the same code as on the web application server: VDM, for example.
Hardware and Software Prerequisites
The hardware and software prerequisites for implementing Instant Collaboration are documented in detail in Software Requirements and Hardware Requirements.
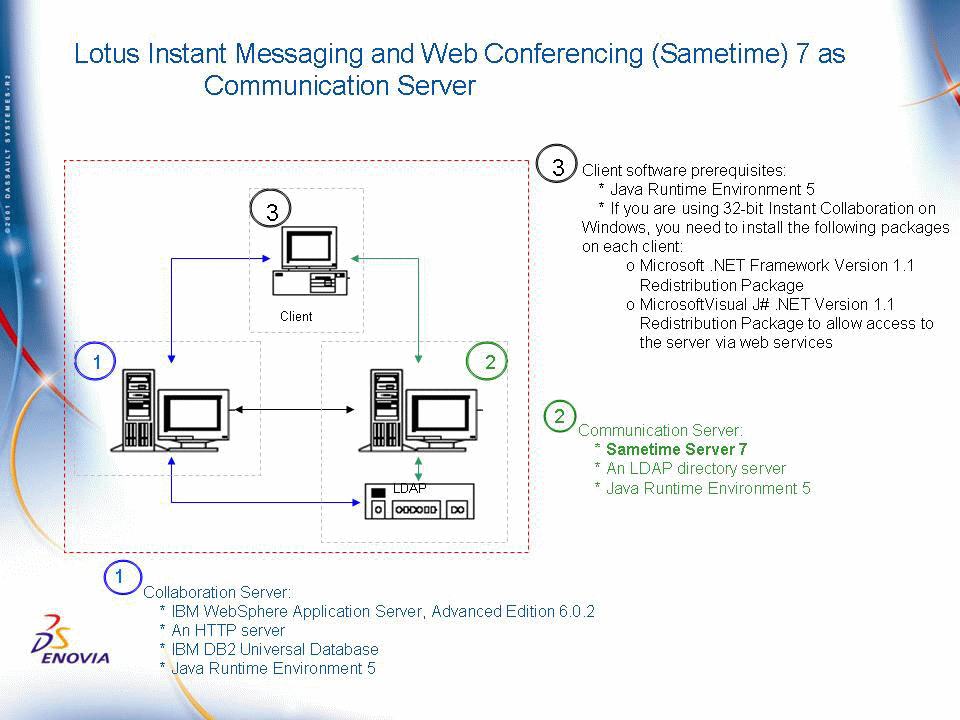
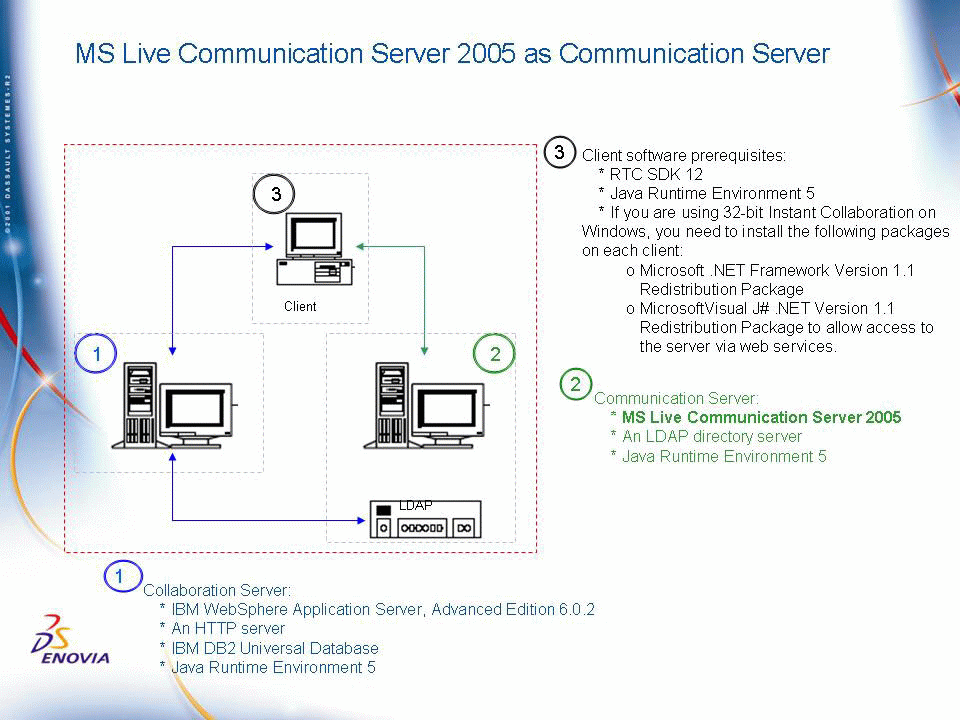
However, here is a quick checklist of server software prerequisites:
- IBM WebSphere Application Server, Advanced Edition
- An HTTP server
- Lotus Instant Messaging and Web Conferencing (Sametime) Version 7 or MS Live Communication Server 2005
- An LDAP directory server
- IBM DB2 Universal Database or Oracle
- Java Runtime Environment.
and a checklist of client software prerequisites:
- Java Runtime Environment
- If you are using 32-bit Instant Collaboration on Windows, you need to
install the following packages on each client:
- Microsoft .NET Framework Version 1.1 Redistribution Package
- MicrosoftVisual J# .NET Version 1.1 Redistribution Package
to allow access to the server via web services.
Deployment Checklist
After you have installed all the software prerequisites, as illustrated in the diagram above, use this checklist to deploy Instant Collaboration:
Phase 1: Installing the Version 5 code on the Web Application
     Server and the V5 Collaboration Client
Phase 2: Configuring the Communication Servers and V5
		Collaboration Clients
Phase 3: Creating a Database for Settings Persistency
Phase 4: Deploying the Web Application in an Application Server
1. Creating the Enterprise Archive File

             2. Securing the WebSphere Application Server

             3. Launching the Web Application
Phase 5: Configuring Single Sign-On (SSO) for Instant
     Collaboration (Optional)
Phase 6: Configuring the Sametime Server
1. Performing Sametime Post-installation Operations
2. Setting Sametime Administration Parameters
Phase 1: Installing the Version 5 Code on the Web Application Server and the Collaboration Clients
Web Application Server
- Install the runtime view of the VDM code on the server:
- Media: ENOVIA V5 VPM
- Configuration: VDM containing VPM Navigator.
V5 Collaboration Client
- Install the V5 runtime view of the VDM code on the V5 collaboration
client:
- Media: ENOVIA V5 VPM
- Configuration: VDM containing VPM Navigator.
Note that you also have to install from the ENOVIA DMU Navigator media a configuration containing the DMU Navigator (for example, DM2). If no DMU license is present, you will not have access to certain functions.
- Perform the following post-installation operations on the V5
collaboration client:
- Install Java level
Phase 2: Configuring the Communication Servers and V5 Collaboration Clients
You can use two different communication servers:
- a Sametime server
- or a MS Live Communication Server 2005.
Sametime Server
The clients communicate with the WebSphere application server and a Sametime server deployed for collaboration purposes as illustrated below:

Sametime Server Configuration (Lotus Instant Messaging and Web Conferencing)
This section describes how to configure the Sametime server. Note that this is pure Sametime configuration: no Version 5 code is concerned at this stage.
If the Sametime server is on another machine from the WebSphere application server, you must tell the Sametime server that it is OK to accept IP connections from server applications on different machines.
You can tell Sametime to accept application IP connections by doing the following:
- On the server machine that is running Sametime, locate the
sametime.ini file. Generally you can find the sametime.ini file in:
$sametime_installpath\sametime.ini
depending on how you installed Sametime).
- Open sametime.ini file with an editor like Notepad.
- Find the [Config] section of the ini file.
- Add the following line in the [Config] section:
VPS_TRUSTED_IPS= "trusted IP list separated by comma"
where the "trusted IP list separated by comma" contains the IP addresses or DNS names of the machines from which server applications are allowed access.
Here is an example of how this can look where three other machines are allowed to run server applications that access the Sametime server:
[Config]

       ....

       VPS_TRUSTED_IPS= 129.33.13.162,129.33.13.163,129.33.13.164
Alternatively, you can tell the Sametime to allow connections to it from any IP address. You can do so by following the previous steps 1 and 2, and do the following:
- Add a section called [Debug] at the end of the ini file (if one doesn't already exist)
- In the [Debug] section add the following line:
VPS_BYPASS_TRUSTED_IPS=1
You should only use this setting for development/tests purposes. We do not recommend to use it on production systems.
Now you are ready to proceed to setting up your environment.
Note: By default there will be no Debug section in a sametime.ini file so you may have to add the line with [Debug] as well.
Configuration of the V5 CATIA Collaboration Client for Sametime
- Copy the following files:
CommRes.jar
STComm.jar
from:$InstallLotus\Lotus\Domino\Data\domino\html\sametime\toolkits\st651javatk\bin
to:$installV5\docs\javacommon
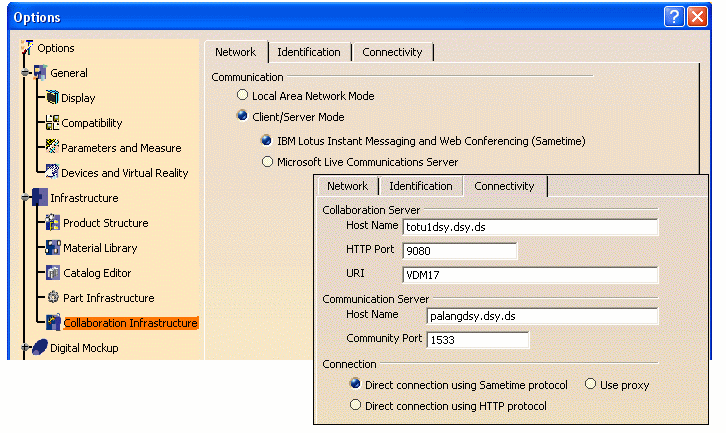
- Set connectivity settings on the V5 collaboration client:
- start a V5 session
- Select Tools->Options... then Collaboration Infrastructure settings
- In the Network tab: check the option IBM Lotus Instant Messaging and Web Conferencing (Sametime)
- In the Connectivity tab:
Collaboration server: specify your WebSphere application server name
Communication server: specify your Sametime host name and port (port 1533 by default)
For more information, refer to the description of how to customize the Connectivity tab in the ENOVIA DMU Navigator Users Guide.
MS Live Communication Server 2005
You can also use a MS Live Communication Server 2005 as illustrated below:

Configuration of the V5 CATIA Collaboration Client for MS Live Communication Server 2005
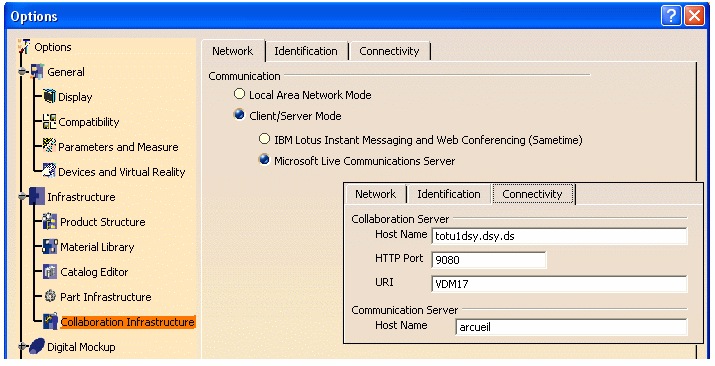
- Set connectivity settings on the V5 collaboration client:
- start a V5 session
- Select Tools->Options... then Collaboration Infrastructure settings
- In the Network tab: check the option Microsoft Live Communications Server
- In the Connectivity tab:
Collaboration server: specify your WebSphere application server name
Communication server: specify your communication server host name
For more information, refer to the description of how to customize the Connectivity tab in the ENOVIA DMU Navigator Users Guide.
Phase 3: Creating a Database for Settings Persistency
Refer to Creating a DB2 Database for Settings Persistency.
Refer to Creating an ORACLE
Database for Settings Persistency.
Phase 4: Deploying the Web Application in an Application Server
Refer to Creating the Enterprise Archive File.
Refer to Securing the WebSphere
Application Server.
Note: We recommend for deployment reasons that you secure the WebSphere
Application Server.
If your are using Secured WAS to access your communication server, you
must modify in your CATIA runtime view the following file:
$os/resources/sso/SSOClient.properties
Set the following properties to "yes":
SSOActivated=yes

       SSOSecuredEnvironment=yes
Refer to Launching the Web Application.
Phase 5: Configuring Single Sign-On for Instant Collaboration (optional)
Once you have deployed the runtime view of the VDM code in the application server, you may also decide to deploy the Single Sign-On (SSO) capability which is an optional feature provided by the application server. It provides a way to sign on once and for all and guarantees authentication on a Websphere Application Server. Single Sign-On provides a single platform to authenticate users for all PLM Hubs.
If you just want to configure SSO for collaboration, refer to the following tasks in Configuring Single Sign-On:
- Configuring the LDAP Server and
Customizing the LDAP Repository
Configuring Credential Sets for Single Sign-On (when creating the credential set, select ENOVIA V5 as the application name)
Activating Single Sign-On (if you are using an ENOVIA V5 VPM server)
- Restart the WAS.
Note: no further customization of the collaboration client is requited for SSO activation: the SSO feature is activated implicitly.
Phase 6: Configuring Sametime
Performing Sametime Post-installation Operations
This part of the Sametime administration involves Version 5 code:
.jar files necessary for the correct functioning of the server
- From the directory of your Sametime server installation, go to the
following directory:
...\Lotus\Domino\Data\domino\html\sametime\toolkits\st651commsrvrtk\bin
- Copy the file
stcommsrvrtk.jarto the directory:
%install_path%\docs\java
.jar and .cab files necessary for the correct functioning of the applet
- From the directory of your Sametime server installation, go to the
following directory:
...\Lotus\Domino\Data\domino\html\sametime\toolkits\st651javatk\bin
- Copy the following files from the directory of your Sametime server
installation:
CommRes.cab

       MeetRes.cab

       STMeeting.cab

       STJNILoader.cab
to the following V5 installation directory deployed on the collaboration server:
%install_path%\docs\applet
These .cab files must be defined with read and execute access privileges for all users on UNIX installations of Instant Collaboration.
CommRes.jar

           MeetRes.jar

           STMeeting.jar

           STJNILoader.jar

           STMeetingPACSupport.jar
Resources necessary for the correct functioning of STLinks
- From the directory of your Sametime server installation, go to the
following directory:
...\Lotus\Domino\Data\domino\html\sametime\stlinks
- Copy the following files:
stlinks.js

       stlinks.cab

       stlinks.jar

       hostInfo.js
to the directory:
$install_path\resources\stlinks
- Restart the WAS.
Setting Sametime Administration Parameters
- Open your browser.
- Go to:
http://YourWasServer:YourPort/YourRootURI/html/CATJadOptions
- Expand Administration > Collaboration and click the Connectivity icon. The JDBC Providers window displays.
- Click the Edit button:
- In the Server text-entry field, enter the name of your Sametime server.
- In the Server index text-entry field, enter the index number (if you have only one WAS accessing the Sametime server, this index number can be any value between 0 and 9. If you have multiple WAS accessing the Sametime server, each WAS must be assigned a unique index number.
- In the Runtime location text-entry field, enter the address of the stlinks runtime directory on the Sametime server.
- Verify that the Installation of prerequisite Lotus Sametime components (Server) status is Complete (green).
The status will be green when the filestcommsrvrtk.jarhas been correctly copied as explained above.- Verify that the Installation of prerequisite Lotus Sametime components (Client) status is Complete (green).
The status will be green when the other files have been correctly copied in the Post-Installation for Sametime above.- Verify that the port numbers defined for both Community and Collaboration correspond 100% to the communication ports defined for the Sametime server configuration.
- To save your settings and start the collaboration services, click the Start services and save these settings button.
- Click Apply to confirm the modifications.
![]()

