- automatic deployment
- manual deployment.
This scenario does NOT cover all possible deployment scenarios on a WAS ND (Network Deployment) cluster of machines. However, the generated JACL (defined later) can be used if all machines in the cluster have same image (OS, file systems, etc.). WAS ND lets you clone the installation of a single WAS node to all the clusters.
A Few Definitions
WAS is an acronym for WebSphere Application Server, the IBM server infrastructure used to run WebTop applications.
EAR is the short name for Enterprise Archive file. An EAR file contains a subset of the information required to deploy a WebTop application in WebSphere Application server: the application root URI, security on the URL handled by the application, persistency details, path to the ENOVIA installation directory.
WebTop: WebTop applications are applications which are targeted to be used from a web browser, like Microsoft Internet Explorer or Mozilla. WebTop applications can be deployed on WAS or as Microsoft ASP.NET. The WebTop applications involved here is the ENOVIA VPM Lifecycle Navigator.
Input Variable
Signification
Source
<was_home> location of the WebSphere Application Server WebSphere administrator <install_path> location of the code installation Unloading the Code <os> operating system of the machine on which you've installed the code Windows: intel_a
AIX: aix_a
SOLARIS: solaris_a
HP/UX: hpux_b<environment_name> the chosen environment filename Unloading the Code <environment_dir> the path to the directory of the environment filename Unloading the Code <db2_jdbc_driver_path> path of the directory containing DB2 Universal JDBC driver files Creating a DB2 Database for Settings Persistency <oracle_jdbc_driver_path> path of the directory containing ORACLE JDBC driver files Creating an ORACLE Database for Settings Persistency <database_name> name of the database for settings persistency If DB2:
Creating a DB2 Database for Settings Persistency
If ORACLE:
Creating an ORACLE Database for Settings Persistency<database_hostname> name of the machine hosting the database If DB2:
Creating a DB2 Database for Settings Persistency
If ORACLE:
Creating an ORACLE Database for Settings Persistency<database_port> port number used by the database instance If DB2:
Creating a DB2 Database for Settings Persistency
If ORACLE:
Creating an ORACLE Database for Settings Persistency<server_name> machine name of the WebSphere Application Server WebSphere administrator <rootURI> name that appears in the URL your users will use to connect to the web application WebSphere administrator DB2 <db2admin_username> user name of the DB2 administrator account DB2 administrator <db2admin_password> password of the DB2 administrator account DB2 administrator ORACLE <settings_username> name of database user corresponding to settings persistency Creating an ORACLE Database for Settings Persistency <settings_password> password of database user corresponding to settings persistency Creating an ORACLE Database for Settings Persistency
Output Variable
Signification
Where Used
<ear_file> absolute path to the Enterprise Archive file Installing the Enterprise Archive file in a WebSphere Application Server
-
Launch the WASSetupUI command as follows:
On Windows
In a command prompt window, change directory to
<install_path>\intel_a\code\bin
in the ENOVIA installation and launch the WASSetupUI command by typing:
WASSetupUI.exeWarning: if the environment directory contains more that one environment file, you must launch the WASSetupUI command this way:
cd <install_path>/<os>/code/bin

       catstart.exe -env <environment_name> -dir <environment_dir> -run
       WASSetupUI
where<environment_name>is the name of the environment file and<environment_dir>is the path to the environment file.On UNIX
Launch the WASSetupUI command:
cd <install_path>/<os>/code/command

       ./catstart -env <environment_name> -dir <environment_dir> -run WASSetupUI
where
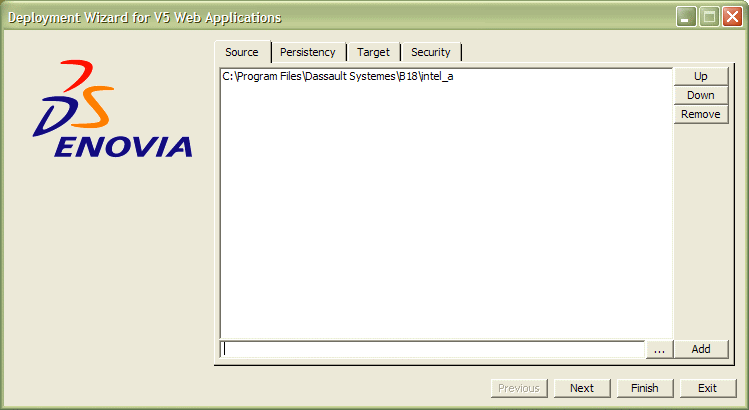
<environment_name>is the name of the environment file and<environment_dir>is the path to the environment file.The WASSetupUI interface will appear. You will now be on the Source tab:
Normally, the WASSetupUI command will automatically find and display the location of the runtime view of the installed code.
-
If not, enter the location of the runtime view of your installed code.
<install_path>/<os> (UNIX)

       <install_path>\<os> (Windows)
In our example, this is:
C:\Program Files\Dassault Systemes\B18\intel_a
-
Click the Next button.
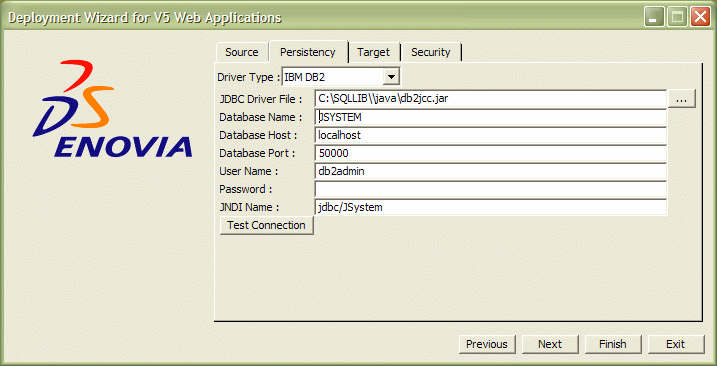
You will now be on the Persistency tab.
The default is for IBM DB2:
-
Click the Driver Type selection button and choose the Driver Type of your persistency database from the proposed list. You must choose either IBM DB2 or ORACLE.
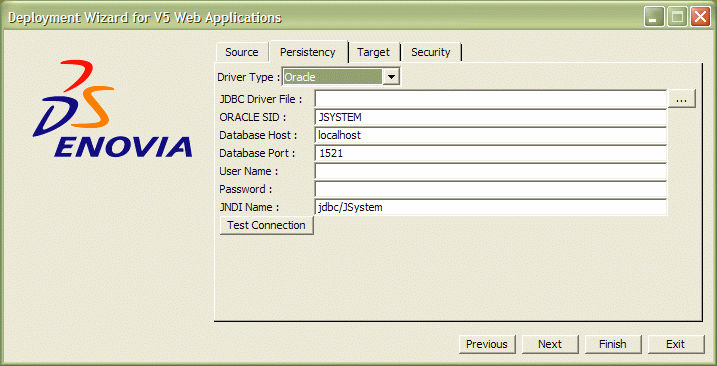
The Oracle tab looks like this:
-
In the JDBC Driver File text-entry field, depending on the database you previously created for settings persistency:
DB2: enter the path of the db2jcc.jar file which is part of the DB2 Universal JDBC Driver:
<db2_jdbc_driver_path>\db2jcc.jar (Windows)

       <db2_jdbc_driver_path>/db2jcc.jar (UNIX)
ORACLE: enter the path of the ORACLE JDBC driver:
<oracle_jdbc_driver_path>/ojdbc14.jar  (Windows)

       <oracle_jdbc_driver_path>\ojdbc14.jar  (UNIX)
-
In the Database Name (DB2) or ORACLE SID (Oracle) text-entry field, enter the database name chosen for settings persistency, <database_name>
-
In the Database Host text-entry field, enter the name of the machine hosting the database, <database_hostname>.
The default is localhost: you can use the default if the database is on the same machine. -
In the Database Port text-entry field, enter the port number used by the database instance, <database_port>.
-
In the User Name text-entry field, depending on the database chosen for settings persistency:
DB2: Enter the name of the database administrator, <db2admin_username>.
ORACLE: Enter the name of the ORACLE user created for settings persistency, <settings_username>. -
In the Password text-entry field, depending on the database chosen for settings persistency:
DB2: Enter the password of the database administrator, <db2admin_password>
ORACLE: Enter the password of the ORACLE user created for settings persistency, <settings_password>. -
In the JNDI Name field, set the JNDI name for the JSystem data source, for example:
jdbc/JSystem -
Click the Test Connection button to test the connection with the database.
A test connection to the persistency database will be performed. An additional Output tab is added displaying test connection execution output. If successful, a popup appears displaying the message:
Successful Database Connection
If so, click OK to continue.
-
Click the Next button.
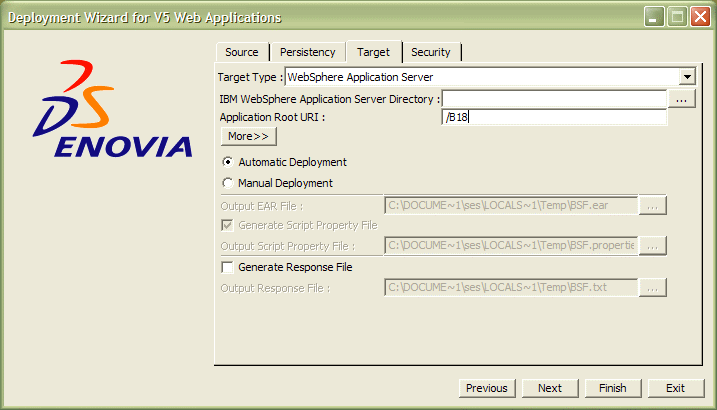
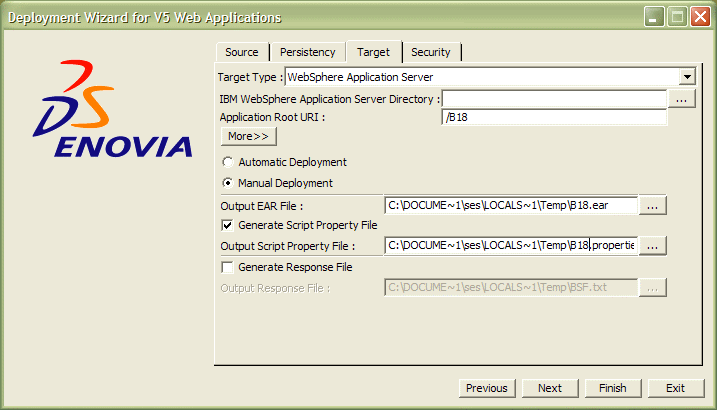
You will now be on the Target tab:
-
Select a Target Type.
The target type is the web application server in which you are deploying the web application. There is only one type: WebSphere Application Server. -
For the WebSphere Application Server target, specify the IBM WebSphere Application Server Directory:
<was_home>/AppServer (UNIX)

       <was_home>\AppServer (Windows)
Normally, the WASSetupUI command will find it automatically.
On UNIX: The IBM WebSphere Application Server Directory should be set to the location of your WebSphere installation. -
In the Application Root URI text-entry field, enter application root, <rootURI>.
You can enter only alphanumeric characters and supported special characters, but no blanks.
The rootURI of a WebTop application is part of the URL typed in the address bar of a web browser in order to access that application. Specifically, the general URL syntax to access a WebTop application is:
http://<server name>:<port>/<rootURI>/
where:
<server name>is the name of the machine running WAS
<port>is the port number on which WAS is listening to run web applications
<rootURI>is the application Root URI. A valid root URI is made of an alphanumerical string
For example:
http://loug3dsy.dsy.ds:9043/ENOVIA_B18
Note: It is very important for compatibility issues with future releases to choose a name that is based on the release number and not based only on a product name. -
Choose either Automatic Deployment or Manual Deployment.
The default is set to Automatic Deployment.
Automatic Deployment
This is by far the simplest solution for simple, rapid deployment of your web application in a single application server. This performs several operations that you had to perform manually in previous releases using the WAS administration console. Deployment is simplified by scripting, reducing the many interactions in WAS Admin Console to running a command.
Warning: If automatic deployment mode is chosen, the WASSetupUI command runs the WebSphere command wsadmin which in turn tries to write its logs in subdirectories in:
<was_home>/logsConsequently, the following steps must be performed using a user who has the right to read and write files in the subdirectories of this WAS directory. For example, on UNIX, use the same user as the one used to install WebSphere Application Server.
To deploy automatically, simply click the Finish button. job execution is traced in the Output tab. When you see the popup:
Successful Execution. Quit?it means that the EAR file has been successfully generated. Click Yes to quit.
Warning: deploying an ENOVIA web application removes any previously deployed ENOVIA web application.
WAS Admin Console is the name for the Administration application of WAS. The WAS Admin Console is run in a web browser. It allows you to deploy, monitor, and perform error tracking and tuning tasks for the web applications run by WAS.
The operations performed by automatic deployment are:
- creation of data sources
- set up of WebSphere server variables
- installation of the EAR in WAS.
Note: performing automatic deployment removes all ENOVIA applications and all previously created data sources, even those created on other WAS servers on the same machine resulting from the same WAS installation.
Once the web application has been deployed, you must restart WAS and run a first test of the web applications:
- SSO
- ENOVIA VPM Lifecycle Navigator.
Limitation: operations related to HTTP server configuration must also be done manually.
Manual Deployment
If you check the Manual Deployment option, the dialog box looks like this:
If you click the Finish button now, deployment will have to be performed exactly as in the previous release, involving all the manual steps inside the WebSphere environment.
The Output EAR File option specifies where the resulting EAR file is located. You will then have to install it in WebSphere exactly as before. In the Output EAR File text-entry field, enter the desired output location of the generated EAR file, <ear_file>. (Note that you must add the ".ear" extension, it will not be added automatically.). You can also click the "..." button to browse and specify the EAR file name and location.
However, if the Generate JACL Property File option is checked, a JACL Deployment script will be generated in the location specified by the Output JACL Property File field.
JACL is the short name for JAva Command Language. JACL is a script language, supported by WAS for scripted installation and administration tasks. With an appropriate JACL script, deployment tasks for WebTop applications can amount to running the wsadmin command, instead of manually performing several interactive steps using the WAS Admin Console. For experienced WebSphere administrators, this file can be customized to perform, for example, deployment on multiple machines.
In the case of deployment to WAS, the JACL script will configure the WAS server called server1.
If a JACL script was generated, you must use the wsadmin command, located in:
<WebSphere application server install dir>\bin (Windows)

       <WebSphere application server install dir>/bin (UNIX)
in order to run the JACL script.
If this option is not checked, the JACL file generation option will be inaccessible and grayed out.
Instructions for Manual Deployment
If the manual deployment option is chosen instead of automatic deployment, there are two cases:
- either all WebSphere configuration steps for deployment will be
performed using WebSphere Admin Console or wsadmin
- or you selected
Generate JACL Property Filewith a target path for this property file.
Fully Manual Deployment
In this case, after running the WASSetupUI command, you must perform the following configuration on WAS (either through the WebSphere Admin Console or using wsadmin commands):
1. Declare a DB2 or ORACLE (database brand must be consistent with the one chosen in WASSetupUI) Data Source, with the following constraints:
- The JDNI name of the data source *must* precisely be this one (mind the capitalization):
jdbc/JSystem- If DB2 is used, the Data source must rely on the DB2 Universal Database Driver (db2jcc.jar) in Type 4 mode
- If ORACLE is used, the Database must rely on the ORACLE JDBC Driver part of standard JDBC drivers choices in WebSphere Admin Console (which depend on the precise WAS version).
2. You must choose a server (in WebSphere terminology: a server means a JVM -Java Virtual Machine) and setup the following for this server.
The following environment variables are set for the chosen server:
Windows
Variable name Variable value Comment PATH <install path>/intel_a/code/bin Required for native code used by ENOVIA WebTop applications
AIX
Variable name Variable value Comment DISPLAY A valid X11 display Required because ENOVIA WebTop application draw images and font server-side LIBPATH <install path>/aix_a/code/bin Required for native code used by ENOVIA WebTop applications
HP-UX
Variable name Variable value Comment DISPLAY A valid X11 display Required because ENOVIA WebTop application draw images and font server-side SHLIB_PATH <install path>/hpux_b/code/bin Required for native code used by ENOVIA WebTop applications LD_PRELOAD /usr/lib/libF90.1 Required for native code used by ENOVIA WebTop applications
Solaris
You can now run Version 5 Webtop applications on SUN Microsystems machines with a SPARC processor and running Solaris 8 upwards.
Variable name Variable value Comment LD_LIBRARY_PATH <install path>/solaris_a/code/bin Required for native code used by ENOVIA WebTop applications
3. The EAR file generated by WASSetupUI must be installed on the chosen server, without modification on the Role mapping.
4. WAS must be restarted after all these changes to run the web applications.
Manual Deployment based on the JACL property file generated by WASSetupUI
The last deployment option, which is to select Manual deployment and Generate JACL property file is meant for advanced users who master the JACL scripting language in WAS. Using the JACL scripts which are part of ENOVIA runtime and the generate JACL property file, advanced users can customize the deployment to their specific needs.
For example, if the machine on which the WASSetupUI command is run is not the same as the targeted machine for WAS, advanced users can copy the JACL and property files and run the deployment on the WAS machine using the wsadmin command. The best way to take advantage of this is to run the WASSetupUI command in automatic mode at least once, and see how the wsadmin commands are launched in the log text area (this can be copy-pasted to a text editor for later inspection). On the remote machine, some paths will probably need to be modified in order to successfully run wsadmin with real file locations, as well as some properties in the JACL file (call, node and server name must match the targeted WAS real names).
Another usage pattern is to copy the JACL files and edit them in order to implement some specific deployment topology not externalized in the JACL property file.
Using the More Button
Click the More button to display the following information:
![]()
In automatic mode, the software assumes that the name of the WAS profile is the default profile (the profile field is grayed out because WAS was not installed on the machine on which the screen shot was made), the WAS cell and WAS node are the same as the name of the machine hosting the WAS, and that the server name is server1. You set the profile, cell, node and server names when installing WAS. If the default names are not correct, reset the correct names using the combo box showing relevant choices (in automatic mode), before clicking the Finish button.
On UNIX, hitting the "More" button lets you choose the X11 display setting (machine:1.0 for example) which is interesting when deploying on a machine without X11 (for example, big servers) or to use the Virtual Frame Buffer:

Note that the WAS profile is the default profile: it is displayed because WAS was installed on the UNIX machine on which the screen shot was made.
Generate response file
The Generate response file option generates the response file corresponding to all options selected in an interactive WASSetupUI session until the Finish button is clicked. The response file can be used by people in charge of web application deployment as a template for silent mode (i.e., non interactive) deployment.
Executing the Command
Once you have made your choice, click the Finish button now. The Output tab is then displayed containing the execution results.
If you selected the Automatic Deployment option, the application will be deployed automatically in the WebSphere Application Server. To start the application, refer to Launching the Web Application.
WASSetupUI Command Options
There are several options for the WASSetupUI command
-i: indicates path of a file containing strings to initialize fields for the user interface-o: log file of the utility (all data written to the Output tab of WASSetupUI are also written in the log file as well as the text displayed for information/error messages-generateInput: indicates the file where all user interface fields are dumped. This file can be used as input (-ioption) for later WASSetupUI execution-silent: indicates the "silent" mode of the utility, which means that the user interface is not displayed and the Finish button is automatically selected. This option should of course be used with the-ooption to obtain a trace of utility execution.
Using the Security Tab
The Security tab is designed to secure your WebSphere Application Server by allowing you to enter the information you usually enter using the WebSphere Administrative console. This means that your WebSphere Application Server can be secured and your Enterprise Archive file can be deployed at the same time.
For full details about how to do so, refer to Securing the WebSphere Application Server.
![]()