Before Creating Credential Sets
Before discussing the SSOAdminConsole application, note that applications frequently need to access external systems and authenticate their users on these systems. The data allowing the connection are called credentials. A credential set contains a certain number of fields, varying from one application to another, in which the administrator enters data.
Before creating credential sets, you need to understand certain concepts and prepare your environment by creating certain data which you will later be required to input when creating the credential set for each application.
The number of fields in a credential set varies on the external application you want to authenticate to, and certain fields are more sensitive than others. The applications to which your end users want to connect are visible when creating credential sets:
- ENOVIA V5 VPM (ENOVIA VPM Product Editor, ENOVIA VPM Lifecycle Navigator and ENOVIA V5 VPM for VPM Navigator)
- Classic 3d com (for 3d com Classic)
- ENOVIA vpm (for ENOVIAVPM)
- Remote File and Declarative File
Note that certain credential set data for certain applications (for example, ENOVIA V5 VPM) are particularly important and require attention before creating the credential set. These are:
- SSO Username
- P&O Username
- User who starts the ENOVIA V5 VPM Server
- Password of the user who starts the ENOVIA V5 VPM Server
SSO Username
The SSO username is the LDAP username (if you implemented LDAP authentication). You must create an LDAP user for each end user requiring access to your applications in SSO mode. The section Configuring and Customizing the LDAP Repository explains how to do so.
Each SSO username can then be referenced in one or more several credentials sets: one credential set is require per user and per application to which that user requires access. For example, you must create one credential set for a user for accessing ENOVIA V5 VPM, and another credential set for the same user for accessing Remote File.
P&O Username
The P&O username is particularly important for the
ENOVIA V5 VPM application. It is not sufficient for an
ENOVIA V5 VPM user to be declared in
the LDAP repository. Each end user also has to be declared beforehand in
the People and
Organization (P&O) database on the ENOVIA server. You enter the P&O
username when creating the credentials set.
In a properly defined working deployment, you typically want the P&O username to be the creator of ENOVIA V5 VPM objects, and you also want the P&O username to match the SSO username declared in your user registry (LDAP directory, ...) to avoid confusion.
Managing P&O users and the P&O database is described in your Enterprise Architecture Administration Guide.
User who starts the ENOVIA V5 VPM Server (and password)
To be able to start ENOVIA applications, an orbix daemon needs to be started. If it is not already started, you need to restart it. Once running, the process name is orbixd, and the owner of the process is typically root on UNIX and must be an administrator userid on Windows.
When you then start an application, for example ENOVIA VPM Lifecycle Navigator, the server manager process is first started. The process name is GW0SRVMG, and the process owner is the owner of the orbix process.
The server manager process then creates other processes, depending on the application launched. For example, for ENOVIA VPM Lifecycle Navigator, the name of the process is VDO0OrbServer. The owner of this process is an OS user defined in the credential set field User who starts the Server.
So you must first create at least one operating system (OS) userid with the following characteristics:
- it must be accessible from the server machine
- the $HOME directory (UNIX) and the USER_HOME directory (Windows) must be accessible in read/write mode.
This OS userid:
- is used to start the Server process
- must have the appropriate rights to start this process
- and does not necessarily have to be the same userid as is declared in your user repository (LDAP, ...).
You only need one OS userid on each OS running the ENOVIA V5 VPM server. This means that you can reference in the credential sets for a large number of users the same OS userid: this will avoid you having to create a separate OS userid for each user on each platform.
Note: the OS userid does NOT have to be declared in the P&O database.
Warning
If you decide to run in SSO mode and SSO is not fully activated, the creator of ENOVIA V5 VPM objects will be the OS user who started the server manager process and NOT the P&O user: this is not desired since you will lose visibility regarding the identity of the creator of objects in the ENOVIA V5 VPM database.
What is meant by full activation of SSO mode is explained in Activating Single Sign-On.
Creating Credential Sets
An administrator is responsible for creating users and their associated credential sets using the SSOAdminConsole application. This is typically the default wpsadmin user created when you set up your LDAP directory.
The following scenario explains how to start the SSOAdminConsole application.
Note: If you are deploying
ENOVIA VPM Lifecycle Navigator, you
can perform the same credential set management tasks in the Webtop
application user interface, using the Administration and Preferences
icon ![]() at
the upper-right corner. The Administration page appears. Expand
the Administration node: Administration -> General -> SSO and
click SSO.
at
the upper-right corner. The Administration page appears. Expand
the Administration node: Administration -> General -> SSO and
click SSO.
- Open a web browser and type the following URL:
http:<host_name>.<domain>:<webapp_port>/<rootURI>/html/SSOAdminConsoleFor example:
http://loug3dsy.dsy.ds:9080/B18/html/SSOAdminConsoleto display the ENOVIA V5 logon dialog box:
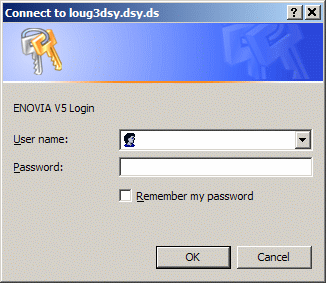
- Log on using the secured SSO Administrator username and
password that you created in your LDAP directory.
You will also reference this SSO Administrator username later when configuring the Web Application Server in the task Activating Single Sign-On.
In our example, this is:
wpsadmin
wpsadmin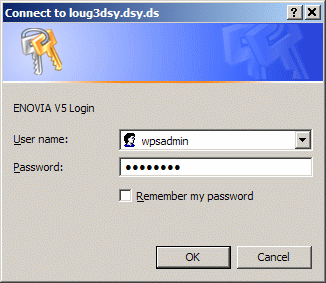
then click OK.
The Single Sign On - Administrative Console is displayed:
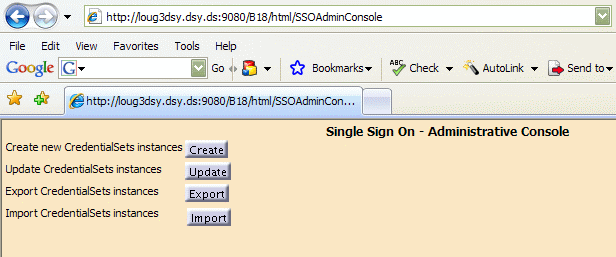
You can now start creating credential set instances for SSO users.
- Click the Create Credential Sets Instances button.
The Create Instance page appears:

- In the SSO User text-entry field, enter the
name of a user that exists in the LDAP directory.
In our scenario, this is the user ses that we set up in our LDAP directory.
- Click the Application Name button and select
the Application Name from the list:
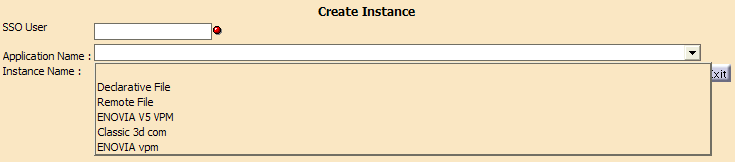
The applications are:
- ENOVIA V5 VPM (ENOVIA VPM Product Editor, ENOVIA VPM Lifecycle Navigator and ENOVIA VPM V5 for VPM Navigator)
- Classic 3d com (for 3d com Classic)
- ENOVIA vpm (for ENOVIAVPM)
- Declarative File and Remote File
- Provide an instance name.
This is the name of the credential set. Click the set as default instance button if you want this to be the default credential set instance for the user in question.
Fill in the fields for the selected application.
Note: pay particular attention to the fact that filling in certain fields is not only mandatory but also requires valid entries. Failure to comply will prevent you from being able to connect to the required application.
If you are deploying the ENOVIA VPM Product Editor, ENOVIA VPM Lifecycle Navigator or VPM Navigator
Select
ENOVIA V5 VPM: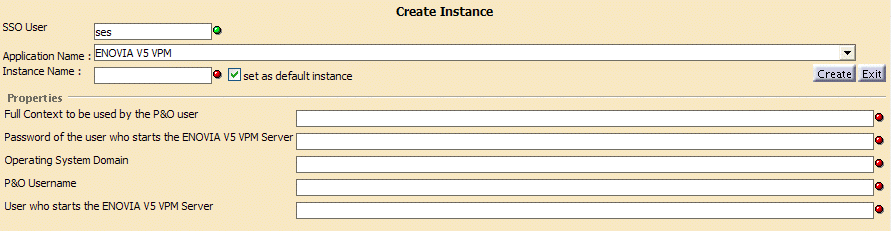
Warning: if you are deploying an ENOVIA VPM Product Editor, you also need to configure a credential set for the Classic 3d com application in order for the settings server to function correctly. The ENOVIA V5 VPM credential is used to launch the ENOVIA V5 VPM server process. But the 3d com credential remains necessary to launch the settings server (
GW0SRVSTprocess).
And the settings server is needed in both ENOVIA V5 VPM and 3dcom products.If not, when attempting to log on, the following message will be displayed:
The user is not authorized to start portal application serversThe result looks something like this for ENOVIA V5 VPM:
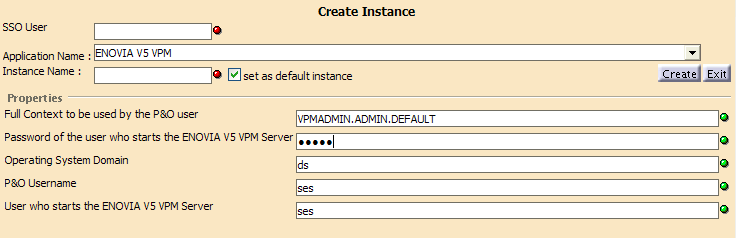
ENOVIA V5 VPM Description Full Context to be used by the P&O user
P&O context (the default context is VPMADMIN.ADMIN.DEFAULT) Password of the user who starts the ENOVIA V5 VPMServer Password of the operating system username used to start the ENOVIA V5 VPM Server. Operating System Domain System domain name or blank character (it is mandatory that this field has at least one character) P&O Username This is the name of the person in the People and Organization (P&O) database. This person is the owner of objects created in the P&O database.
We recommend that the P&O username matches the name for the user declared in the LDAP repository (SSO Username) to avoid confusion.User who starts the ENOVIA V5 VPM Server Operating system username used to start the ENOVIA V5 VPM Server. If you are deploying Classic 3d com
You must configure credential set instance for each application you will be accessing from the Classic 3d com , so select
Classic 3d com.Warning: if you are deploying an ENOVIA VPM Product Editor, you also need to configure a credential set for the Classic 3d com application in order for the settings server to function correctly.

Field description:
Classic 3d com Description P&O Username This is the name of the person in the People and Organization (P&O) database. This person is the owner of objects created in the P&O database.
We recommend that the P&O username matches the name for the user declared in the LDAP repository (SSO Username) to avoid confusion.Operating System Domain System domain name or blank character (it is mandatory that this field has at least one character) Password of the user who starts the classic 3d com Server Password which the user usually enters to start the appropriate application. User who starts the classic 3d com Server Username which the user usually enters to start the appropriate application. If you are deploying ENOVIA vpm
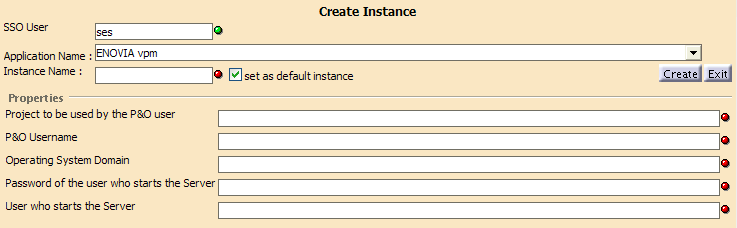
ENOVIA vpm Description Project to be used by the P&O user
P&O project to be used by the P&O user P&O Username This is the name of the person in the People and Organization (P&O) database. This person is the owner of objects created in the P&O database.
We recommend that the P&O username matches the name for the user declared in the LDAP repository (SSO Username) to avoid confusion.Operating System Domain System domain name or blank character (it is mandatory that this field has at least one character) Password of the user who starts the Server ENOVIAVPM user password User who starts the Server ENOVIAVPM user - Click the Create
The following message appears:
Credentials Created Successfully - Click the Close button then the Exit
button to return to the Single Sign On -
Administrative Console page.
If you want the same user to be able to use other applications, create another credential set for the same user, but this time select another application and enter the name the user enters usually to run that application.
Updating and Deleting Credentials
As SSO Administrator from the starting page, click the Update Credential Sets Instances button.The following dialog box appears:

To update credentials:
- Select the name of the SSO User whose credentials are to be updated.
- Select the application to which access is granted for the user.
- Select the instance name of the Credential Set to update.
- Update the credential values.
- Click on the Update button.
To delete credentials:
- Select the name of the SSO User whose credentials are to be deleted.
- Select the application to which access is granted for the user.
- Select the instance name of the Credential Set to delete.
- Click on the Delete instance button.
Importing Credentials
You can also import credentials from a previously created file with the
suffix .creddif.
A sample of this file, the Import2Users.creddif file is located in:
install_directory/$os/resources/sso/samples
<?xml version="1.0"?>

     <SSOCredentialList>

     <User name="LDAP_user1">

     <Application name="portal">

     <ApplicationInstance name="Classic 3d com instance" default="true">

     <Credential name="CredentialPropagated">yes</Credential>

     <Credential name="Password">os_password</Credential>

     <Credential name="Domain">os_domain</Credential>

     <Credential name="RealName">PO useranme</Credential>

     <Credential name="User">os_user</Credential>

     </ApplicationInstance>

     </Application>

     <Application name="enovia">

     <ApplicationInstance name="ENOVIA V5 VPM instance" default="true">

     <Credential name="CredentialPropagated">yes</Credential>

     <Credential name="UserEnvironment">role for the PO user</Credential>

     <Credential name="Password">os_password</Credential>

     <Credential name="Domain">OS_Domain</Credential>

     <Credential name="RealName">PO username</Credential>

     <Credential name="UserProject">project</Credential>

     <Credential name="User">os_user</Credential>

     </ApplicationInstance>

     <ApplicationInstance name="my second
       ENOVIA V5 VPM instance">

     <Credential name="CredentialPropagated">yes</Credential>

     <Credential name="UserEnvironment">role for the PO user</Credential>

     <Credential name="RealName">PO username</Credential>

     <Credential name="Domain">OS_Domain</Credential>

     <Credential name="Password">os_password</Credential>

     <Credential name="UserProject">project</Credential>

     <Credential name="User">os_user</Credential>

     </ApplicationInstance>

     </Application>

     <Application name="vpm">

     <ApplicationInstance name="ENOVIAvpm instance" default="true">

     <Credential name="CredentialPropagated">yes</Credential>

     <Credential name="UserEnvironment">project</Credential>

     <Credential name="Password">os_password</Credential>

     <Credential name="Domain">OS_Domain</Credential>

     <Credential name="RealName">POUseranme</Credential>

     <Credential name="User">os_user</Credential>

     </ApplicationInstance>

     </Application>

     <Application name="PPRJNavRemoteFile">

     <ApplicationInstance name="remote file instance" default="true">

     <Credential name="ctx.username">user</Credential>

     <Credential name="ctx.password">password</Credential>

     </ApplicationInstance>

     </Application>

     <Application name="PPRJNavDeclarativeFile">

     <ApplicationInstance name="Declarative file instance" default="true">

     <Credential name="ctx.username">user</Credential>

     <Credential name="ctx.password">password</Credential>

     </ApplicationInstance>

     </Application>

     </User>

     <User name="LDAP_user2">

     <Application name="portal">

     <ApplicationInstance name="Classic 3d com instance" default="true">

     <Credential name="CredentialPropagated">yes</Credential>

     <Credential name="RealName">PO useranme</Credential>

     <Credential name="Domain">os_domain</Credential>

     <Credential name="Password">os_password</Credential>

     <Credential name="User">os_user</Credential>

     </ApplicationInstance>

     </Application>

     <Application name="enovia">

     <ApplicationInstance name="ENOVIA V5 VPM instance" default="true">

     <Credential name="CredentialPropagated">yes</Credential>

     <Credential name="UserEnvironment">role for the PO user</Credential>

     <Credential name="RealName">PO username</Credential>

     <Credential name="Domain">OS_Domain</Credential>

     <Credential name="Password">os_password</Credential>

     <Credential name="UserProject">project</Credential>

     <Credential name="User">os_user</Credential>

     </ApplicationInstance>

     </Application>

     <Application name="vpm">

     <ApplicationInstance name="ENOVIAvpm instance" default="true">

     <Credential name="CredentialPropagated">yes</Credential>

     <Credential name="UserEnvironment">project</Credential>

     <Credential name="RealName">POUseranme</Credential>

     <Credential name="Domain">OS_Domain</Credential>

     <Credential name="Password">os_password</Credential>

     <Credential name="User">os_user</Credential>

     </ApplicationInstance>

     </Application>

     <Application name="PPRJNavRemoteFile">

     <ApplicationInstance name="remote file instance" default="true">

     <Credential name="ctx.username">user</Credential>

     <Credential name="ctx.password">password</Credential>

     </ApplicationInstance>

     </Application>

     <Application name="PPRJNavDeclarativeFile">

     <ApplicationInstance name="Declarative file instance" default="true">

     <Credential name="ctx.username">user</Credential>

     <Credential name="ctx.password">password</Credential>

     </ApplicationInstance>

     </Application>

     </User>

     </SSOCredentialList>
To import a credential file:
- As SSO Administrator from the starting page, click the
Import Credential Sets Instances button.
The following dialog box appears:
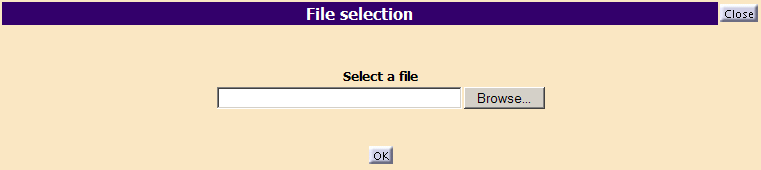
- Click the Browse button, select a
file with the suffix
.creddifand click OK.
Exporting Credentials
- As SSO Administrator from the starting page, click the
Export Credential Sets Instances button.
The following dialog box appears:

- Select in the list the user(s) whose credentials are to be exported.
- Click on the Export button.
Then, a pop-up appears prompting you to save the exported file. The default file name is:
ExportedCredentials.creddif.xmlFor example, if the credentials generated in our scenario for the ENOVIA V5 VPM application were like this:
exporting the credentials in our scenario produces the following file:
<?xml version="1.0"?>
<SSOCredentialList>
<User name="ses">
<Application name="enovia">
<ApplicationInstance name="ENOVIA V5 VPM Credentials" default="true">
<Credential name="CredentialPropagated">yes</Credential>
<Credential name="UserEnvironment">VPMADMIN.ADMIN.DEFAULT</Credential>
<Credential name="Password">Toto1=</Credential>
<Credential name="Domain">ds</Credential>
<Credential name="RealName">ses</Credential>
<Credential name="UserProject">DefaultProject</Credential>
<Credential name="User">ses</Credential>
</ApplicationInstance>
</Application>
</User>
</SSOCredentialList>
Note that the
CredentialPropagatedandUserProjectparameters are not accessible via the SSOAdminConsole application but are mandatory and have preset default values.Warning: It is highly recommended that no one else can access this file since all passwords are not encrypted.
Deactivating Single Sign-On Credential Sets for the Default Repository
If you are using the default SSO Repository, delete the following file located in the installation path of the web application deployed in the application server:$install_path/$os/resources/credentials/SSOServer.credentials
WARNING: We do not recommend that you use the default SSO Repository. To create your own SSO Repository, see Implementing your Own SSO Repository. However, if you do use your own SSO Repository, you must manage its deactivation yourself.
Implementing Your Own SSO Repository
When creating credentials, the default implementation of the SSO server uses a storage mechanism whereby credentials are stored in an XML file repository (a single XML file) in the installation path of the web application deployed in the application server.
However, the default implementation is not designed to support concurrent access from the SSO server and it does not support encryption.
Therefore, we strongly recommend that you implement your own SSO Repository as follows:
For the information necessary to implement the interface, please refer to the CAA RADE documentation.
- edit the file:
$install_path/$os/resources/sso/SSOServer.properties - set the value of the SSORepositoryClassname property to the
classname of the implementation you created above, for example:
SSORepositoryClassname=com.dassault_systemes.plmsecssoserver.plmsecssosrvimpl.SSORepository
![]()