Depending on the type of application you are deploying, the steps to be performed are different.
There are two groups of applications:
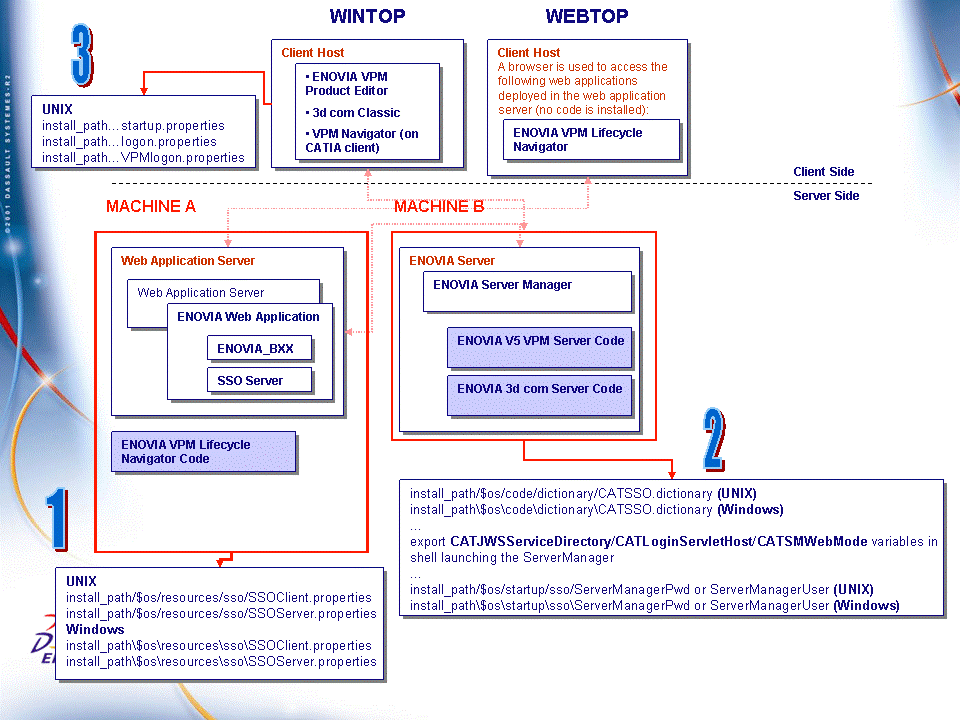
- Webtop application: ENOVIA VPM Lifecycle Navigator
- Wintop applications: the ENOVIA VPM Product Editor (the ENOVIA VPC product), 3d com Classic and the VPM Navigator client.
The following table sums up the relevant SSO activation tasks, depending on whether you are deploying SSO for Webtop or Wintop applications:
| Task | Wintop | Webtop |
| Activate SSO in the install path deployed in the Web Application Server | Yes | Yes |
| Activate SSO on the ENOVIA server side | Yes | Yes |
| Activate SSO on the ENOVIA client side | Yes | No |
Warning: Wintop and Webtop applications (for example, ENOVIA VPM Lifecycle Navigator and the ENOVIA VPM Product Editor, the VPC product) cannot by default share access to the same ENOVIA server in SSO mode. For a detailed explanation of how to enable this function, refer to Enabling Wintop and Webtop Applications to Share the Same ENOVIA V5 Server.
Deployment Possibilities
The deployment diagrams in Deploying Wintop and Webtop Applications identify the software components involved but do not specify on which machine they are located.
Important: we recommend that the V5 code installation path deployed in the WAS resides on the same machine as the WAS.
Test Configuration: All Code on the Same Machine
It is quite possible, for example in the case of Webtop applications, to install all the ENOVIA server code (including for example Webtop applications) on the same machine as the WAS, in which case there is only one V5 installation path, like this:
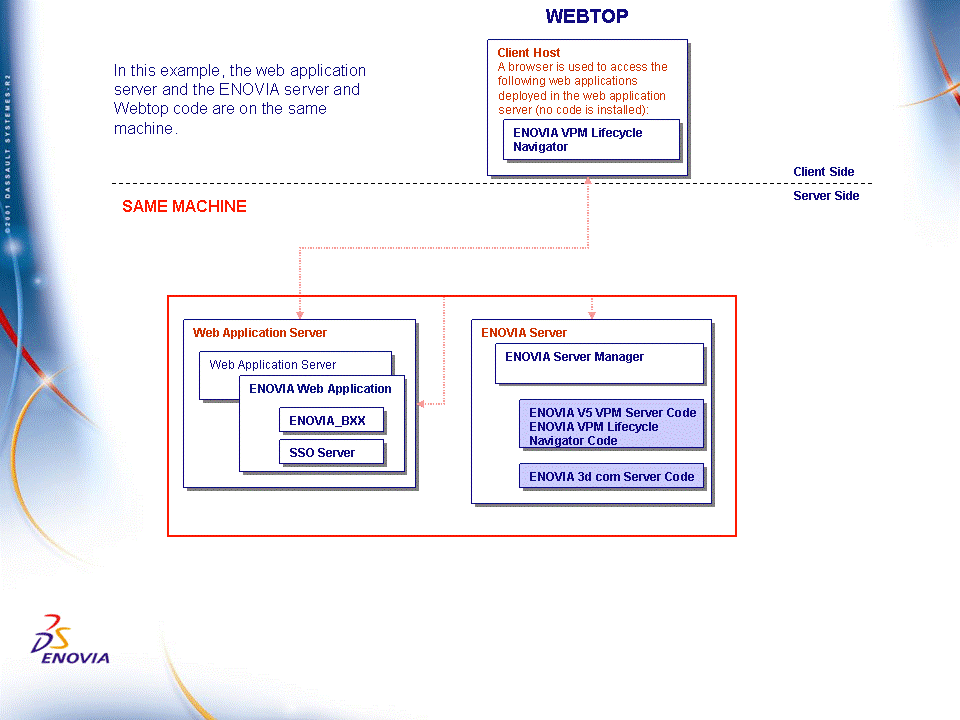
The only use for this type of deployment is, for example, to test the software before deciding to deploy it on different machines.
Please note, however, that this is not a recommended deployment scenario.
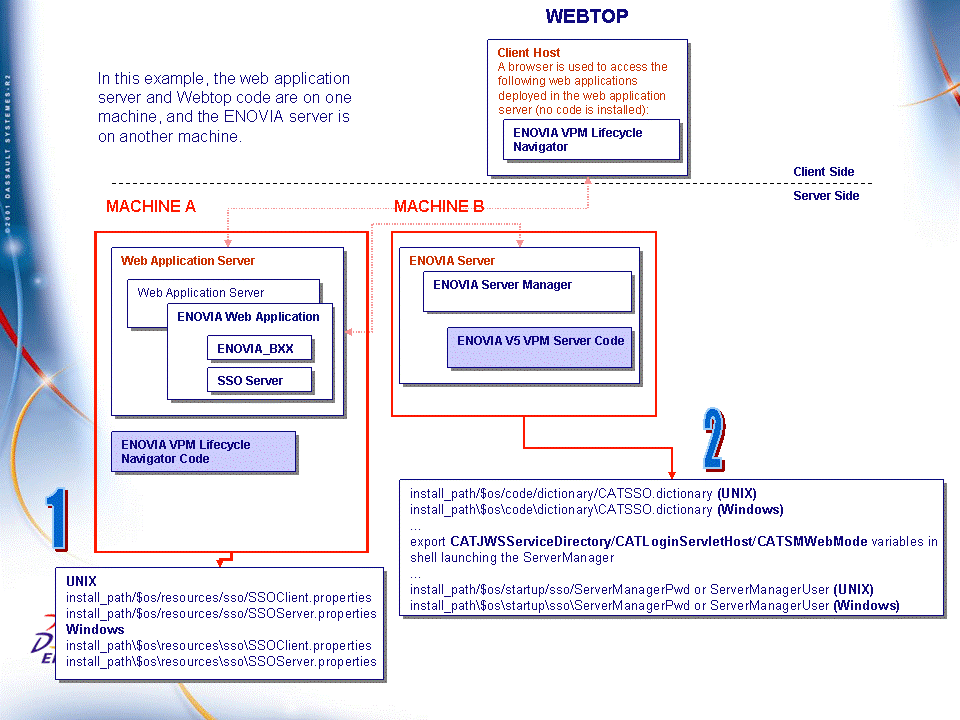
Recommended Industrial Production Scenario: Server Code On One Machine, and WAS and V5 Code on Another Machine
We recommend that you deploy ENOVIA V5 VPM server code on one machine, and deploy the V5 code in the WAS together on a different machine. In this illustration, we illustrate how to deploy Webtop applications in the WAS on the same machine:
Keep in mind that with this kind of setup, you have two different installation paths. You need to understand fully in which install path you need to perform the different activation steps.

Activating SSO in the Installation Path Deployed in the Web Application Server (Wintop or Webtop)
To activate SSO for either Webtop or Wintop applications, the following steps are required to activate the SSO component in the Web Application Server, and must be performed in the installation path for the V5 application deployed in the Web Application Server.
When you have the WAS and V5 code on one machine, and the ENOVIA V5 VPM server on another, you must edit two files in the installation path of the V5 code deployed on the same machine as the WAS.
Activating SSO in the Install Path Deployed in the WAS
- Go to the directory:
install_path/$os/resources/sso (UNIX)

       install_path\$os\resources\sso (Windows)
then edit the file:
SSOServer.propertiesand check that the SSO Administrator username has been correctly defined. It contains the following lines:
SSORepositoryClassname=com.dassault_systemes.plmsecssoserver.plmsecssosrvimpl.SSORepository#You should change wpsadmin to the right Single Sign On administrator name
SSOAdministrator=wpsadminThe SSO Administrator username is set by default to: wpsadmin. As mentioned in Configuring and Customizing the LDAP Repository, this is a recommended user, but you can replace it with another user. If so, set it to the correct name.
Note: theSSORepositoryClassnamereferenced in R16 is the same as in R18. - Edit the file:
install_path/$os/resources/sso/SSOClient.properties
       (UNIX)

       install_path\$os\resources\sso\SSOClient.properties (Windows)
and set the following properties to "yes" (the default is "no"):
SSOActivated=yes

       SSOSecuredEnvironment=yes
The role of the property
SSOActivatedis to activate the SSO mode.The role of the property
SSOSecuredEnvironmentis to specify that you have secured the application server hosting the SSO Server.
The result is now this:

Activating SSO on the ENOVIA Server (Wintop or Webtop) and ENOVIA Client Side (Wintop only)
You also have to:
- activate SSO on the ENOVIA server side (both Wintop and Webtop)
- activate SSO on the Wintop client (whenever a Wintop client is necessary).
in addition to the steps you already performed in Activating SSO in the Web Application Server for Webtop and Wintop Applications.
Activating SSO on the ENOVIA Server
The following operations are required to activate the SSO component for the ENOVIA server and must be performed in the V5 installation path of the ENOVIA server:
- Copy the CATSSO.dic dictionary file from:
install_path/$os/startup/sso
       (UNIX)

       install_path\$os\startup\sso (Windows)
to:
install_path/$os/code/dictionary (UNIX)

install_path\$os\code\dictionary (Windows) - Define the following variables in the shell launching the server
manager, after the comments and before the line defining the
operating system, #OS, and make sure they are included before the command
starting the server manager.
The variables are:
- CATJWSServiceDirectory
- CATLoginServletHost
- CATSMWebMode.
UNIX
On UNIX, edit the file:
install_path/$os/code/command/runServerManagerand export them like this:
export CATJWSServiceDirectory=http://host.domain:port/RootURI


       export CATLoginServletHost=<wasservername>

       export CATSMWebMode=true (only when deploying Webtop applications)
Example for deploying Wintop applications:
export CATJWSServiceDirectory=http://loug3dsy.dsy.ds:9080/B18

       export CATLoginServletHost=loug3dsy.dsy.ds
Example for deploying Webtop applications:
export CATJWSServiceDirectory=http://loug3dsy.dsy.ds:9080/B18

       export CATLoginServletHost=loug3dsy.dsy.ds

       export CATSMWebMode=true
Windows
On Windows, edit the file:
install_path\$os\code\command\runOrbix.batand set them like this:
set CATJWSServiceDirectory=http://host.domain:port/RootURI

       set CATLoginServletHost=<wasservername>

       set CATSMWebMode=true (only when deploying Webtop applications)
Example for deploying Wintop applications:
set CATJWSServiceDirectory=http://loug3dsy.dsy.ds:9080/B18

       set CATLoginServletHost=loug3dsy.dsy.ds
Example for deploying Webtop applications:
set CATJWSServiceDirectory=http://loug3dsy.dsy.ds:9080/B18

       set CATLoginServletHost=loug3dsy.dsy.ds

       set CATSMWebMode=true
Then, on Windows, restart Orbix using the following command:
install_path\$os\code\bin\catstart -direnv envdirectory -env
       environment_file -run runOrbix.bat
where
envdirectoryis the name of the directory containing the environment andenvironment_fileis the name of your runtime environment file.Warning: After applying or rolling back a service pack, the running processes will be stopped at the beginning of the procedure, but re-started at the end, at least for the orbix daemon. After deploying SSO, the
runorbix.exewill be-relaunched whilerunorbix.batwas expected. So you should manually kill and restart your orbix daemon.For a detailed explanation of why exporting these three variables is necessary, refer to Importance of Exporting the CATJWSServiceDirectory, CATLoginServletHost and CATSMWebMode Variables for Webtop Applications.
- If you do NOT want to add a specific user
ServerManager in your corporate LDAP repository (and you did not
import this user earlier via an LDIF file), you have to specify an
existing user by creating a file named:
ServerManagerUserin:
install_path/$os/startup/sso (UNIX)

       install_path\$os\startup\sso (Windows)
and storing the LDAP username to be used instead of the user ServerManager.
And in the file:
ServerManagerPwdstore the password for the same LDAP username.
- If you DID import the specific user
ServerManager, you must store in the file named:
ServerManagerPwdin:
install_path/$os/startup/sso (UNIX)
install_path\$os\startup\sso (Windows)
the password of the user ServerManager (that you created earlier in the LDAP directory), then save and exit the file.
Due to security concerns, when filling in the file:
install_path/$os/startup/sso/ServerManagerPwd(UNIX)
install_path\$os\startup\sso\ServerManagerPwd(Windows)you should give read access rights only for the user who starts the Orbix process.
The result is now this:
Activating SSO on the Wintop Client
If you installed a Wintop client (for example, the ENOVIA VPM Product Editor), you must activate the SSO component by editing the following files in the V5 installation path of each client.
- Edit the file:
install_path/$os/docs/java/startup.properties
       (UNIX)

       install_path\$os\docs\java\startup.properties (Windows)
and add at the end of the line of the
applet.0.dsarproperty (do not insert a carriage return):PLBssoClientSide.jar
- Edit the file:
install_path/$os/docs/java/logon.properties
       (UNIX)

       install_path\$os\docs\java\logon.properties (Windows)
then uncomment and customize the file as follows:
###Example:
# Custom properties for single sign-on solution
###
#AuthenticationImpl=<full class name of the AuthenticationInterface implementation>
#CryptImpl=<full class name of the CryptInterface implementation>
#CATLoginServletHost=<host name the web server is running on>
#CATLoginServletPort=<port number the web server is listening to>
#CATLoginServletURI=<path to the login servlet the web server will follow>
###
       ###

       # Custom properties for single sign-on solution

       ###

       AuthenticationImpl=com.dassault_systemes.catweb.base.security.AuthenticationImpl

       CryptImpl=com.dassault_systemes.catweb.base.security.CryptBase64Impl

       CATLoginServletHost=loug3dsy.dsy.ds

       CATLoginServletPort=9080

       CATLoginServletURI=/B18/sso

###Warning: the path for the
CATLoginServletURIproperty must comprise the Application Root URI value you entered when generating the enterprise archive file (.ear), and the suffix /sso. For example:/B18/sso
- Edit the file:
install_path/$os/docs/java/VPMlogon.properties
       (UNIX)

       install_path\$os\docs\java\VPMlogon.properties (Windows)
which looks like this:
Nb_Languages=6

       Language.0=en

       Language.1=fr

       Language.2=de

       Language.3=ja

       Language.4=zh

Language.5=koroleModelClassname=com.dassault_systemes.vpm.security.catlet.model.CATVpmRoleModelthen add and customize the following declaration (as in the logon.properties file) as follows:
###

       # Custom properties for single sign-on solution

       ###

       AuthenticationImpl=com.dassault_systemes.catweb.base.security.AuthenticationImpl

       CryptImpl=com.dassault_systemes.catweb.base.security.CryptBase64Impl

       CATLoginServletHost=loug3dsy.dsy.ds

       CATLoginServletPort=9080

CATLoginServletURI=/B18/sso/
###Warning: the path for the
CATLoginServletURIproperty must comprise the Application Root URI value you entered when generating the enterprise archive file (.ear), and the suffix /sso/. For example:/B18/sso/
The result is now this:
Importance of Exporting the CATJWSServiceDirectory, CATLoginServletHost and CATSMWebMode Variables for Webtop Applications
If you are deploying SSO mode for Webtop applications, you can only
truly consider that the SSO mode has been successfully activated once you
have exported the CATJWSServiceDirectory,
CATLoginServletHost and CATSMWebMode variables on the
ENOVIA server side, that is, if you have performed the steps explained in
Activating SSO on the ENOVIA Server.
The temptation is to take shortcuts. It is actually possible to deploy the ENOVIA VPM Lifecycle Navigator, for example, in the WAS, activate SSO partially in the installation path deployed in the WAS (that is, by editing only the SSOServer.properties and SSOClient.properties files, but without exporting the three above-mentioned variables on the ENOVIA server side), and log onto an ENOVIA VPM Lifecycle Navigator session using an LDAP identity. This gives the impression that the SSO mode is fully activated. The fact that you can then create and save ENOVIA V5 lifecycle objects reinforces this impression that you are working in SSO mode, whereas in reality this is not the case.
THIS IS A PITFALL.
This pitfall occurs irrespective of whether the WAS, the Webtop code and the ENOVIA server are on the same machine, or the WAS and Webtop code are on one machine, and the ENOVIA server on another.
To illustrate this pitfall, and for the sake of simplicity, in the following scenarios the different software components are installed on the same machine.
Scenario 1
In this scenario:
- Server side activation has not been performed: SSO has been activated
by editing ONLY the
SSOServer.propertiesandSSOClient.propertiesfiles. - The LDAP user is SMQ.
- The P&O user is also SMQ.
- The generic OS user who starts the ENOVIA V5 VPM server manager is SES.
Here is the credential set:
You will be able to log on without realizing that the SSO mode has not been fully activated: the SSO token has not been propagated:
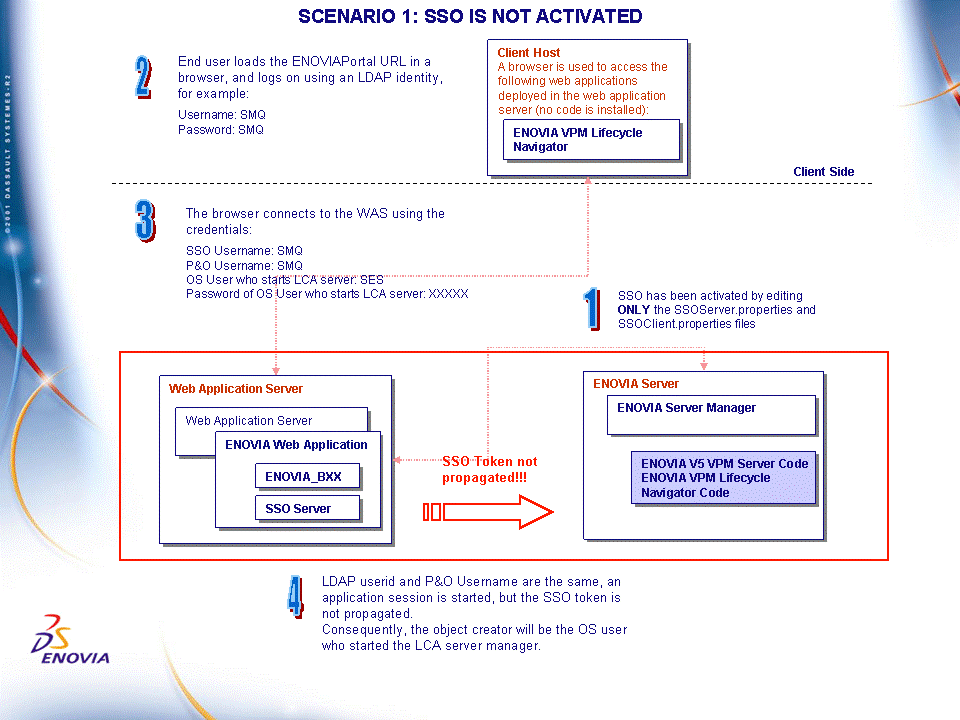
What does that mean? The SSO token is an internal mechanism which transfers the correct credentials to the application process. If the variables are not exported, the application process started by the server manager will be owned by the OS user who started the server manager process, and not the P&O user.
This is the process ownership hierarchy (using the process explorer tool on Windows):

demonstrating that the owner of the server manager process is SES.
This is the properties tab of an action created with the same credentials:
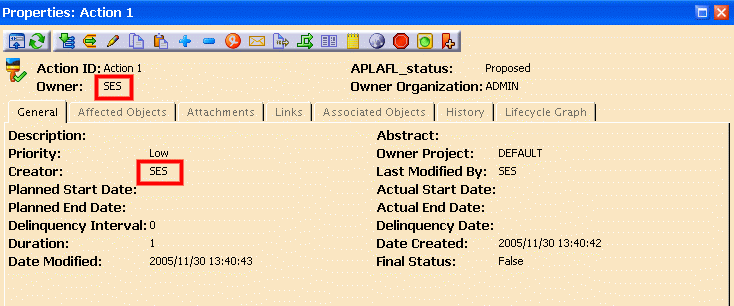
demonstrating that the owner/creator of the action is SES.
In concrete terms, this means that when creating objects using lifecycle functions, for example, the creator of ENOVIA V5 objects will be the OS user who started the server manager process, and not the P&O user. Consequently, the owner of all the objects you create will be identical: the OS user. This is not desired.
Scenario 2
In this scenario:
- Server side activation has been fully performed with all the variables exported.
- The LDAP user is SMQ.
- The P&O user is also SMQ.
- The generic OS user who starts the ENOVIA V5 VPM server manager is SES.
So the credential set is identical:

This is the process ownership hierarchy:
demonstrating that the owner of the server manager process is still SES.
This is the properties tab of an action created with the same credentials:

demonstrating that the owner/creator of the action is this time the P&O user: SMQ.
Note: the OS userid does NOT have to be declared in the P&O database.
Enabling Wintop and Webtop Applications to Share the Same ENOVIA V5 Server
There are two groups of applications:
- Wintop applications: the ENOVIA V5 VPM client (the ENOVIA VPC product), 3d com Classic and the VPM Navigator client
- Webtop application: ENOVIA VPM Lifecycle Navigator.
By default, Webtop applications and Wintop applications cannot share access to the same ENOVIA V5 server in SSO mode.
Warning: the same installation path must NOT contain both the code for the Wintop client (with SSO enabled) and the code for the Webtop application (with SSO enabled) required by the WebSphere Application Server. You can have the following configurations:
Configuration 1
In one installation path:
- the ENOVIA V5 VPM server code (with SSO enabled)
- the Webtop code (with SSO enabled) required by the WAS
and in another installation path:
- the Wintop client code (with SSO enabled)
Configuration 2
In one installation path:
- the ENOVIA V5 VPM server code (with SSO enabled)
- the Wintop client code (with SSO enabled)
and in another installation path:
- the Webtop code (with SSO enabled) required by the WAS.
However, you can enable Webtop applications and Wintop applications to effectively share access to the same server by following this scenario which involves duplicating the Orbix entry point, with one Orbix environment for Webtop applications and one for Wintop applications, then exporting a variable in the resulting Webtop environment:
- Create a new Orbix directory,
orbix2(for the Webtop environment), for example by copying the Orbix directory in the ENOVIA V5 VPM server installation path from:
$install_path/startup/orbix
to:
$install_path/startup/orbix2 - Modify the file:
$install_path/startup/orbix2/iona.cfg
by replacing:
cfg_dir = "$install_path/startup/orbix/config/";
with:
cfg_dir = "$install_path/startup/orbix2/config/";
- Set the orbix2 ports. In:
$install_path/startup/orbix2/config/common.cfg
set:
IT_DAEMON_PORT = "xxxx", where xxxx is the number of an available
       listen port

       IT_DAEMON_SERVER_BASE = "yyyy", where yyyy is a number of an available
       port

       IT_DAEMON_SERVER_RANGE="zzz", where zzz is a range interval
- Copy the file:
$install_path/code/command/runServerManager
to:
$install_path/code/command/runServerManager2
- Modify the file
CATIAServerManager.IMPfile found in:
$install_path/startup/orbix2/config/Repositories/ImpRep
by replacing:
runServerManager
with:
runServerManager2
- Activate the SSO mode in the file
runServerManager2. - Edit the file
runServerManager2and set the following variable:
export CATSMWebMode=true
- Create a shell starter for orbix2 by copying the shell:
$install_path/code/command/runOrbix
to:
$install_path/code/command/runOrbix2
- Modify IT_CONFIG_PATH in the
runOrbix2shell as follows:
IT_CONFIG_PATH=$install_path/startup/orbix2
IT_DAEMON_PORT=xxxx (as defined in step 2 above)
- Start the orbix2 daemon as follows:
$install_path/code/command/runOrbix2
This means that:
- in the
runServerManagerfile for the Wintop applications, theCATSMWebModevariable is not set - but the
runServerManager2file for the Webtop applications contains the line:
export CATSMWebMode=true
Note: This methodology can be easily implemented on the Windows OS. The purpose of the CATSMWebMode environment parameter is to differentiate two behaviors of the Server Manager, which are not compatible.
Note that the CATSMWebMode variable can
only be exported for the Webtop applications.
Deactivating Single Sign-On and Deleting Credential Sets
To deactivate the Single Sign-On capability, you must undo the steps that were performed on the ENOVIA server and the client.
Note: If you are using the default SSO Repository, to delete all credential sets that you created on the machine on which the server was installed, delete the file:
$install_path/$os/resources/credentials/SSOServer.credentials
WARNING: We do not recommend that you use the default SSO Repository. To create your own SSO Repository, see the task Implementing Your Own SSO Repository. However, if you do use your own SSO Repository, you must manage the deactivation yourself.
Customizing User Exits for VPM V4
The repository database of VPM V4 must be configured to support server authentication for SSO to be enabled in VPM V4 (and therefore ENOVIA V5 VPM).
In addition to the ENOVIA V5 VPM setup itself, other tasks must be performed in the environment of VPM V4 in order to complete the SSO setup when using ENOVIA V5 VPM. To do so:
- run the following command to activate the single sign-on plug-in in
VPM V4:
VPMSettings -a -n VPM_EXTERNAL_LOGIN -v YES
- set the following environment variables:
CATLoginServletHost
CATLoginServletPort
CATLoginServletURI
They reference the server host name, the port to be used for HTTP connections, and the servlet to be run on it, respectively.
If data encryption is enabled on the server, the following variables must also be set in order to reference the correct library and encryption/decryption methods:
CATLoginCryptLibrary

     CATLoginCryptFunction

     CATLoginUncryptFunction
The default values should be:
CATLoginCryptLibrary=VX0SCEXT

     CATLoginCryptFunction=encodeBase64Password

     CATLoginUncryptFunction=decodeBase64Password
which make VPM V4 use its built-in 64-bit encoding.
All these variables should be set in the run-time environment of VPM V4. This could be done automatically by adding the adequate variable export commands to an initialization file, such as VPMWsUser.env.
Note: the previous six environment variables are the same as those set in initialization file ssoinit.sh of ServerManager. The values always be the same for the first three servlet variables. The values of the other three may differ depending on the legacy encryption implementation.
Servers Checkpoint
Troubleshooting Session Management
Some database or WAS configuration mistakes can break Single Sign-On in a way which leads to an exception page whenever users try to open the Single Sign-On administration page. The following lines appear in the exception page:
Original Exception: Error Message: Server caught unhandled
     exception from servlet [CATServletManager]: null Error Code: 500 Target
     Servlet: CATServletManager Error Stack: java.lang.NullPointerException at
     com.dassault_systemes.catjsystem.catjsyj2ee.CATJ2EEServlet
     Manager.getSession(CATJ2EEServletManager.java:111) at
     com.dassault_systemes.catjsystem.catjsyj2ee.CATJ2EEServlet
     Manager.service(CATJ2EEServletManager.java:168) at
     javax.servlet.http.HttpServlet.service (HttpServlet.java:853)
Possible causes leading to this error are:
- Single Sign-On not being able to connect to the Settings database.
- Wrong session parameters at server or web application scope.
The following subsections will cover determining the problem's cause and fixing it.
Fixing Single Sign-On not being able to connect to the Settings database
The error page quoted above shows up when Single Sign-On application is not able to connect to the Settings databases. The usual causes of this failure are:
- Database not started: check this by issuing a start database command.
- Database alias not properly defined (DB2) or wrong TNSNAME (ORACLE): check this using command-line SQL client (sqllib for DB2, sqlplus for ORACLE) in order to check database connection.
- Mistake in the Data Source definition: use the 'Test Connection' button in WAS admin console to check the Data Source ; and make sure that its JNDI name is 'jdbc/JSystem'.
- Database server being corrupted for other reasons: restart the database server, or even the database server machine.
If any changes to database or data source definition where made during these verification steps, stop and restart WAS to make sure all changes were taken into account. In case of a WAS ND-based deployment, also restart the node agents.
Fixing Wrong session parameters at server or web application scope
Another cause leading to the exception page can be a mistake in WAS session configuration. You can check session parameters with the following steps:
- Launch the Administrative Console and select Servers -> Application Servers.
- Click the name of the server on which the Single SignOn EAR file was deployed. In this example, this is server1.
- Scroll down and click Web Container.
- On the Web Container page, click Session Management.
- On the Session Management page, check that Enable Cookies property is checked in the 'Session tracking mechanism' line, and click on the Enable Cookies link.
- On the Cookies page, make sure that in the Cookie maximum age line, the 'No timeout' radio button is checked. If Set timeout radio button is checked, change this so that No timeout is checked.
- Save all changes and restart all servers before re-testing.