When a console is active, it keeps only as many observations as its history property specifies. As you are using xmperf, you will very likely encounter situations where the observations are moving out of your view too fast. For such cases, and to facilitate "playing" of scenarios collected on other hosts, the Recording and Playback feature of xmperf was implemented. Another feature lets you annotate recording files.
In addition to the recording function of xmperf, recordings can be created by 3dmon, the xmservd daemon, and by the azizo program, and a set of recording support programs. The creation of recordings by these programs are described in:
Recording of statistics can be initiated for one or more instruments in a console or for all instruments in a console. Recording can be active for more than one console at a time. Recordings are always written to a file, which has a name prefix of "R.". followed by the name of the console. The file is written to the directory $HOME/XmRec . For example, the recording file for a console named:
Remote IP Load
would be:
$HOME/XmRec/R.RemoteIPLoad
There's a number of things to be aware of here. First, whenever a file is created, a full description of the entire console is written as the first records of the file. This is true whether recording is started for the console as a whole or for only some instruments in the console.
Second, if the file exists when you wish to start recording, you are asked whether you want to append to the file or recreate it. If you elect to append to the file, it is assumed that a console description already exists in the file.
Third, recording files are located in a subdirectory named XmRec in the user's home directory. If this directory does not exist when recording is requested, xmperf attempts to create it.
When you select recording from a menu, you are presented with the following choices:
Depending on whether a console or one of its instruments is currently recording, and depending on which recording menu you select, different items in the recording submenu are active. It is important that you understand this, or you may be recording stuff you don't need or worse: not recording what you really need. The status of the menu items is closely related to the difference between console recording and instrument recording so let's first look at that.
If the Recording submenu is arrived at from a Start Console Recording menu, all menu items in the submenu are assumed to be concerned with the console as a whole. Thus, whether one, more, or all instruments in the console are currently being recorded, a selection of End Recording stops recording for all instruments. Similarly, no matter if one or more instruments are currently being recorded, a selection of Begin Recording from the submenu causes all instruments in the console to be recorded from this time on.
If the recording submenu is arrived at from a Start Instrument Recording menu, all menu items in the submenu are considered to apply to the currently selected instrument. Therefore, if the selected instrument is not currently being recorded, a selection of Begin Recording starts recording for the instrument. If the instrument is being recorded, no matter if the recording was started as a consequence of a full console recording being started, a selection of End Recording stops recording for the selected instrument. In neither case does the operation affect any other instrument in the console.
The Save Buffer submenu item is valid only if no recording is currently going on for any instrument in the console. This restriction helps you avoid mixing historic data with a "real-time" recording.
All the above rules influence what submenu items are active at any point in time. The table that follows lists the possible combinations:
| All instruments are recording | Selected instrument is recording | Selected instrument not recording | No instrument selected | No instrument is recording | ||
| Console Menu | Save Buffer | - | - | - | - | + |
| Console Menu | Begin Recording | - | + | + | + | + |
| Console Menu | Save & Begin Rec | - | - | - | - | + |
| Console Menu | End Recording | + | + | + | + | - |
| Console Menu | Annotate | + | + | + | + | - |
| Instrument Menu | Save Buffer | - | - | - | N/A | + |
| Instrument Menu | Begin Recording | - | - | + | N/A | + |
| Instrument Menu | Save & Begin Rec | - | - | _ | N/A | + |
| Instrument Menu | End Recording | + | + | _ | N/A | - |
| Instrument Menu | Annotate | + | + | _ | N/A | - |
+ means option is available under these
conditions.
- means option is not available under these conditions.
Recording Submenu, Active Items
To remind you that recording is in progress, a symbol illustrating a tape reel is shown in the lower right corner of all instruments with recording active (except state light instruments).
Playback is initiated from the File menu of the main window of xmperf. When you select the Playback menu item, you are presented with a list of files available for playback. The file list consists of all files in the $HOME/XmRec directory with a prefix of "R." You can use the filter part of the file selection box to look for other masks in whichever directory you want. To select a file to replay, click on it and then on the OK button or double-click on the file name.
The selection box remains open after you select a file to replay. This allows you to select more than one file. To make the selection box go away, click on Cancel.
Recording files may have been produced by xmperf, in which case they contain information about the appearance of the console from which they were recorded. Recording files created or modified by 3dmon, xmservd, azizo or one of the recording support programs do not normally contain console information.
If a recording file does contain console information, this information is used to create the playback console in the image of the original console. This can not be done for other types of recordings so xmperf uses default layouts in playback consoles for such recordings.
Though recording files may lack console information, they must contain information that groups statistics together in sets. Each set is treated by xmperf as an instrument. If any set contains more than 24 statistics, the set is broken into smaller sets. The playback console for a recording without console information is built by adding instruments for the sets as they are encountered in the recording file. Initially, xmperf attempts to allocate space for the instruments in the full width of the console. If too many instruments or values are present to allow this, the console is divided into multiple columns of instruments.
When a recording file lacks console information, it still can contain information about the color or style of values. Similarly, it can include or lack information about the scales to use for plotting the values. xmperf uses any such information present and supplies default properties when they are not. The default properties for values are:
Recording files without console information never carry instrument descriptions. Therefore, a set of standard instrument properties is assigned to the instruments used to play the recorded statistics back. The default properties are the same as are assigned to a console you create from scratch. They are described in Instruments .
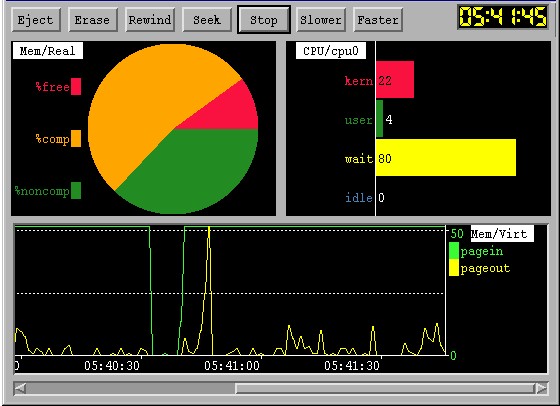
When you select a valid recording file, xmperf reads any console configuration from the file and creates the console. If console information is not available in the recording file, a default console is constructed. A playback console looks different from other consoles in that a row of buttons appear below the top border of the console window. Playback doesn't start until you click on the Play button. The following figure shows a playback console for a recording created from the console shown in the figure Sample xmperf Console .
Sample xmperf Playback Console
The functions of the buttons at the top of the window are as follows:
If some other program is using the recording file at the time you attempt to erase it or if you are not authorized to delete the file, you are informed of this and are prevented from erasing the file.
In situations where a recording file spans over midnight so that the same time stamp exists more than once in the playback file, the seek proceeds from the current position in the playback file and wraps to the beginning if the time is not found. Because multiple data records may exist for any hour and minute combination, use the Play function to advance to the next minute before doing additional seeks on the same time, or seek for a time one minute earlier than the current playback time.
If you are playing back from a file while recording to the file is still in progress, the Seek function does not permit you to seek beyond the end time of the recording as it were when you first selected the file for playback.
The Seek button is not active while you are playing back.
Initially, playing back is attempted at approximately the same speed at which the data was originally recorded. When the recording was created by other programs than xmperf, and especially if the file is produced by merging several files, xmperf may have difficulty determining this speed. This may cause the start of the playback to be delayed. You can change the speed by using the Slower and Faster buttons.
While playing back, neither the Rewind nor the Seek buttons are active.
Recordings from instruments contain control blocks describing the instrument and console from which the recording was done. If a recording was created by a version of xmperf, which has a control block format different from the one of the version of the program used for playback, playback is not possible. When you attempt to play a recording back under such conditions, xmperf detects this and displays a dialog box. From the window you can choose to keep or delete the old recording file. You do not have the option of playing it back. If you choose to keep the file, you can convert it to Performance Toolbox for AIX format used by your version of xmperf with the ptxconv program.
Obviously, if you try to play back from a file that does not contain valid data, results are unpredictable. There may also be unanticipated side effects of special conditions for recording or playback, such as:
Annotations are special record types in recording files. They contain a several structured fields and a text of variable length. Because recording files are binary files, so are the annotation records. It requires special programs to add and delete annotation records. Several programs can be used to do this and one of those programs is xmperf . This section describes how to work with annotations. The description is centered around the way it is done in xmperf but applies to the other programs that support annotation. This includes azizo , 3dmon , and 3dplay .
In the current implementation, all annotations added interactively are timestamped annotations, meaning that they can be related to a specific point in time. The intention is to allow an annotation to describe a certain pattern of recorded metrics with reference to when it occurs in the recording. Annotations have the following structured fields:
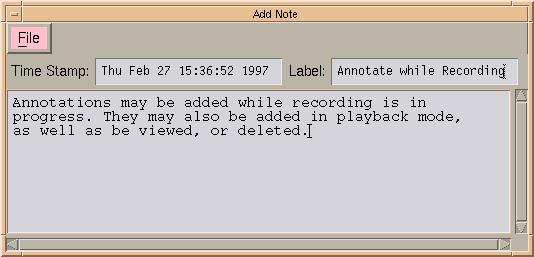
Annotations can be added from xmperf and 3dmon while recording is taking place. When you request annotation, the following window displays. Initially, the window is empty except for the time stamp set to the time you requested annotation.
Adding an Annotation
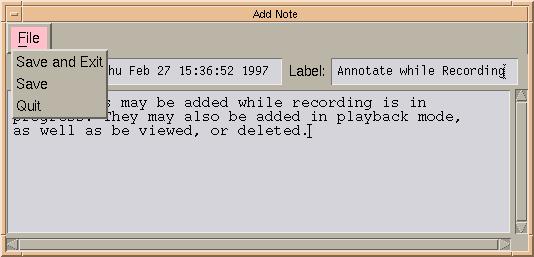
The label (abstract text) may then be entered, as well as the annotation text. The menu shown in the Add Annotation Menu figure can be used to save the annotation to the recording file.
Add Annotation Menu
The most common way to view or add annotations is during playback of a recording file through xmperf or 3dmon . It is also common during analysis with azizo . After selecting annotation, the first window you will see is the one shown below. The window will contain one line for each annotation in the recording file. Each line will contain the status, timestamp, and label.
Annotation List Window
In the Annotation List Menu figure, one annotation is listed. From the File pulldown menu, "Add Note" or "Quit Annotation" can be selected. To add another annotation, use the File pulldown menu and select "Add Note". This will bring up the window Adding an Annotation , which was seen previously. "Quit Annotation" will exit annotation, and write all added notes to the recording file. The menu is shown in the following figure,Annotation List Menu .
Annotation List Menu
To view the annotation text, click on the line that represents the annotation you want to see. In the example, Annotation Selected , the first line was clicked and the window shown in Annotation View Window was created and shows the current annotation text.
Annotation Selected
Annotation View Window
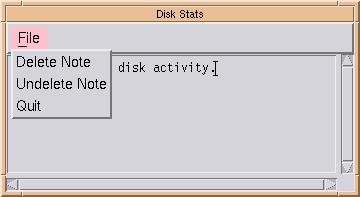
From the Annotation View Window, Notes may be Deleted, Undeleted, or Quit. This is shown in the Annotation View Menu below.
Annotation View Menu
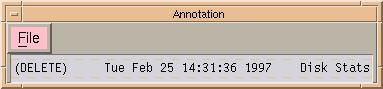
"Delete Note" will mark the annotation as deleted, as seen in the following Annotation Deleted figure. The notes will not actually be removed from the recording file. "Undelete Note" will mark the note as active. The notes remain in the recording file until "Write Current View" is selected from the playback menu. "Write Current View" will rewrite the recording file, ommitting all notes marked deleted. This will reduce the size of the recording file.
Annotation Deleted