This chapter provides information about the xmperf command menu interface.
The command menu interface of xmperf is entirely configurable. The intention with this interface is to:
Virtually any AIX command can be defined in the xmperf configuration file. A simple syntax is used to arrange the commands in multi-level menus and to define the specifics of each command and its options. The following sections describe how to define menus and commands to xmperf.
Commands are defined as belonging to one of the following xmperf main window pulldown menu items:
Lines in the configuration file that define menus or commands must have an identifier as the first characters on each line. This identifier determines what main menu the definition goes to:
The command menus are cascading menus. This means that each item on any given menu represents either another level of menu or a single command. A menu tree for the main menu group Analysis might be represented like this:
Start New xmperf
Time Profiler
   Profiling w/source
   Minimal Profiling
Reduced Memory Simulator
   Memory Simulation
      Standard Simulation
      Special Simulation
   Set Reduced Memory
   Reset Memory
Sample Menu Structure
In the preceding figure, menu lines are those followed by an indented line. The end-points of each indentation represent tools or commands that can be selected and executed. It follows, that the lines:
Time Profiler
Memory Simulation
both are menu lines, while:
Start New xmperf
Profiling w/source
represent executables. Executables are defined as described in the following figure, Defining Executables .
The menu structure defined above is created with the following lines (lines enclosed in "<>" are place holders for lines to define executables and should be ignored for now).
   <lines to define: Start New xmperf>

analy.menubegin.Time Profiler
   <lines to define: Profiling w/source>

   <lines to define: Minimal Profiling>

analy.menuend.analy
analy.menubegin.Reduced Memory Simulator
analy.menubegin.Memory Simulation
   <lines to define: Standard Simlation>

   <lines to define: Special Simuation>

analy.menuend.analy
   <lines to define: Set Reduced Memory>

   <lines to define: Reset Memory>

analy.menuend.analy
Defining the Sample Menu Structure
Whichever lines to define executables appear between any pair of menubegin and menuend, are added to the menu named in the menubegin line. Whenever a new menubegin line is encountered, another menu level is begun.
A menuend line terminates the menu begun by the last menubegin in effect. Excess menuend lines are ignored.
Menu definition lines must follow the format above. The menubegin lines define the name of the menu. The name contains all characters following the menubegin keyword (and the period) up to the end-of-line character. The menuend lines must have a non-blank character following the menuend keyword (and a period); by convention, the name of the main menu group is used.
The first five (or six, in the case of the Analysis menu) characters on each menu line must be analy , ctrl, or util followed by a period.
An executable is defined by two line types. For both line types, the first five (or six) characters of each line must be one of analy , ctrl, or util followed by a period. The first five (or six) characters determine the menu to which the executable is added.
The characters following the first period and up to (but not including) the next period identify the executable. The identification is used to group together all the lines that define a particular executable, and is also the text shown on the menu where the executable is added. After the period that terminates the identification must come one of the following:
As an example, let's define the executable represented by the line:
Set Reduced Memory
in the figure Sample Menu Structure . That could be done as follows:
analy.Set Reduced Memory.program: rmss $mem
analy.Set Reduced Memory.$mem: -c%r%n%16%Simulated Memory Size
(MB)
What these two lines say is that the command line to execute for this particular tool is:
rmss $mem
but that the token $mem should be substituted by whatever the user responds when the second line causes him or her to be prompted for "Simulated Memory Size". The line with the program: keyword is quite simple. It represents a skeleton command line. Before the command line is executed, xmperf attempts to replace all tokens in the skeleton line with the values the user selected. When attempting this, xmperf may end up in different situations:
In all situations where a token value is replaced in (rather than removed from) the command line, the token value includes the command flag if defined in the option line. Where a token is removed from the skeleton command line, the flag is not inserted either.
Before the command line is submitted for execution, an & (ampersand) is added at the end of the line. This causes all commands to be executed in background.
The general format of an option line is as follows, with the character % (percent sign) as a delimiter between fields:
menu.identifier.$token:
[flag]%{o|r}%{c|n|f|e}%[default]%description
Some commands require a list of extension values to be separated by a non-blank character such as a comma. For such commands, the flag value of the extension line must be followed by that character on all extension lines. When the resulting command line is generated by xmperf, the last such character is removed.
The following sections show a few examples to clarify how to define some more complex executables. This first example shows how you might define one particular invocation of the svmon analytical tool.
The svmon tool has many command line options. This example defines only a subset of options, namely the flags -P (output report selection based on processes) and -i (time between iterations and number of iterations). The syntax of the selected options is:
[-P{n|s|a}{u|p|g} [count]]
and:
[-i interval [count]]
This means that both flags are optional, as seen from the point of view of svmon, but we elect to define them as required because we are defining one particular invocation of the tool. When the -P flag is specified, one argument of each of the groups nsa and upg must be selected, which is a good opportunity to show you a definition of a single choice options list. A count may or may not be given.
The -i flag must be followed by an interval between executions and, optionally, by a number of executions. Since the default number of executions is "forever," we elect to define this number as required.
The lines to define this executable could look like this:
analy.svmon sample.program: (svmon $1$2 $count $int $rep
>
$ofile; \
                            sleep 10; aixterm -e view $ofile )
analy.svmon sample.$1:      -P%r%f%%Output selection
analy.svmon sample.$1:      n%r%e%y%Non-system segments only
analy.svmon sample.$1:      s%r%e%%System segments only
analy.svmon sample.$1:      a%r%e%%All segment types
analy.svmon sample.$2:      %r%f%%Process sort criteria
analy.svmon sample.$2:      u%r%e%y%Decreasing by pages in real
memory
analy.svmon sample.$2:      p%r%e%%Decreasing by pages pinned
analy.svmon sample.$2:      g%r%e%%Decreasing by page space used
analy.svmon sample.$count:  %o%n%10%Number of process reports
analy.svmon sample.$int:    -i %r%n%5%Interval, number of seconds
analy.svmon sample.$rep:    %r%n%3%Number of iterations
analy.svmon sample.$ofile:  %r%c%./svmon.out%Filename for svmon
output
Defining an Execution of svmon
The program: line is a skeleton for the execution of a series of commands:
The commands are separated by semicolons and the entire skeleton line is enclosed in parentheses, ready for execution under ksh. Notice that when the definition is split over two lines, you terminate the first line with a \ (backslash); this can be continued up to a maximum of 1024 characters. The skeleton command line specifies tokens to be substituted for values chosen by the user. Each token is positioned at the appropriate place for correct execution of the command.
One token is not part of the svmon command line. That's the token called $ofile, which is used to specify a file name where the output from svmon is to be written. Since svmon writes its output to stdout, the token is used to redirect the output to the file name given. Notice how this token appears twice in the skeleton command line: once to do the redirection; once to specify the input file to view.
The option lines are defined so that the skeleton command line would be converted to the following line if the user changes nothing:
(svmon -Pnu 10 -i 5 3 >
./svmon.out; sleep 10; aixterm -e
view ./svmon.out)
The command vmstat has several command line options. The following example defines them all except the flag -s, which has no meaning in AIX Version 3 and 4. The syntax of the vmstat command line is:
vmstat [-f] [Phys_volume ...] [interval [count]]
When vmstat executes, it sends its output to stdout. Since we want to be able to browse through the output, we send it to a file and then use view to browse that file.
A challenge is the definition of interval and count, since the omission of the first would cause vmstat to use the second as interval. To overcome this, we define both options as being required and give decent default values.
The definition looks as shown in the figure below.
analy.vmstat sample.program: (/usr/ucb/vmstat $forks $vols
$int $iter\
                             >
 $ofile; aixterm -n vmstat_out\
                             -name vmstat_out -e view $ofile )
analy.vmstat sample.$forks:  -f%o%f%%Report number of forks since
boot
analy.vmstat sample.$vols:   %o%c%%List of physical volumes to
analyze
analy.vmstat sample.$int:    %r%n%5%Interval between samples
analy.vmstat sample.$iter:   %r%n%20%Number of samples
analy.vmstat sample.$ofile:  %r%c%$HOME/vmstat.tmp%Output file
name
Defining an Execution of vmstat
With this definition, we can accept that the user keys in a list of physical volumes to analyze in response to the prompt for the token $vols. This requires you to remember or look up the names of physical volumes. To make things easier, you could code this into the definition. Assuming the physical volumes hdisk0 through hdisk2, the definition would look like that shown in Defining an Enhanced Execution of vmstat below.
analy.vmstat sample.program: (/usr/ucb/vmstat $forks $vols
$int $iter\
                             >
 $ofile; aixterm -n vmstat_out\
                             -name vmstat_out -e view $ofile )
analy.vmstat sample.$forks:  -f%o%f%%Report number of forks since
boot
analy.vmstat sample.$vols:   %o%f%%Select physical volumes to
analyze
analy.vmstat sample.$vols:   hdisk0 %o%e%y%Physical volume: hdisk0
analy.vmstat sample.$vols:   hdisk1 %o%e%y%Physical volume: hdisk1
analy.vmstat sample.$vols:   hdisk2 %o%e%y%Physical volume: hdisk2
analy.vmstat  sample.$int:   %r%n%5%Interval between samples
analy.vmstat sample.$iter:   %r%n%20%Number of samples
analy.vmstat sample.$ofile:  %r%c%$HOME/vmstat.tmp%Output file
name
Defining an Enhanced Execution of vmstat
This is an example of how you specify a group of flag extensions to be presented in a multiple choice selection prompt. The advantage of using this technique rather than defining each disk as a separate flag is that you can use the flag definition line to specify a heading for this group of choices. Notice how each of the flag values represent data values rather than traditional flags and that each of the values has a trailing blank. Without the trailing blanks, all choices would be sent to vmstat as one concatenated character string.
When you use the technique described in Example vmstat Definition to redirect output from a command running in background to a file and then use the view command to show it in an aixterm window, you don't have any way of knowing that a popup window should appear. Likewise, you might miss the fact that the commands run in the background and try to run a command multiple times not realizing that it's already executing.
This, of course, is inherent in UNIX systems, but it becomes less apparent when the command is executed from a menu so that the normal operating system response to submitting a background job is not seen by the user. The following example of a definition of vmstat is taken from the distributed configuration file and shows how a clever use of parentheses and double quotes can direct the output from the vmstat command to an aixterm window and allow you to use that window's scroll bar to examine the output.
analy.vmstat Monitor.program: aixterm -geometry 85x20 -n
vmstat \
                              -name vmstat -sl 1000 -sb -fn Rom10\
                              -e ksh -c "(/usr/ucb/vmstat \
                              $(cd /dev ; /bin/ls cd* hdisk*) \
                              $int $iter; read)" &
analy.vmstat Monitor.$int:    %r%n%5%Interval between samples
analy.vmstat Monitor.$iter:   %o%n%20%Number of samples
An Even More Enhanced Definition of vmstat
In the preceding figure, we show how the execution of vmstat starts by opening an aixterm window as described by the first two lines; the window is specified as 85x20 characters in size, has a title bar and icon name set to "vmstat," saves up to 1000 lines of history, has a scroll bar, and uses the font Rom10.
The third line specifies to execute the program ksh (-e ksh ) and that the shell must run a command which follows the -c flag. The command to run is actually a series of commands, enclosed in double quotes as well as parentheses. The sequence of commands is:
(/usr/ucb/vmstat $(cd /dev ; /bin/ls cd* hdisk*) $int $iter;
read)
Which means that the command /usr/ucb/vmstat is to be executed. The arguments passed to the command are the disk names produced by the command sequence:
cd /dev; /bin/ls cd* hdisk*
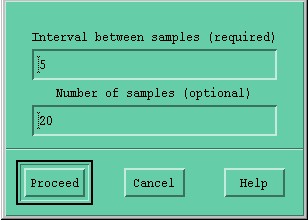
This command sequence is followed by the command line arguments represented by the tokens $int $iter . After this command is executed, issue a read, which terminates the aixterm session when the user presses the Enter key from the window. The dialog window created from the definition in An Even More Enhanced Definition of vmstat is shown in the following figure.
The vmstat Command Box of xmperf
Two of the three main menu items that are used to define command menus have a fixed menu item. The main menu items are Controls and Utilities. This section describes the fixed menu item in the Controls pulldown. This fixed menu item is called Process Controls. The purpose of the Process Controls menu item is twofold:
The default sort criterion for the process list is defined to place the largest consumers of CPU resources (hot processes) at the top of the list.
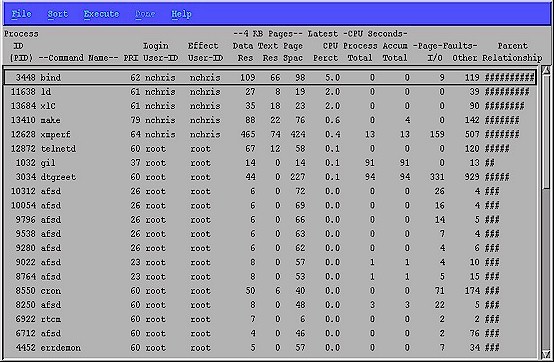
When you select Process Controls you immediately see a list of all running processes in your system at the time you made the selection. The list shows the most interesting details about the processes, and initially is sorted in descending order after CPU percentage used by the process. An example of a local process list is shown below.
Sample Local Process List of xmperf
The fields in the list are, from left to right:
By default, this field is used to sort the list so you can easily pinpoint processes that are large consumers of CPU resources.
When the process overview list is displayed, a menu bar is available to control the list. The following menu items are available:
One special sort criteria is called "Parent Relationship" which sorts the processes so that a process is listed before its child(ren). This generates a hierarchical display of parent-child process relationships at the far right of the list.
Two things distinguish the Process Execute menu from other tools menus: the identifier for lines to define the line is proc, and a new token type is introduced. This is explained in Process Token .
The Execute menu selection is only active if the process overview window is generated by a selection of the Process Controls item in the Controls pulldown menu of the main window. If the process overview window is generated while instantiating a skeleton console, the Done menu item is active instead of Execute.
Executables that are defined as belonging to the process execution menu must be defined so a process token is present in the skeleton command line. The process token is simply the character # (number sign). During token substitution before the command is executed, the process token is replaced by a list of process IDs as selected from the process list by you.
If you try to execute a command from the Process Execution menu and no process ID is selected, the execution is not allowed. Selection can be done as a single-selection of one process by clicking on a line, or as a multiple-selection by dragging the mouse pointer with mouse button 1 pressed down. Extensions or deletions from selections can be done by holding the CTRL key down on the keyboard while selecting.
Before the command is executed, you are presented with a the list of processes you selected. This way you can verify that the selection is correct.
To illustrate how you use the process token, the following example of using the process token shows how you could define the renice command in the Process Execution menu for AIX Version 4.
proc.Increase priority.program:  renice -n -$pri -p #
proc.Increase priority.$pri:     %r%n%1%Priority increase
proc.Decrease priority.program:  renice -n $pri -p #
proc.Decrease priority.$pri:     %r%n%1%Priority decrease
Example of Using the Process Token