About Interference Checking and Analysis

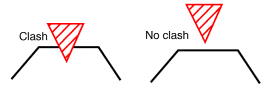
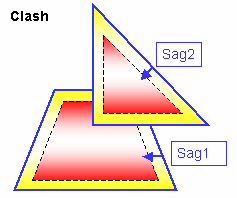
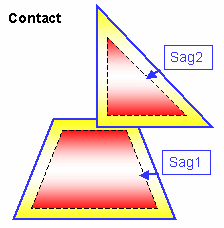
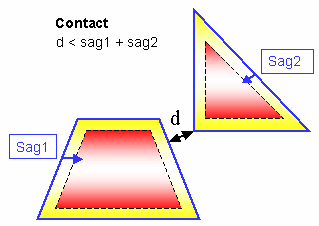
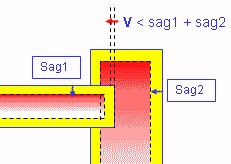
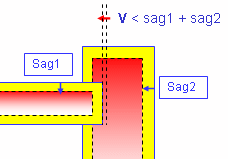
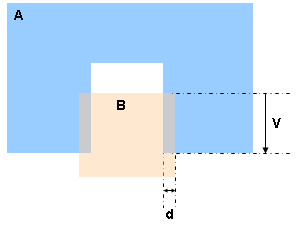
You can check your document for clash, contact and clearance conflicts to determine whether document components interfere with each other.

Depending on your needs, you can choose between different levels of analysis, ranging from a simple detection of interferences between parts (Analyze > Part to Part Clash) to a detailed clash, contact and clearance analysis of products and/or elements (Clash command). Note that only visible parts and products are taken into account; interference checking is not done on parts and products in the No Show space. Results differ depending on the interference type selected for the analysis.

You can analyze Clash command results using a variety of tools and visually browse interferences in a preview window or separate viewer. You can also export and publish results in text, XML and HTML formats. 
 

As part of a standalone clash process, you can export both clash results and geometry to a dedicated file-based database. Results and geometry are managed in XML files. You can then import these results back into your session.


The following section deals with:

Creating Groups of Products

In DMU-P2, prior to running your interference analysis, you can create groups containing the product(s) you want to analyze using the Group icon in the DMU Space Analysis toolbar or Insert -> Group... in the menu bar.

Groups created are identified in the specification tree and can be selected from there for the analysis. Only one group per selection can be defined.

ENOVIA Integration

When working with ENOVIA LCA, the user can send the clash object directly from the ENOVIA query panel to CATIA. The clash result is re-created in the CATIA session. To import the products involved and visualize the clash, simply click the appropriate interference line in the Check Clash dialog box.

You can also compare clash results with those stored in ENOVIA VPM or ENOVIA LCA.


Interference Analysis Results

Interference checking and analysis is done on polyhedric models represented by triangular meshes. Results differ depending on the interference type selected for the analysis. The following illustrates expected results for the different analysis combinations.

Clash

Given for information only. This option is not available.


Contact + Clash

  • If red zones overlap, a clash is detected.

  • If yellow zones only overlap, a contact is detected.

  • If the shortest distance (d) between the yellow zones is less than the total sag (sag1 + sag2), a contact is detected.

 Same illustration as left showing outer sag (green zone):

Legend for Contact + Clash illustrations:

  • Blue contour: triangular mesh.
    Note: the topology is not represented.

  • Dotted line: inner sag tolerance.

  • Red zone: clash zone

  • Yellow zone: contact zone based on inner sag

  • Green zone: contact zone based on outer sag

  • Yellow + Green zones: total contact zone

Clearance + Contact + Clash

  • If the total sag (sag1 + sag2) is less than the shortest distance (d), and the shortest distance (d) is less than the specified clearance distance (D), a clearance is detected.

Clearance
sag1 + sag2 < d < D


Penetration Depth

 
Clash

Contact


V is the penetration vector and visualizes the penetration depth.

In the second illustration above, if you translate product A by V, both products are in contact.

Important: If V < sag1 + sag2, a clash may be detected (see below).

 
Clash

Contact


Penetration Depth versus Authorized Penetration

The penetration depth (an interference result) is not to be confused with authorized penetration (an input).


A clash is detected between products A and B.

V is the penetration vector and visualizes the penetration depth.

Note that V is greater than the authorized penetration in our illustration.

If the authorized penetration is greater than distance d, no clash is detected.

Sag

The sag corresponds to the fixed sag value for calculating tessellation on objects (3D fixed accuracy) set in the Performances tab of Tools > Options > General > Display. By default, this value is set to 0.2 mm. The sag value set in this tab is offset from the skin inwards (blue contour) on both selection 1 and selection 2.

This value is valid for both the Part to Part Clash and the Clash commands.

In Visualization mode, you can dynamically change the sag value for selected objects using the Tools > Modify SAG command.