This task explains how to read the global results in the Check Clash dialog box and browse through them in the Preview window.
Insert the following sample cgr files: ATOMIZER.cgr, BODY1.cgr, BODY2.cgr, LOCK.cgr, NOZZLE1.cgr, NOZZLE2.cgr, REGULATION_COMMAND.cgr, REGULATOR.cgr, TRIGGER.cgr and VALVE.cgr.
They are to be found in the online documentation filetree
in the common functionalities sample folder cfysm/samples.
-
Select Insert > Clash from the menu bar or click Clash
 in the DMU Space Analysis toolbar and
run a check of type Clearance (3mm) +
Contact + Clash between two selections: the Regulation_ Command and the
Regulator (Selection 1), and the two body products (Selection 2). The
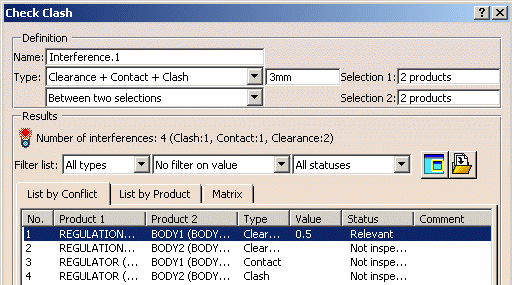
Check Clash dialog box expands to show the results.
The dialog box identifies the number of interferences detected along with the type: 4 interferences have been detected.
Status lights
 are color-coded as follows:
-
red: at least one conflict is relevant
-
orange: no relevant conflicts, at least one conflict is Not inspected
-
green: all conflicts are Irrelevant.
-
Interference results are presented in three different ways in the dialog box:
-
List by Conflict tab: lists results by conflict with one conflict per line.
-
List by Product tab: lists results by product. There may be more than one conflict per product.
-
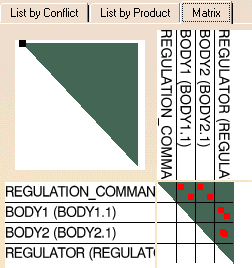
Matrix tab (P2 only): presents conflicts in the form of a matrix.
By default, results are organized by conflict in the List by Conflict tab.
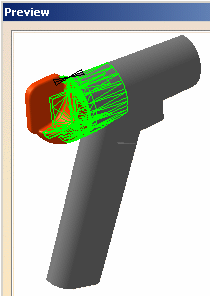
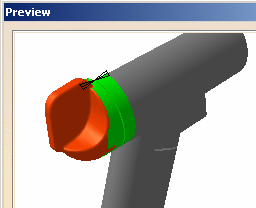
The first conflict in the list, in our example a clearance, is selected by default and a detailed computation has been run. The minimum distance is specified in the dialog box and both the minimum distance and green triangles identifying the products separated by less than the specified clearance distance of 3mm are displayed in the geometry area.
Naming conventions for products in conflict are the same as those used in the specification tree.
Using the Tools > Options > Infrastructure > Product Structure command, you can customize the name, reference or description of a product or component (Nodes Customization tab).
-
-
If necessary, pan, zoom and/or rotate in the Preview window to visualize the interference better.
-
Select interferences in turn in the List by Conflict tab to run a detailed computation. As you select them, the Value and Status columns in the Check Clash dialog box, and the Preview window are updated.
-
Experiment with filter list capabilities and view the results.
-
To change the status of an inspected conflict, click the status field of the appropriate conflict: The conflict status changes from relevant to irrelevant and vice-versa depending on the initial value. You can also add comments to selected conflicts:
-
Add a comment to the selected conflict:
-
Click the Comment field
-
Enter your comment in the dialog box that appears and click OK.
Note: Do not use the following characters: <, >, &, /. These characters are not supported when exporting results to XML files.

-
-
Click the List by Product tab to display conflicts associated with products.

Results are organized by product in the List by Product tab. There may be more than one conflict per product.

-
 Click
the Matrix tab to display conflicts in the form of a matrix.
Color Coding and Symbols Used in Matrix tab
-
Clash:

-
Contact:

-
Clearance:

-
Current conflict: highlighted box around current conflict

-
Not inspected: yellow
-
Relevant: red
-
Irrelevant: green.
The area in the top left-hand corner is a preview area representing the matrix.
-
Zoom (press and hold down the middle mouse button, then click the left mouse button and drag, still holding the middle mouse button down) in the matrix itself to get a better view of the results.
-
Drag the square symbol in the preview area to home in on the result of interest.
-
-
Click OK to exit when done. Both the interference results and the definition are kept as specification tree features.
The numeric value (minimum distance or penetration depth) of the current result is kept when you exit the command. If you subsequently edit the results, the system re-displays the last current result analyzed.
P2 Capabilities

In DMU-P2:
-
you can customize the display in the Results box as well as change the default setting to have the penetration depth and minimum distance or all numeric and graphic results calculated for all interferences detected during the initial computation (DMU Space Analysis > DMU Clash tab).
-
you can change this setting using the Tools > Options... command (DMU Clash - Detailed Computation tab under Digital Mockup > DMU Space Analysis ).
Preview

A Preview window appears showing the products in conflict only.
Using the Tools > Options..., Digital Mockup command, you can change the default display setting for the Preview window (DMU Navigator tab).
-
Click the Results window
 icon in the Check Clash dialog box
This opens the interference results window. -
Click the Results window
 icon a second time
The results window is closed and the Preview window is restored. -
If however, you close the Results window (using the Close button in the title bar), the Preview window will not be restored.

Color Coding for Conflicts

-
Clash: red intersection curves identify clashing products.
-
Contact: yellow triangles identify products in contact.
-
Clearance: green triangles identify products separated by less than the specified clearance distance.
Detailed Computation Mode
By default, the detailed computation mode is set to Element level. Triangles identifying contacts and clearances, intersection curves identifying clashes and the penetration depth or minimum distance are computed and displayed.
Note: The graphics display and storage of the triangular representation is costly and may adversely affect performance.
Computing and Displaying Contacts &
Clearance Results as Surfaces:
To have contact and clearance results computed and displayed as surfaces (rather than triangles):
-
Select Tools > Options..., Digital Mockup > DMU Space Analysis, DMU Clash - Detailed Computation tab
-
Click Surface under Contact & Clearance Results
-
Set the accuracy, then click OK in the Options dialog box.
The accuracy entered defines the maximum value for the length of the longest side of a triangular representation of the results. A lower value will give you a more accurate result but will also require a longer computation time. The triangular representation is then used to obtain the yellow (contact) and green (clearance) surfaces.
You can also view the selected interference in a
dedicated viewer. To do so, click the Results
window
![]() icon in the Check Clash dialog box.
icon in the Check Clash dialog box.
Filtering the Display in the Dialog Box
-
You can filter the display of results in tabs by:
-
Type: clash, contact or clearance.
-
Value: no filter, increasing value or decreasing value. The penetration depth is reported in the Value field for a clash, the minimal distance for a clearance, and a zero value for a contact.
-
Status: all, not inspected, relevant, irrelevant. Until selected, all interferences are reported not inspected. Inspected interferences can be relevant or irrelevant.
-
Note: Other columns are available when comparing results.
To change the status of a conflict, click a current conflict again or right-click and select Change status from the contextual menu.
To add a comment, right-click a current conflict and select Comment from the contextual menu.
See Finer analysis to find out how visualization filters work and how to read detailed results. You can also export and publish clash command results in a variety of formats.
Note: Clicking Deselect in the Check Clash dialog box removes the current results from the selection.
![]()