
|
This task explains how to define
groups of products. A group is a set of products explicitly defined by
selecting products individually. Groups are persistent and can be stored in
the document.
|
 |
Insert the following cgr files
from the cfysm samples folder:
ATOMIZER.cgr
BODY1.cgr
BODY2.cgr
LOCK.cgr
NOZZLE1.cgr
NOZZLE2.cgr
REGULATOR.cgr
REGULATION_COMMAND.cgr
TRIGGER.cgr
VALVE.cgr
|
 |
-
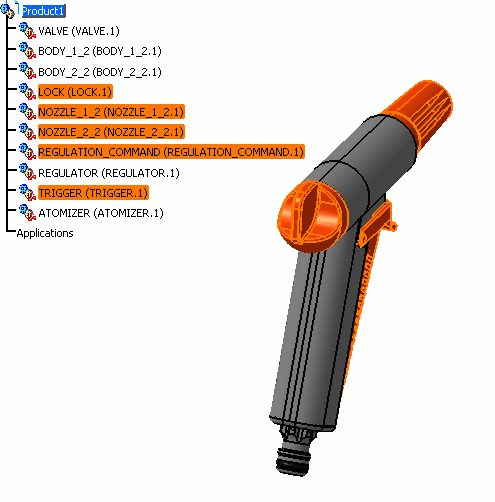
In the specification tree or in the geometry area, select
the products you wish to constitute the initial group content (you can
use ctrl-click to multi-select products).
|
|
|
 |
Creating a Group
-
To create a Group, in the DMU Review Creation toolbar,
click the Group icon
 or, in the menu bar, select Insert -> Group .
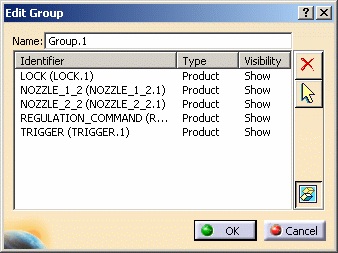
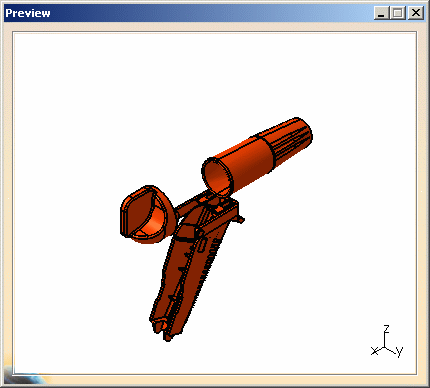
The Edit Group dialog box and the Preview window
appear.
The Preview window displays the selected products.
|
 |
Product representations visualized
in the Group Preview window do not take sticker representations into
account. |
 |
To customize the default display
setting for the Preview window, see Customizing General DMU Settings
in the DMU Navigator user guide. |
|
-
To add a product to the Group content, select the product
in the specification tree or the geometry area.
The product is added to the Group content listed in the Edit Group dialog
box.
-
To remove a product from the Group content, you can
either:
- de-select the product in the Specification Tree or in the Main
window
|
| |
- select the product in the Edit Group dialog box and click the
Remove from Group
 icon icon
- select the product in the Preview window, right-click and
select Remove in the contextual menu
Note: The multi-selection is now available in the Identifier list
of the Edit Group dialog box.
|
| |
-
In the Name text-entry field, enter a name for
the group you wish to create.
-
Click OK to create the group.
The group is identified in the specification tree. Groups created in this
manner are persistent and can be stored in the document.

|
|
Editing a Group
-
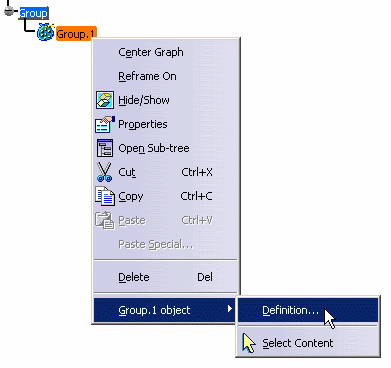
To edit a group, in the specification tree, double-click
the group
or
right-click the group and select Group.1 object -> Definition
from the contextual menu.
The Edit Group dialog box appears and lists the content of the
group you just created. Products in the group are highlighted in the
specification tree and in the geometry area.
|
|
|
 |
Note that although the group is selected and its content is
highlighted in both the specification tree and in the geometry area, the
group content is not considered selected.
|
|
-
Modify the Group content as desired.
-
Click OK to confirm.
Selecting Group Content in the Main Viewer
-
To select the Group content in the main viewer,
right-click the Group in the specification tree and select Group.1
object -> Select Content from the contextual menu.
The group components are highlighted in both the specification tree and
in the geometry area and the group content is considered selected.

|
|
Hiding Group Content
-
To hide the Group content, click the Hide/Show
icon
 .
.
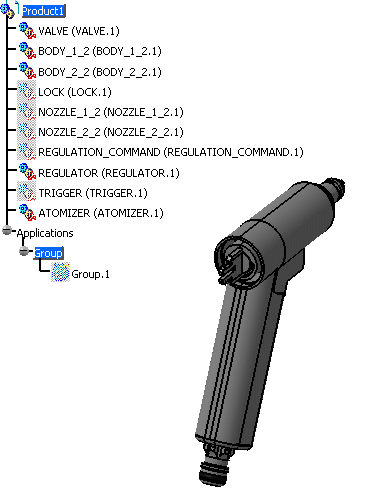
The group components are hidden and the icons are grayed out in the
specification tree.
Note: If you then move individual components back into the show space,
the group icon in the specification tree remains grayed out.
|
| |
Showing Hidden Components in the Preview Window
-
After having hidden the group content in the previous
step, double-click the Group in the specification tree.
The Edit Group dialog box and the Preview window appear.
The group content is indicated in the specification tree, but the icons
are still grayed, indicating that the products are hidden.
The Edit Group dialog box will look as follows:
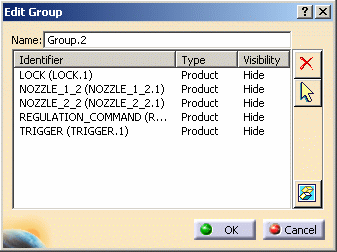
-
In the Edit Group dialog box, select all of the
components (the multi-selection is now available) and click the Show
Hidden Objects icon
 . .
The Visibility attribute of each component will still be
Hide, corresponding to the visibility status in the Main window.
but the components will now be visible in the Preview window.
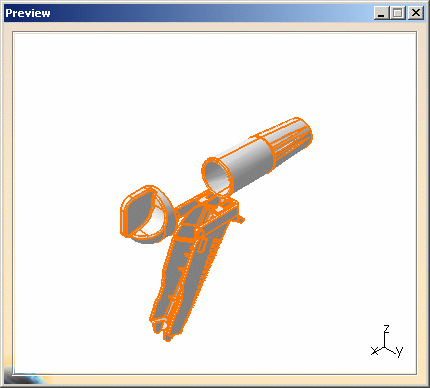
|
 |
This functionality does not work
for Manikins. |
 |
In the Edit Group dialog box, the
value in the Visibility column corresponds to the value of the graphic
property of the instance and is consistent with the visibility state of the
icon in the specification tree. However, it is possible, due to
inheritance, that it not be consistent with the product as displayed in the
Main window.
|
| |
Cross-Highlighting between the Edit Group
dialog box and the Preview window
-
In the Edit Group dialog box, de-select LOCK and
NOZZLE_1_2.
The components are also de-selected in the Preview window.
-
In the Preview window, re-select LOCK and NOZZLE_1_2.
The components are now selected in the Edit Group dialog box.
Note: The multi-selection is now available in the Identifier list
of the Edit Group dialog box.
|
| |
Defining Groups of Groups
You can now define groups of groups. A group that contains sub-groups
will be automatically updated upon any modification to the content of its
sub-groups.
Note: When you expand a group in the specification tree, you will not
see products belonging to any sub-groups in order to avoid possible
confusion with the product structure tree content.
-
Create Group.2 consisting of the components BODY_1_2 and
BODY_2_2.
-
Create Group.3 consisting of components VALVE and
ATOMIZER.
-
Click the title bar of the Edit Group dialog
box to activate it.
-
In the specification tree, click Group.2.
Group.2 is added to the content of Group.1.
-
In the specification tree, click Group.3.
Group.3 is added to the content of Group.1.
-
In the Edit Group dialog box, click OK
to confirm.
The content of Group.1 in the specification tree now includes Group.2 and
Group.3 as sub-groups.
-
In the specification tree, select Group.1.
The content of Group.1 is highlighted in the main window. Its content now
includes its original content as defined above in the section Creating a
Group plus the content of its sub-groups, Group.2 and Group.3.
|
| |
Replacing by highest common Father
The objective of this command is to optimize group content by replacing
a set of brother products by their common father when all of the brothers
belong to the same group. This optimization is especially interesting when
selecting a group and highlighting its content.
Note: The optimization is not applied recursively on sub-groups.
With the following product structure, the composed groups would be
transformed as presented by the application of the Replace content by
higher father command.
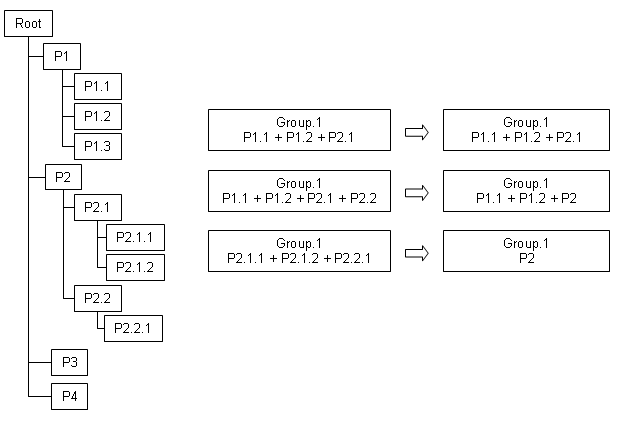
-
In Tools -> Customize, add the Factorize
Content command using a customized toolbar or access the command
directly in Views -> Commands List.
-
If you added the command using a customized toolbar, then
click the Replace content by higher father icon
 . .
Brother products are accordingly replaced by their highest common father.
|
| |
Replacing Content by Terminal
Nodes
This command explodes groups: products are replaced by their children.
Note: This command is not recursive on sub-groups, sub-groups will be
not exploded.
With the following product structure, the composed groups would be
transformed as presented by the application of the Replace content by
terminal nodes command.
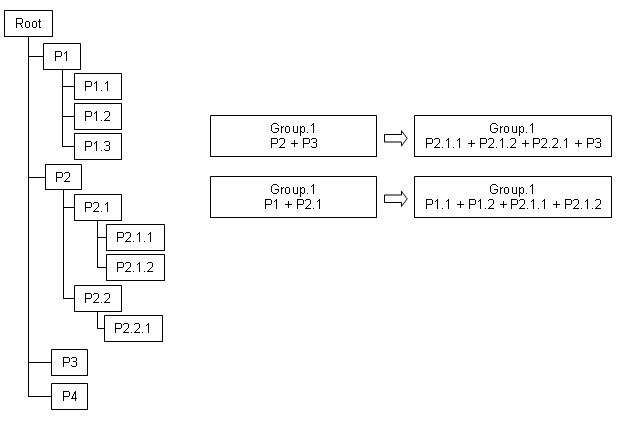
-
In Tools -> Customize, add the Explode
Content command using a customized toolbar or access the command
directly in Views -> Commands List.
-
If you added the command using a customized toolbar, then
click the Replace content by terminal nodes icon
 . .
Content is replaced by its terminal nodes accordingly.
|
 |
From the Edit Group dialog box,
you can also select a subset of components by selecting the corresponding
Identifiers in the Edit Group dialog box and clicking the Select icon
 . .
|
 |
You can also modify group
properties (color, line type and weight). |
|

|
