You can sweep an explicit profile:
- along one or two guide curves (in this case the first guide curve is used as the spine by default)
- along one or two guide curves while respecting a specified spine.
The profile is swept out in planes normal to the spine.
In addition, you can control the positioning of the profile while it is
being swept by means of a reference surface.
The profile position may be fixed with respect to the guide curve
(positioned profile) or user-defined in the first sweep plane.
- two guide curves and two length values for extrapolating the profile
- a guide curve and a middle curve
- a guide curve, a reference curve, an angle and two length values for extrapolating the profile
- a guide curve, a reference surface, an angle and two length values for extrapolating the profile
- a guide curve, and a reference surface to which the sweep is to be tangent
- a guide curve and a draft direction
- two tangency surfaces.
- three guide curves
- two guide curves and a radius value
- a center curve and two angle values defined from a reference curve (that also defines the radius)
- a center curve and a radius
- two guides and tangency surface
- one guide and tangency surface
- a limit curve and a tangency surface
- two guide curves
- three guide curves
- four guide curves
- five guide curves
- Generally speaking, the sweep operation has a derivative effect, meaning that there may be a continuity loss when sweeping a profile along a spine. If the spine presents a curvature continuity, the surface presents at least a tangency continuity. If the spine presents a tangency continuity, the surface presents at least a point continuity.
- Generally speaking, the spine must present a tangency continuity.
However, in a few cases, even though the spine is not tangent continuous, the swept surface is computed:- when the spine is by default the guide curve and is planar, as the swept surface is extrapolated then trimmed to connect each of its segments. Note that if a spine is added by the user, the extrapolation and trim operations are not performed.
- when consecutive segments of the resulting swept surface do not
present any gap.

Tangency discontinuous spine
with connex swept segments
(the sweep is created)Tangency discontinuous spine
with non connex swept segments
(the sweep is not created)
Defining Laws

-
visualize the law evolution and the maximum and minimum values,
-
navigate into the viewer by panning and zooming (using to the mouse),
-
trace the law coordinates by using the manipulator,
-
change the viewer size by changing the panel size,
-
fit all in by using the viewer contextual menu,
-
change the law evaluation step by using the viewer contextual menu (from 0.1 (10 evaluations) to 0.001 (1000 evaluations)).
- Constant: a regular law, only one value is needed.
- Linear: a linear progression law between the Start and End indicated values
- S type: an S-shaped law between the two indicated values
- Advanced: allowing to select a Law element as defined in Creating Laws.
This capability is available with all types of swept surfaces, except for:
- explicit profile: With pulling direction subtype
- linear profile: Limit and middle, With tangency surface and With two tangency surfaces subtypes
- circular profile: Three guides and Two guides and tangency surface subtypes
- conical profile: Five guide curves subtype.
Defining Relimiters
Below is an example with a plane as Relimiter 1.
When there is only one relimiter, you are able to choose the direction of the sweep by clicking the green arrow.
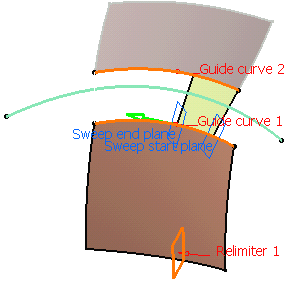
- Relimiters can be selected on a closed curve (curve, spine, or default spine). In that case, you are advised to define points as relimiters, as plane selection may lead to unexpected results due to multi-intersection.
- You can relimit the default spine, thus avoiding to split it to create the swept surface.
Smoothing
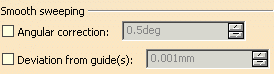
- In the Smooth sweeping section, you can check:
-
Angular correction to smooth the sweeping motion along the reference surface. This may be necessary when small discontinuities are detected with regards to the spine tangency or the reference surface's normal. The smoothing is done for any discontinuity which angular deviation is smaller than the input value, and therefore helps generating better quality for the resulting swept surface.
Over 0.01 degree, the smoothing is cancelled.
By default, the angular correction is set to 0.5 degree. -
Deviation from guide(s) to smooth the sweeping motion by deviating from the guide curve(s). A smoothing is performed using correction default parameters in tangency and curvature.
By default, the deviation is set to 0.001mm, as defined in Tools > Options. Refer to General Settings for more information.
This option is not available with With tangency surface subtype.
-
![]()
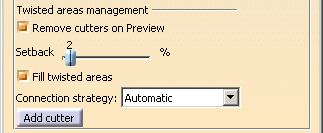
Removing Twisted Areas
|
|
|
|
|
-
Click Sweep
 .
.The Swept Surface Definition dialog box appears. -
Click the Line profile icon and choose the With reference surface subtype.
-
Select Curve.1 as the Guide Curve 1.
-
Select the xy plane as the reference surface.
-
Define Length 1 as 30 mm and a Length 2 as 10 mm.
-
Deselect Remove cutters on Preview.
-
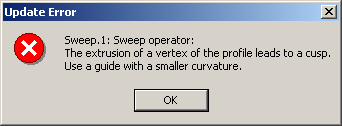
Click Preview.
An error message is displayed advising you to use a guide with a smaller curvature:
...and two manipulators ("cutters") appear for each untwisted zone. Their default positions are the maximal zone delimiters out of which they cannot be dragged. This maximal zone corresponds to the larger untwisted portion of the swept surface. 
-
Use these manipulators to delimit the portions of the swept surface you want to keep. These cutters are stored in the model as points on curve with ratio parameters when the guide curve is not closed.

We advise you cut a bit less than the maximal zone to delimit a safety area around the twisted portion. 
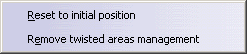
A contextual menu is available on the manipulators: -
Reset to initial position: sets the manipulators back to their default positions, that is the position defined as the maximal zone.
-
Remove twisted areas management: removes the manipulators and performs the swept surface generation again.
-
-
Click Preview again in the Swept Surface Definition dialog box.
The swept surface is generated. 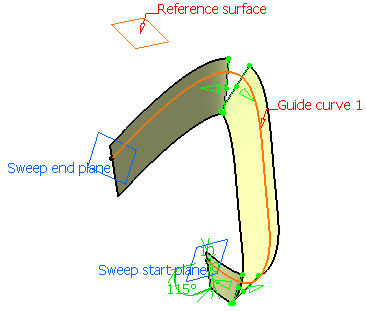
If you modify the length value after clicking Preview, and the swept surface to be generated has no twisted area, the generated swept surface will still be cut. Use the Remove twisted areas management option to start the operation again. -
Check Remove cutters on Preview and click Preview.
The error message is displayed again. This option amounts to using the Remove twisted areas management contextual command before clicking on Preview: the swept surface is recomputed without the green relimiters each time you click on Preview. -
Enter 15mm for Length 1 to reduce the swept surface width.
-
Click Preview again.
The surface has no twisted areas any more nor any hole introduced by a previous cusp or twist detection. 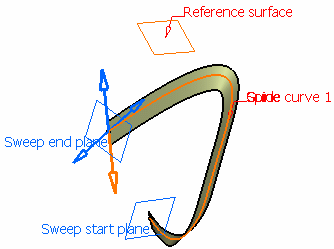
-
Click OK to create the swept surface.

This capability is available with all types of swept surfaces, except for the With tangency surface and With two tangency surfaces subtypes of the linear profile, and the One guide and tangency surface of the circular profile. 
-
-
If the generated surface is composed of several unconnected part, the Multi-result management dialog box opens. For further information, refer to Managing Multi-Result Operations.
-
![]()