 |
This task shows
you how to create a run. |

|
You can begin
routing a run from:
- Space.
- An object, such as a duct.
- The end of a run or middle of a run.
- A point.
- Connectors.
- Item reservation face.
When you
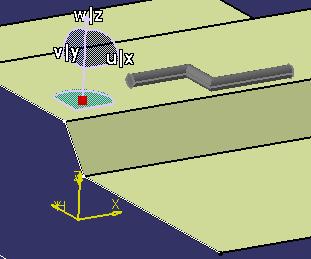
route, by default the run is created on the XY (Z=0) plane. If you
want to route a run on a specific surface or another plane, then you
need to place the compass on the plane or surface on which you want
to create the run. In the image below, if the compass had not been
placed on the surface, routing would take
place at the XY plane. If the user wants to route on the surface of
the object, he has to place the compass on it (as shown). The run
will be created on the base plane of the compass, as shown below.
 |

|
1.
|
Click the Route a Run button
 . .
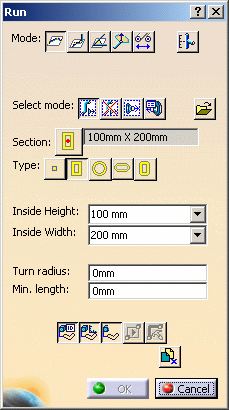
The Run dialog box is displayed.
|
|
2. |
Define the routing mode for the run:
 Point-to-point: routing will be directly between two points indicated
by clicking.
Point-to-point: routing will be directly between two points indicated
by clicking.
 Orthogonal: routing between two points will proceed first in the X
direction, then in the Y direction.
Orthogonal: routing between two points will proceed first in the X
direction, then in the Y direction.
 Slope routing: see
Slope
Routing.
Slope routing: see
Slope
Routing.
 Directional routing: see
Routing
with a Compass.
Directional routing: see
Routing
with a Compass.
 Edgeline: see
Edgeline
Routing.
Edgeline: see
Edgeline
Routing.
 Branch at
Center: see
Branching
a Run. Branch at
Center: see
Branching
a Run.
Click one of the Select Mode buttons - the default is No Filter.
 No Filter: No filters are applied and you can route from any routable
object or in space.
No Filter: No filters are applied and you can route from any routable
object or in space.
 In Space: Routing will be in space. This is useful when you have a
large object in the background, such as a ship structure, and you
want to be able to route in space. You must select this option when
you are routing in cache mode and you want to route in space with an
object in the background. When you are in design mode you do not
need to select this option. You can also select the option Allow selection of
objects in cache mode during routing. If the option (Tools
- Options - Equipment & Systems - Design Criteria) is un-selected
then you will not need to click the In Space button.
In Space: Routing will be in space. This is useful when you have a
large object in the background, such as a ship structure, and you
want to be able to route in space. You must select this option when
you are routing in cache mode and you want to route in space with an
object in the background. When you are in design mode you do not
need to select this option. You can also select the option Allow selection of
objects in cache mode during routing. If the option (Tools
- Options - Equipment & Systems - Design Criteria) is un-selected
then you will not need to click the In Space button.
 Only Part Connectors: Select this to be able to route from part or
equipment connectors only.
Only Part Connectors: Select this to be able to route from part or
equipment connectors only.
 Select
part
to
display
connector
list:
This button allows you to use a dialog box to select the connector on
which to place a part, and is useful in busy documents. Click this
button if you want to select the connector on which to place your part
by using a dialog box, instead of selecting the connector in the viewer.
With your document open, select the part you want to place, click the
Select
part
to display
connector
list
button and choose the part on which you want to place your part. A
Selected
Part
dialog box will display, showing all the connectors on your selected
part. The selected connector will be highlighted, and will be orange in
the viewer. Select the connector on which you want to place your part
and click OK. Select
part
to
display
connector
list:
This button allows you to use a dialog box to select the connector on
which to place a part, and is useful in busy documents. Click this
button if you want to select the connector on which to place your part
by using a dialog box, instead of selecting the connector in the viewer.
With your document open, select the part you want to place, click the
Select
part
to display
connector
list
button and choose the part on which you want to place your part. A
Selected
Part
dialog box will display, showing all the connectors on your selected
part. The selected connector will be highlighted, and will be orange in
the viewer. Select the connector on which you want to place your part
and click OK.
 Import
Node Points: This allows you to route using predefined node points.
See
Routing with Defined Nodes for more information. Import
Node Points: This allows you to route using predefined node points.
See
Routing with Defined Nodes for more information.
|
|
|
Section
dimensions, Turn radius and Minimum length fields display the values
given to the Line ID being used. Click the Section icon. The Display
buttons allow you to select a display mode of Line/Curve or Solid.
Click the Display Centerline button to show the centerline of the run.
This will appear as a dashed yellow line. In addition a blue line will
appear to display the Set Point setting. This feature works in both the
Line/Curve and Solid display modes. |
|
|
3. |
Define the Section parameters: |
a. Select the Section Type
button.
The Section dialog box displays.
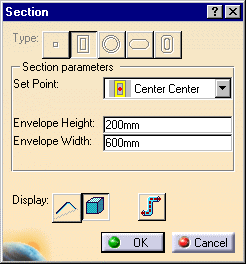
Select the Set Point, enter the Envelope dimensions (if
applicable) and select a display. Click OK.
|
b. In the Run dialog box, define the section type and
corresponding parameters for each of them:
 No Section
 Rectangular. Enter or select the:
- Inside Height
- Inside Width
 Circular
 Flat Oval
- Inside Height
- Inside Width
 Radius
Corner Radius
Corner
- Inside Height
- Inside Width
- Radius Corner
|
|
|
|
Instead
of entering the type of run, the set point and the height, width or
diameter in the Section
dialog box, you can select an existing run in your document. Once
selected, the Section dialog box will display the values for that run.
To select, click on the Run
button and then click on the run whose values you want as the default.
Make sure the entire run is selected - not just a segment or a node. It
will be easier to select the run in the specifications tree. |
|
4. |
Enter values for the minimum length and
turn radius. |
|
|
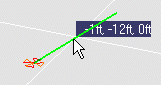
If you enter a minimum length or turn radius you
will not be able to route correctly unless these values are satisfied.
For instance, if you enter a minimum length of 10 feet, you will not be
able to complete a segment that is 5 feet. In the illustration below,
the green line shows the minimum segment length that will be created,
even if you try to make a shorter segment, because the minimum length
you entered is longer than the segment you are now trying to create.
Similarly, if you enter a value for the turn radius, your run will
automatically be adjusted to satisfy the defined turn radius.
 |
|
5. |
Click in the drawing to define the routing
points. If you want the application to show you possible paths between
two objects, then select your beginning and end points and click the
Display Alternate Path button
 . The first click
displays a field showing the number of possible paths: . The first click
displays a field showing the number of possible paths:
 .
Subsequent clicks show the actual paths. You have a choice of three:
shortest distance; orthogonal from start to end and orthogonal from
end to start. The minimum length of any segment will be equal to or
more than the Minimum Length value in the Run
dialog box. See
Displaying Alternate Paths
for more information about this option. .
Subsequent clicks show the actual paths. You have a choice of three:
shortest distance; orthogonal from start to end and orthogonal from
end to start. The minimum length of any segment will be equal to or
more than the Minimum Length value in the Run
dialog box. See
Displaying Alternate Paths
for more information about this option. |
|
6. |
Once you have a route you want to accept,
click OK or the
Create the Run button
 and the run will
be created. If you click the button you can select another run. If you
click OK you
will exit the command. Click
Cancel to abort
your routing. and the run will
be created. If you click the button you can select another run. If you
click OK you
will exit the command. Click
Cancel to abort
your routing.You can also double-click on the last point to
stop routing. In this case you will not be able to alternative paths.
|
|
7. |
Click on the Close Loop symbol
 that shows at the beginning
of the run if you want to create a closed loop run. In a closed loop
run the ends of the run are joined. that shows at the beginning
of the run if you want to create a closed loop run. In a closed loop
run the ends of the run are joined. |
|
8. |
When starting a run from a part, a run
that is a
continuation of an existing run, or if branching from an existing
run use the following buttons as needed:
 Get Line ID from Selection: gets the line ID from the run or part you
are routing from.
Get Line ID from Selection: gets the line ID from the run or part you
are routing from.
 Get Line
Size/Spec from Selection: gets the size and spec from the run or part
you are routing from. Get Line
Size/Spec from Selection: gets the size and spec from the run or part
you are routing from.
 Get Line Spec from Selection: gets the line specification from the
run or part you are routing from.
Get Line Spec from Selection: gets the line specification from the
run or part you are routing from.
NOTE: The above three buttons are dependent upon settings in the
project resource management file. Certain settings in that file will
mean these buttons are always grayed out. In the task
List of PRM Resources and Flags, see
entries for the resources: AlwaysUseSpecFromLine;
GetLineFromSelection; GetSizeFromSelection; GetSpecFromSelection.
|
| |
9. |
 The Change to
Schematic Mode button lets you toggle between schematic and
non-schematic mode. You will exit the command when you click this
button and need to click the Route Run command again. The Change to
Schematic Mode button lets you toggle between schematic and
non-schematic mode. You will exit the command when you click this
button and need to click the Route Run command again. |
|
 |