- pulling direction: this direction corresponds to the reference from which the draft faces are defined.
- draft angle : this is the angle that the draft faces make with the pulling direction. This angle may be defined for each face.
- parting element : this plane, face or surface cuts the part in two and each portion is drafted according to its previously defined direction. For an example, refer to Drafts with Parting Elements.
- neutral element : this element defines a neutral curve on which the drafted face will lie. This element will remain the same during the draft. The neutral element and parting element may be the same element, as shown in Drafts with Parting Elements.
This task shows you how to create a basic draft by selecting the neutral element.
-
The Draft Definition dialog box is displayed and an arrow appears on a plane, indicating the default pulling direction.
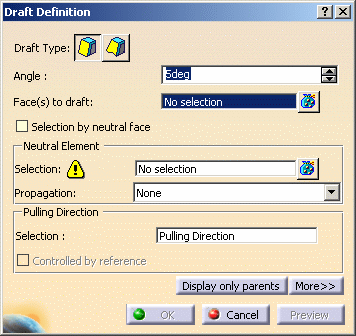
This dialog box displays the constant angle draft option as activated. If you click the Variable icon
 , you
get to the
command for creating variable angle drafts.
, you
get to the
command for creating variable angle drafts.The
 icon now available after the Faces to draft field lets you edit
the list of the faces to be drafted. For more information about that
capability, refer to
Editing a List of Elements.
icon now available after the Faces to draft field lets you edit
the list of the faces to be drafted. For more information about that
capability, refer to
Editing a List of Elements.
-
Check Selection by neutral face to determine the selection mode.
-
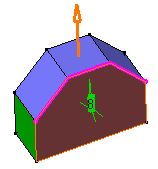
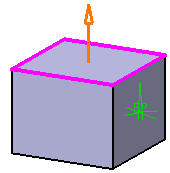
Select the upper face as the neutral element. This selection allows the application to detect the face to be drafted.
The neutral element is now displayed in blue, the neutral curve is in pink. The faces to be drafted are in dark red.
The Propagation option can be set to:
- None: there is no propagation
- Smooth: the application integrates the faces propagated in tangency onto the neutral face to define the neutral element.
For more about the neutral element, refer to A Few Notes about Drafts.
Pulling Direction
The pulling direction is now displayed on top of the part. It is normal to
the neutral face.
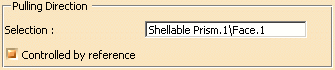
The Controlled by reference option is now activated, meaning that whenever you edit the element defining the pulling direction, you will modify the draft accordingly.
 |

- Contextual commands creating the pulling directions you need are
available from the Selection field:
- Create Line: For more information, see Creating Lines.
- Create Plane: see Creating Planes.
- X Axis: the X axis of the current coordinate system origin (0,0,0) becomes the direction.
- Y Axis: the Y axis of the current coordinate system origin (0,0,0) becomes the direction.
- Z Axis: the Z axis of the current coordinate system origin (0,0,0) becomes the direction.
If you create any of these elements, the application then displays the corresponding icon next to the Selection field. Clicking this icon enables you to edit the element.
You can use the compass direction when you use the pulling directions in the contextual menu.
-
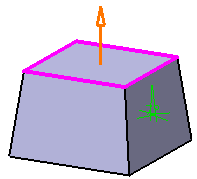
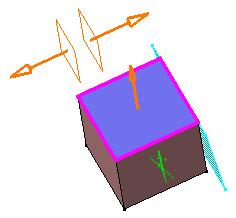
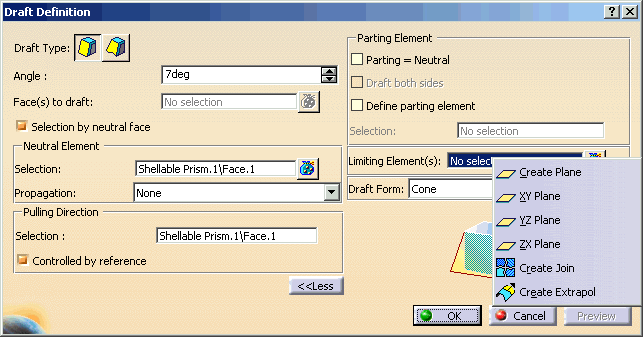
The default angle value is 5. Enter 7 degrees as the new angle value.
The new angle value is displayed in the geometry.
-
Click Preview to see the draft to be created.
-
Click More to access additional options.
To know how to use the options Parting Element and Draft Form, refer to Drafts with Parting Elements.
Limiting Elements
-
Click the Limiting Element(s) field. While drafting a face, you can limit it by selecting one or more faces or planes that intersect it completely.
-
Select Plane.1 as the limiting element.
The arrow points to the portion of material that will be kept after performing the operation.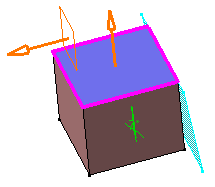
-
Select Plane.2 as the second limiting element.
Note that the number of limiting elements you select is indicated in the dialog box, just in front of the Limiting Elements field. -
Click the arrow to reverse its direction, and therefore retain the opposite side of the feature.
- Create Plane: for more information, see Creating Planes
- XY Plane: the XY plane of the current coordinate system origin (0,0,0) becomes the limiting element.
- YZ Plane: the YZ plane of the current coordinate system origin (0,0,0) becomes the limiting element.
- ZX Plane: the ZX plane of the current coordinate system origin (0,0,0) becomes the limiting element.
- Create Join: joins surfaces or curves. See Joining Surfaces or Curves.
- Create Extrapol: extrapolates surface boundaries or curves. See Extrapolating Surfaces and Extrapolating Curves.
If you create any of these elements, the application then displays the corresponding icon next to Limiting Element(s). Clicking this icon enables you to edit the element.
-
Click OK to confirm the operation.
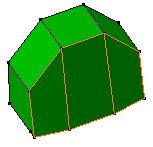
The faces are drafted but the part areas included between both limiting planes have not been modified, as specified through the limiting element option.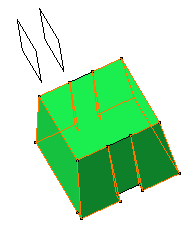
A Few Notes about Drafts
Editing Drafts |
|
|
 |
|
|
Neutral Elements |
|
|
|
|
|
Draft Definition |
Result |
|
|
|
|
Draft Definition |
Result |
Methodology |
|
|
|