|
|
-
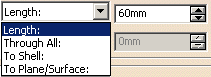
To Plane/Surface: the plane or surface you select trims the
prism. In alternative to the selection of a plane/surface you can
select a sketch,
a sketch Output or a sketch Output Profile as profile, in this case a surface is automatically extruded along
the sketch plane normal. It is also
possible to trim the prism at an Offset distance from the plane or
surface. If existing planes or
surfaces do not meet your needs, you can use any of these creation
contextual commands available from the empty field:
-
Create Plane: you can create a plane by
using one of the method described in
Creating
Planes.
-
XY Plane: the XY plane of the current
coordinate system origin (0,0,0) becomes the trimming element.
-
YZ Plane: the YZ plane of the current
coordinate system origin (0,0,0) becomes the trimming element.
-
ZX Plane: the ZX plane of the current
coordinate system origin (0,0,0) becomes the trimming element.
-
Create Join: joins surfaces or curves. See
Joining
Surfaces or Curves.
-
Create Extract: generates separate
elements from non-connex sub-elements. See
Extracting Geometry.
-
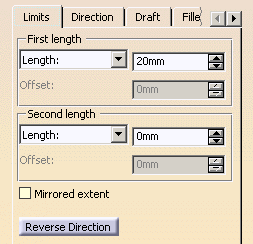
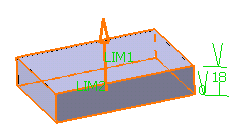
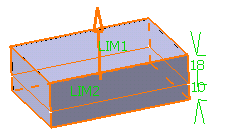
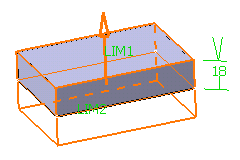
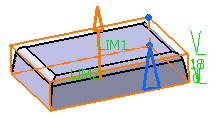
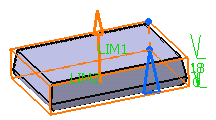
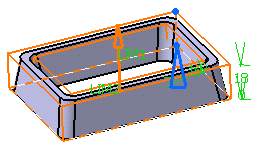
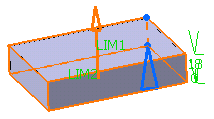
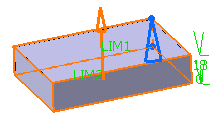
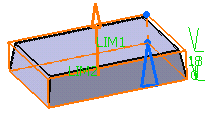
Enter the value of your choice the First length
field to define the feature length from the sketch plane. If you prefer,
you can drag the LIM1 manipulator in the geometry area.
For the purpose of our scenario, enter 18mm.
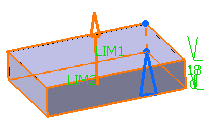
Optionally, you can also enter a value in the Second
length field to define the feature length in the opposite
direction.
Checking the Mirrored extent option extrudes
the profile in the opposite direction using the same length value as the
one defined for the first length.
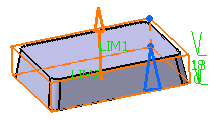
Clicking the Reverse Direction button reverses
the extrusion direction. Another way of reversing the direction is by
clicking the arrow in the geometry area.
-
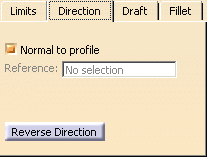
Click the Direction tab.
By default, the Normal to profile option is
checked, meaning that the profile is extruded normal to the sketch plane.
If you wish to specify another direction, just uncheck the option, and
then select a geometrical element to be used as the new reference.
You can also use
any of the following creation contextual commands:
- Create Point: For more information, see
Creating Points
- Create Line: see
Creating Lines.
- Create Plane: see
Creating Planes
- Edit Components: edits the coordinates of the
direction's components.
- X Axis
- Y Axis
- Z Axis
- Compass direction
|
Clicking the Reverse Direction button reverses
the extrusion direction.
For the purpose of our scenario, use Normal to
profile .
-
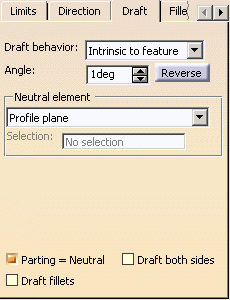
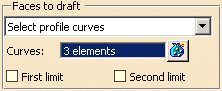
Click the Draft tab.
The Draft behavior field provides three
options:
None: there is no draft. Intrinsic to feature: you can perform a draft
operation by defining the followings:
Draft Properties:
you can perform a draft operation by defining the followings with
the faces to be drafted.
Note: You need to define a
Draft
Properties prior to the creation of the Prism
to choose Draft Properties in the pull down menu. See
Faces to draft
section.
|
|
|
 |
|
|
 |
|
|
 |
Plane/Surface: If this is
chosen, the Selection field is active. You need to
select the plane or surface of interest.
From R16 onwards, you can select a
sketch. When the sketch is selected, a GSD surface will be
automatically built internally.
|
|
|
Faces to draft
|
Faces to draft functionality can control
which faces are drafted.
There are three options:
|
|
|
|
|
|
|

 |
Parting element
|
When the Profile Plane or Plane/Surface
options are chosen to define the neutral element, then the
Parting=Neutral option is active by default. Moreover,
when Parting=Neutral is active, the Draft both
sides option becomes active too. If Draft both sides
is on, the draft will be symmetrical on the parting element.
Parting=Neutral: If
this is chosen, the plane or surface you selected as the
neutral element is also used as the parting element. Draft both sides: If this is chosen, the draft
operation applies to both opposite directions from the parting
element. Draft fillets:
If this is chosen, the fillets are applied before the draft is
created. Sometime small edges that do not lie on the parting
surface might be created. With this option, the fillets will
become the variable radius fillets instead of the constant
fillet and it prevents to generate the extra edges.
|
Without Draft Fillets option
With Draft Fillets option
|
 |
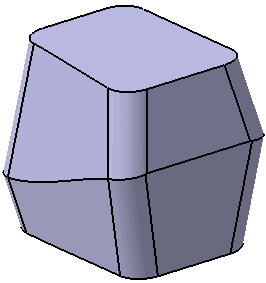
For the purpose of our scenario, set the Intrinsic to
feature option, the profile plane as the neutral element
and then enter the value of your choice to define the draft
angle. |
 |
Fillet
|
 |
-
Click the Fillet tab.
-
Check the Lateral radius option to fillet
lateral edges. You merely need to set the radius value of your choice.
For example, enter 6mm.
Checking the First radius option lets you
fillet top edges. You merely need to set the radius value of your choice.
Checking the Second radius option lets you
fillet bottom edges. You merely need to set the radius value of your
choice.
|
|
|
You can add lateral fillets to the
end faces of open sketches when the
Fillet profile ends
option is combined with one or multiple of the radius options. Here
are simple examples of the Fillet profile ends
option.
Prism with lateral radius ON
(Fillet profile end is OFF)
|
Prism with lateral radius and Fillet profile end ON
|
Prism with First radius ON
(Fillet profile end is OFF)
|
Prism with First radius and Fillet profile end ON
|
Prism with Lateral, First, and Second radius ON (Fillet profile end
OFF)
|
Prism with Lateral, First, Second radius, and Fillet profile end
ON
|
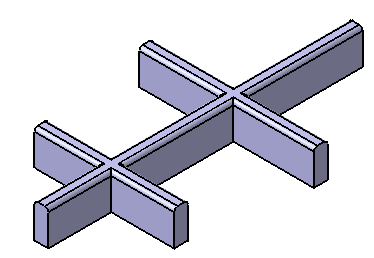
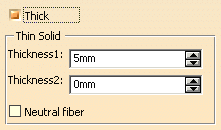
-
Check the Thick option. This option enables
you to add material to both sides of the profile.
-
Enter 10mm in the Thickness1 field and click
Preview. Thickness is added to the inside of the profile.
-
Enter 15mm in the Thickness2 field and click
Preview. Thickness is added to the outside of the profile.
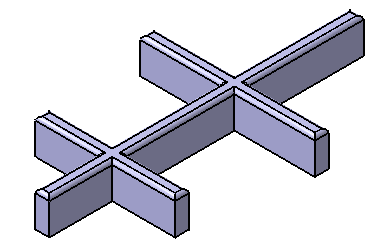
-
Enter 10mm and check
Neutral fiber and click Preview to see the result. The
Neutral fiber option adds the same
thickness to both sides of the profile. The thickness you define for Thickness1
is evenly distributed.
Core (Specific to Shellable Features)
|
The Core capability enables you to define a core body
(offset) for a shellable feature.
|
 .
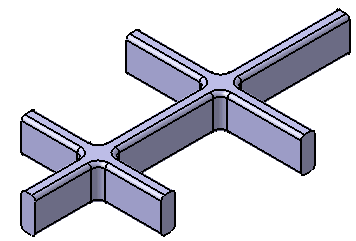
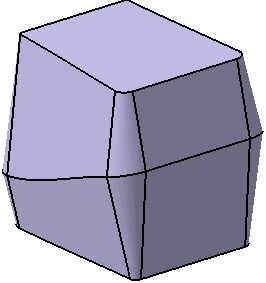
The Prism
.
The Prism
 is the default shape proposed by the application.