Open the Points3D1.CATPart document.
For instance, if you choose the Coordinates type, you are not able to select a curve. May you want to select a curve, choose another type in the combo list.
This capability is not available in object-action mode and is not retained at edition.
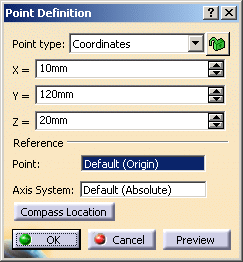
Coordinates
-
Click Point
") .
.The Point Definition dialog box appears. -
Select the Coordinates point type.
-
Enter the X, Y, Z coordinates in the current axis-system.
-
Optionally, select a Reference Point.
When the command is launched at creation, the initial value in the Axis System field is the current local axis system. If no local axis system is current, the field is set to Default.
Whenever you select a local axis system, the point's coordinates are changed with respect to the selected axis system so that the location of the point is not changed. This is not the case with points valuated by formulas: if you select an axis system, the defined formula remains unchanged.
If you create a point using the coordinates method and an axis system is already defined and set as current, the point's coordinates are defined according to current the axis system. 
The current local axis system must be different from the absolute axis. -
-
Click OK to create the point.
The point (identified as Point.xxx) is added to the specification tree.
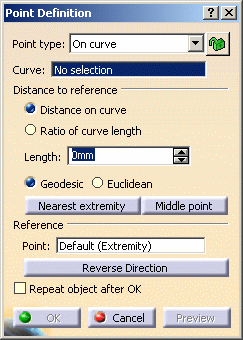
On curve
-
Click Point
.The Point Definition dialog box appears. -
Select the On curve point type.
-
Select a curve.
-
Optionally, select a reference point.
If this point is not on the curve, it is projected onto the curve. 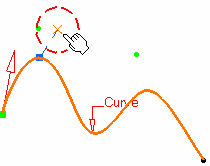
If no point is selected, the curve's extremity is used as reference. -
Select an option point to determine whether the new point is to be created:
- at a given distance along the curve from the reference point
- a given ratio between the reference point and the curve's extremity.
-
Enter the distance or ratio value.
If a distance is specified, it can be: - a geodesic distance: the distance is measured along the curve
- an Euclidean distance: the distance is measured in relation to the reference point (absolute value).
The corresponding point is displayed. 
-
Click OK to create the point.
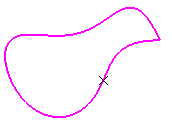
The point (identified as Point.xxx) is added to the specification tree. - If the curve is infinite and no reference point is explicitly given, by default, the reference point is the projection of the model's origin
- If the curve is a closed curve, either the system detects a
vertex on the curve that can be used as a reference point, or it
creates an extremum point, and highlights it (you can then select
another one if you wish) or the system prompts you to manually
select a reference point.
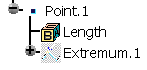
Extremum points created on a closed curve are aggregated under their parent command and put in no show in the specification tree.
- If the input for the curve is a feature, and an extremum point exits on this curve, this point is used as reference point.
- If the input for the curve is a part of a geometric feature (here an edge), and even though an extremum point already exists on this geometric feature, a new extremum is created.
It is not possible to create a point with an euclidean distance if the distance or the ratio value is defined outside the curve. Several options are available: - Nearest extremity allows you to display the point at the nearest extremity of the curve.
- Middle Point allows you to display the mid-point of the curve.
Be careful that the arrow is orientated towards the inside of the curve (providing the curve is not closed) when using the Middle Point option. - Reverse Direction allows you to display:
- the point on the other side of the reference point (if a point was selected originally)
- the point from the other extremity (if no point was selected originally).
- Repeat object after OK lets you create equidistant points on the curve, using the currently created point as the reference, as described in Creating Multiple Points and Planes.
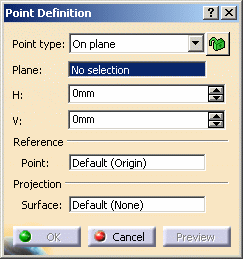
On plane
-
Click Point
.The Point Definition dialog box appears. -
Select the On plane point type.
-
Select a plane.
If you select one of the planes of any local axis system as the plane, the origin of this axis system is set as the reference point and featurized. If you modify the origin of the axis system, the reference point is modified accordingly. -
You can select a point to define a reference for computing coordinates in the plane.
If no point is selected, the projection of the model's origin on the plane is taken as reference. -
Optionally, select a surface on which the point is projected normally to the plane.
-
Click in the plane to display a point.

-
Click OK to create the point.
The point (identified as Point.xxx) is added to the specification tree.
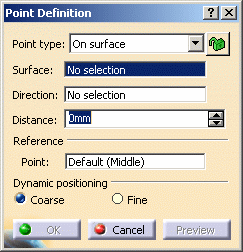
On surface
-
Click Point
.The Point Definition dialog box appears. -
Select the On surface point type.
-
Select the surface where the point is to be created.
-
Optionally, select a reference point. By default, the surface's middle point is taken as reference.
-
You can select an element to take its orientation as reference direction or a plane to take its normal as reference direction.
You can also use the contextual menu to specify the X, Y, Z components of the reference direction. -
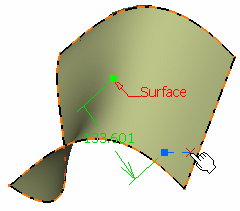
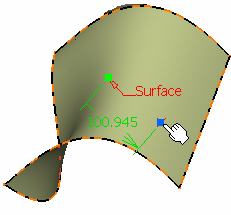
Enter a distance along the reference direction to display a point.
-
Choose the dynamic positioning of the point:
- Coarse (default behavior): the distance computed
between the reference point and the mouse click is an euclidean
distance. Therefore the created point may not be located at the
location of the mouse click (see picture below).
The manipulator (symbolized by a red cross) is continually updated as you move the mouse over the surface.
- Fine: the distance computed between the reference
point and the mouse click is a geodesic distance. Therefore the
created point is located precisely at the location of the mouse
click.
The manipulator is not updated as you move the mouse over the surface, only when you click on the surface.
- Coarse (default behavior): the distance computed
between the reference point and the mouse click is an euclidean
distance. Therefore the created point may not be located at the
location of the mouse click (see picture below).
-
Click OK to create the point.
The point (identified as Point.xxx) is added to the specification tree. - Sometimes, the geodesic distance computation fails. In this case, an euclidean distance might be used and the created point might not be located at the location of the mouse click. This is the case with closed surfaces or surfaces with holes. We advise you to split these surfaces before creating the point.
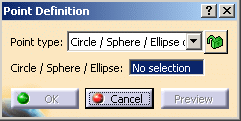
Circle / Sphere / Ellipse center
-
Click Point
.The Point Definition dialog box appears:
-
Select the Circle / Sphere / Ellipse center point type.
-
Select a circle, circular arc, ellipse, or elliptical arc, or
-
Select a sphere or a portion of sphere.
A point is displayed at the center of the selected element. 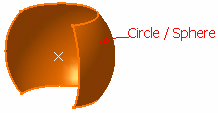
-
Click OK to create the point.
The point (identified as Point.xxx) is added to the specification tree.
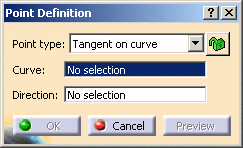
Tangent on curve
-
Click Point
.The Point Definition dialog box appears. -
Select the Tangent on curve point type.
-
Select a planar curve and a direction line.
The Multi-Result Management dialog box is displayed because several points are generated. Refer to the Managing Multi-Result Operations chapter. 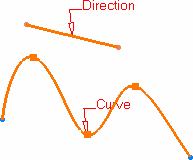
-
Click OK to create the point.
The point (identified as Point.xxx) is added to the specification tree.
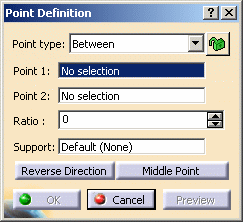
Between
-
Click Point
.The Point Definition dialog box appears. -
Select the Between point type.
-
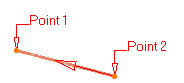
Select any two points.
-
Enter the ratio, that is the percentage of the distance from the first selected point, at which the new point is to be.
-
Select an optional Support. It can be a surface or a curve.
If a support is selected, the point is created between the two points measured along the support.
If the support is a curve, the distance along the curve is used. If the support is a surface, the created point lies on the computed geodesic curve between the two points on the surface.- If the ratio is less than 0 or greater than 1, the point is created along the extrapolated curve tangent to the support. In this case, the created point may not lie on the support.
- For a closed curve, the point is created along the orientation of curve. If you want to create the point along another part of the closed curve, the input points should be selected in reverse order.
- Points must lie on the support, otherwise an error message is issued.
- In some cases, it may not be possible to create a point on a surface with a hole or a closed surface (for instance, if the geodesic curve encounters a hole).
-
Click Reverse direction to measure the ratio from the second selected point.

If the ratio value is greater than 1, the point is located on the virtual line beyond the selected points. -
Click OK to create the point.
The point (identified as Point.xxx) is added to the specification tree.
Parameters can be edited in the 3D geometry. For more information, refer to Editing Parameters.
You can isolate a point in order to cut the links it has with the geometry used to create it. To do so, use the Isolate contextual menu. For more information, refer to Isolating Geometric Elements.
![]()