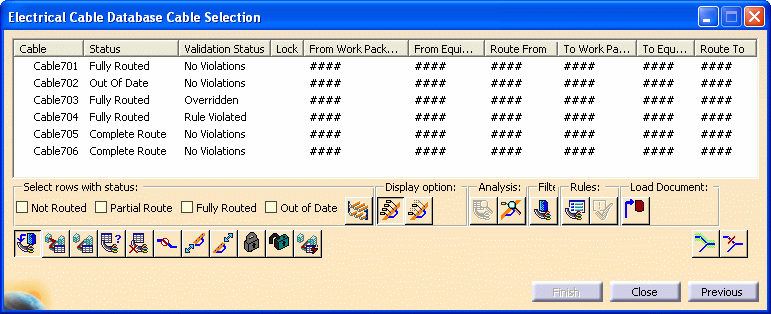
You can choose to fully route cables, or partially route a cable from one hanger to another. You can also validate cable routes, delete cable routes, and add extra length to a cable route.
For a more detailed explanation, see Routing Cables from the Database.

Depending on the checkbox you select on the Electrical Cable Database: Get Cables dialog box, you see either all the cables in the database, or only cables connected to Equipment Work Packages, or in Schematic Work Packages.
All the cables listed are identified by the current context.
No information displays for the listed cables (you see only ####) until you load the cable data. You must load cable data from the database for selected cables, or you cannot route the cables.
Click the
Load Cable from Database button
![]() and click
Finish.
and click
Finish.
For more detailed information, see Loading Cable Data from the ENOVIA Database.
You now can route the cables you loaded from the ENOVIA database.
Click the Route
Cable button
![]() and click Finish. Cables are routed using the
shortest available path.
and click Finish. Cables are routed using the
shortest available path.
You can choose to display light network object labels in your document for fully routed and partially routed cables.
Select a cable route and click the Display Label During Highlight
of Route button
![]() .
This displays all the light network objects through which this cable is
routed.
.
This displays all the light network objects through which this cable is
routed.
To display only the main key stations in your document, click the
Only Display Key Station button
![]() (after
clicking the Display Label During Highlight of Route button).
(after
clicking the Display Label During Highlight of Route button).
Click the Partial Route Cable button
![]() and Partial Route From and To fields display at the
bottom of the dialog box.
and Partial Route From and To fields display at the
bottom of the dialog box.
![]()
In your document, select the From and To hangers on the route. The hangers you select list in the Partial Route From and To fields, and display as From and To in your document.
Click Finish.
From the list in the Electrical Cable Database Cable Selection dialog box, select cables where extra length needs to be added to the From Equipment. Sorting on the From Equipment column to make sure you select cables that are connected to the same equipment.
By default, the distance between the equipment connector and the connected hanger is added to the cable length. Choosing this command overrides this distance, and adds the desired extra length.
Click the Adjust Extra Length to From Equipment button
![]() and enter the extra length to the Extra Length field
and enter the extra length to the Extra Length field
![]() . Click
Finish and the Electrical Cable Database Cable Result
dialog box displays.
. Click
Finish and the Electrical Cable Database Cable Result
dialog box displays.
Click Previous and on the Electrical Cable Database
Cable Selection dialog box, click the Adjust Extra Length to To
Equipment button
![]() and enter the extra length.
and enter the extra length.
Click Finish and the Electrical Cable Database Cable Result dialog box displays. The bottom pane of the dialog box displays a report detailing route information. You can click Save As to save the report.
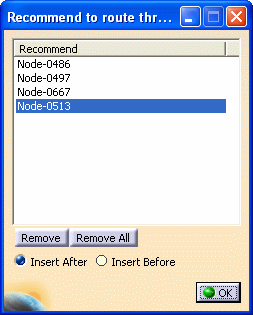
Click Recommend
Path button
![]() and the Recommend to Route Through Network dialog box displays.
and the Recommend to Route Through Network dialog box displays.
In your document, select the hangers on the path that you want to recommend. The hangers you select display as Recommend in your document.
And they display in the Recommend to Route Through Network dialog box.

You must define the hangers in order, beginning with the Route From object. You can arrange the hanger order by selecting a hanger name from the Recommend list and then selecting the Insert After or Insert Before checkbox. Now select the hanger in your document, and the hanger name is inserted in the appropriate position on the list.
Click OK when done.
The Electrical Cable Database Cable Selection dialog box redisplays. Click the Route Cable button and click Finish.
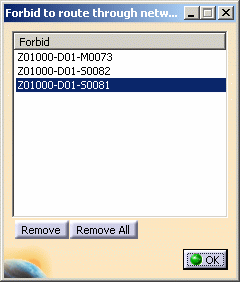
You can forbid certain hangers to be used when routing or partially routing a cable.
Click the Forbid Path button
![]() and the Forbid to Route Through Network dialog box displays.
and the Forbid to Route Through Network dialog box displays.
In your document, select the hangers on the path that you want to forbid. The hangers you select display as Forbid in your document and display in the Forbid to Route Through Network dialog box.

You can decide to remove a hanger from the list by selecting the hanger and clicking Remove. Click OK when done.
The Electrical Cable Database Cable Selection dialog box redisplays. Click the Route Cable button and click Finish.
When the routing is complete, the Electrical Cable Database Cable Result dialog box displays. The Status column indicates if the cable was routed (Fully Routed or Partially Routed), or if it could not be routed (Unable to Route). The bottom pane of the dialog box displays a report detailing route information. You can click Save As to save the report.
Click Previous to return to the Electrical Cable Database Cable Selection dialog box and manage other cables from the list.
Click the Select Cables Routed Through a Network
Object button
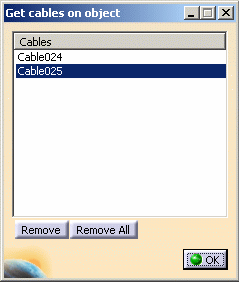
![]() and the Get Cables on Object dialog box displays.
and the Get Cables on Object dialog box displays.
In your document, select specific hangers. The cables routed through these hangers display in the Get Cables on Object dialog box.

And Query Routed Cables displays in your document at the hanger location.
Click OK when done. The Electrical Cable Database Cable Selection dialog box redisplays. the cables listed in Get Cables on Object dialog box are highlighted.
Select a
cable route from the in the Electrical Cable Database Cable Selection
dialog box. Click the Display Full Analysis of a Cable and its Route
button
![]() and the Electrical Cable Database: Analyze Cable dialog box
displays.
and the Electrical Cable Database: Analyze Cable dialog box
displays.
You can analyze a light network object such as a hanger. Click the
Display Full Analysis of Light Network Object button
![]() and the Electrical Cable Database: Analyze Light Network dialog
box displays.
and the Electrical Cable Database: Analyze Light Network dialog
box displays.
Select an object (a hanger) on the light network, and information for the selected object displays in the Electrical Cable Database: Analyze Light Network dialog box.
Click the Validate Cable Route button
![]() and click Finish.
and click Finish.
When the validation is complete, the Electrical Cable Database Cable Result dialog box displays with validation information.
If a cable is invalid because not all the nodes are connected, the route will be converted to a partial route. This allows you to manually complete the route after the cableway network is modified.
Click the
Delete Cable Route button
![]() and click Finish.
and click Finish.
When the cable route is deleted, the Electrical Cable Database Cable Result dialog box displays.
Click Previous to return to the Electrical Cable Database Cable Selection dialog box and manage other cables from the list.
You can override violations of routing rules defined in Tools Options. See Overriding Violations of Routing Rules for more information.
You can lock and unlock cable routes. See Locking and Unlocking Cable Routes for more information.
![]()