 |
-
From the Start>Knowledgeware menu, access the
Business Process Knowledge Template workbench.
-
Create the Driver technological type.
-
Add an attribute to the technological type.
-
Click the Driver type and click the Sequential
Combination icon ( ).
SequentialCombination is displayed in the Behaviors view. Double-click
SequentialCombination and double-click Driver in the Behaviors tab. ).
SequentialCombination is displayed in the Behaviors view. Double-click
SequentialCombination and double-click Driver in the Behaviors tab.
-
Double-click the SequentialCombination node. The
Sequential Combination editor is displayed. In the Name field, enter
Selecting Manikin, and click OK to validate.
-
Click the Selecting Manikin node and click the Knowledge
Relations behavior icon ( )
to create a rule. )
to create a rule.
-
Double-click the KnowledgeRelation node in the Behaviors
tab. The Knowledge Relations editor is displayed.
-
Click the Attributes tab and add the following
attributes:
| Name: Legislation, Type: String. |
| Name: Act_EEC, Type: Boolean, Value: false,
Quality: Output |
| Name: Act_US, Type: Boolean, Value: false, Quality:
Output |
 |
For more information about the
Quality field, see About the Add
Attribute dialog box... |
-
Add a rule to the behavior.
|
|
|
|
if Legislation == "SAE"

                   {

                   Act_EEC = FALSE

                   Act_US = TRUE

                   }

                   else

                   {

                   Act_EEC = TRUE

                   Act_US = FALSE

} |
|
 |
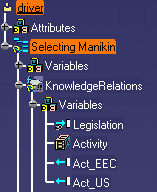
At this stage of the scenario, your workbench is
similar to the graphic opposite.
|
 |
-
Link the Knowledge Relation behavior with the Selecting
Manikin Combination for the Knowledge Relation to react to the
combination changes.
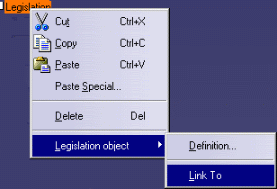
- Expand the KnowledgeRelations node and right-click the
Legislation attribute, and select Legislation object>Link To.
|
 |
- Expand the Driver node and click the Legislation attribute.
Both attributes are now linked.
|
-
Click the Selecting Manikin node in the Behaviors tab and
click the Sequential Combination icon ( )
to add a new combination. This new combination will enable the user to
load a manikin matching the US standard. )
to add a new combination. This new combination will enable the user to
load a manikin matching the US standard.
-
Double-click the SequentialCombination node in the
Behaviors tab. The SequentialCombination editor is displayed.
- In the Name field, enter Insert_US.
- Click OK to validate.
|
-
Click the Insert_US combination in the Behaviors tab and
click the Load behavior icon. The LoadDocument behavior is displayed in
the Behaviors tab.
-
Double-click the LoadDocument node. The Load Document
editor is displayed.
- In the Properties tab, select Expert&Administrator from the
scrolling list of the Behavior States and select the Activate
check box.
|
-
Click the Insert_US combination in the Behaviors tab and
click the Bind Object behavior icon. The BindObject behavior is displayed
in the Behaviors tab.
-
Double-click the BindObject node. The Bind Object editor
is displayed.
- In the Relative name field, enter: ../../../.. to access the
root product. For more information about the syntax to use in the
Relative name field, see About the Bind
mechanism...
- In the Properties tab, select Expert from the scrolling list
of the Behavior States and select the Activate check box.
|
-
Click the Insert_US combination in the Behaviors tab and
click the Insert Components behavior icon. The InsertComponents behavior
is displayed in the Behaviors tab.
-
Double-click the InsertComponents node. The Insert
Components editor opens.
- From the Definition scrolling list, select Existing
Component.
|
- Click the Existing component field, expand the LoadDocument
node and select the output Document.
|
- Click the Father product field, expand the BindObject node
and select the output Link.
|
- Set the number of instances to 1.
|
- In the Properties tab select the Activate and Focus check
boxes.
|
|
|
 |
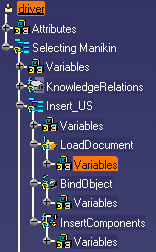
At this stage of the scenario, your workbench is
similar to the graphic opposite. |
 |
-
Click the Selecting Manikin combination in the Behaviors
tab and click the Sequential Combination icon ( )
to add a new combination. This new combination will enable the user to
load a manikin matching the EEC standard. )
to add a new combination. This new combination will enable the user to
load a manikin matching the EEC standard.
-
Double-click the SequentialCombination node in the
Behaviors tab. The SequentialCombination editor is displayed.
- In the Name field, enter Insert_EEC.
- Click OK to validate.
|
-
Click the Insert_EEC node in the Behaviors tab and click
the Load behavior icon. The LoadDocument behavior is displayed in the
Behaviors tab.
-
Double-click the LoadDocument node. The Load Document
editor is displayed.
- In the File path field, click
 and select the
BktDriver-2D-EEC.CATPart file. and select the
BktDriver-2D-EEC.CATPart file.
- In the Properties tab, select Expert&Administrator from the
scrolling list of the Behavior States and select the Activate
check box.
- Click OK to validate.
|
-
Click the Insert_EEC node in the Behaviors tab and click
the Bind Object behavior icon. The BindObject behavior is displayed in
the Behaviors tab.
-
Double-click the BindObject node. The Bind Object editor
is displayed.
- In the Relative name field, enter: ../../../.. to access the
root product.
- In the Properties tab, select Expert from the scrolling list
of the Behavior States and select the Activate check box.
|
-
Click the Insert_EEC node in the Behaviors tab and click
the Insert Components behavior icon.
-
Double-click the InsertComponents node. The Insert
Components editor opens.
- From the Definition scrolling list, select Existing
Component.
- Click the Existing component field, expand the LoadDocument
node and select the output Document.
- Click the Father product field, expand the BindObject node
and select the output Link.
- Set the number of instances to 1.
- From the Allow sub typing scrolling list, select false.
- In the Behavior States field and select the Activate and
Focus check boxes.
|
-
Expand the Insert_EEC variables node, right-click the
Activity variable, select Activity object>Link To, expand the
KnowledgeRelations variables node and click the Act_EEC output.
-
Expand the Insert_US variables node, right-click the
Activity variable, select Activity object>Link To,
expand the KnowledgeRelations variables node and click the Act_US
output.
-
Save your .CATfct file in the Graphics directory. Click
here to open the
created .CATfct.
-
Click the Generate Applicative Workbench icon
( )
to generate a user workbench. Enter the name of the workbench in the
Workbench name field, Select Manikin in this example,
and select the workbench type, Product here. )
to generate a user workbench. Enter the name of the workbench in the
Workbench name field, Select Manikin in this example,
and select the workbench type, Product here.
-
From the Tools>Options>Knowledgeware>Business
Knowledge Template menu, select All Users from the
Access Rights scrolling list and click OK to work in a User
environment.
-
Select Product1 in the specification tree and select the
Driver check box to type the root product. Its name is now
Driver:Product1.
-
Right-click Driver (product1) and select Selecting
Manikin.
The manikin matching the US standard is inserted.
-
Double-click the Legislation attribute located below the
driver (Product1) feature and enter EEC in the opening dialog box.
-
Right-click Driver (product1) and select Driver.
The manikin matching the EEC standard is inserted.
|
![]()