Click the Generate Applicative Workbench icon (![]() ):
The Applicative Workbench Generation window is displayed.
):
The Applicative Workbench Generation window is displayed.
From the Current user category scrolling list, select the category to which the workbench will belong.
|
|
Manage categories
enables you to access the Deployed Workbenches and User Categories
Management window where you can:
|
In the Workbench Name field, enter the name of the workbench you want to generate.
|
|
The Functional Library field displays the name of the current .CATfct. |
From the Workbench Type scrolling list, select the document type. Click OK to validate. The new workbench is created.
|
|
 |
|
|
To make this workbench and the user categories persistent, a
WorkbenchesIndex file is generated and stored in the
\<OS>\resources\knowledge\workbench directory (\<OS>\resources\knowledge\
corresponds to the CATKnowledgePath variable). If this directory does
not exist, it is automatically created (depending on the Write permissions.)
![]()
Click the Generate Applicative Workbench icon (![]() ).
The Applicative Workbench Generation window is displayed.
).
The Applicative Workbench Generation window is displayed.
Click Manage categories. The Deployed Workbenches and User Categories Management window is displayed.
Select the category to which the workbench belongs.
Select the workbench you want to delete and click Delete in the Deployed Workbenches Management frame. Click OK when done in this window and Cancel in the Applicative Workbench Generation window.
WorkbenchesIndex files are .xml files generated using the Generate Applicative Workbench icon and are managed by administrators. The Business Process Knowledge Template workbench enables expert users to generate applicative workbenches based on a declarative form as they rely on technological types and behaviors. Up to this release, those generated workbenches were made persistent by storing information in some Settings files:
 |
No more settings files are now involved in the administration process of applicative workbenches. |
These .xml files describe the content of user categories that can be concatenated, which produces the complete user category description. In addition to the concatenation of the categories and workbenches introduced by the different levels of administration, the expert user can have a WorkbenchesIndex file in Write access. So, he can add/remove deployed workbenches/categories within existing user categories provided they do not belong to upper levels.
![]()
The generated xml files are available in the
\<OS>\resources\knowledge\workbench directory. They are protected
against modifications and cannot therefore be modified without using the
Business Process Knowledge Template workbench. If you modify these files
manually, the modifications will be ignored when concatenating the user
categories sections. Moreover, the modified .xml file will be corrupted and no
more readable.
|
||
 |
The generated workbenches are divided into categories that are displayed in the Start menu like any other workbench. The Start menu changes if a concatenation of Workbenches index files is found.
 |
A list of user categories appears between the list of favorites workbenches (if any) and the list of DS solutions. These categories are displayed as a sub-menu whose menu items are the deployed workbenches. |
![]()
To understand the concatenation, let's take an example. Imagine an organization made up of 3 different levels:
| The expert user who manages the corporate user workbenches creates 2 user categories InteriorDesign and ChassisDesign containing respectively the Left/Right_Mirror workbenches and the Centar_Pillar workbenches (see picture below.) |
|
|
| The expert user who manages the user workbenches at the organization level creates a new user category ErgonomyChecks containing the DriverSight, 3D_Occupation and Accessibility workbenches. He also adds the Center_Mirror to the InteriorDesign user category, and the Rear_Pillar and the Front_Pillar workbenches to the ChassisDesign user category. Then he concatenates both .xml files (see picture below.) |
|
|
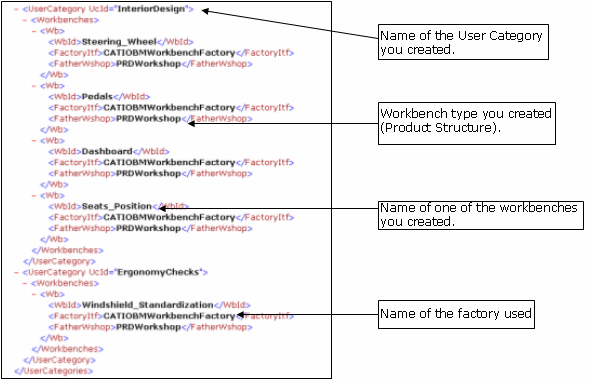
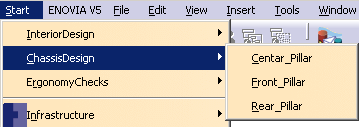
| The expert user who works at the department level adds 4 workbenches to the InteriorDesign user category and 1 workbench to the ErgonomyChecks one and concatenates the .xml files that were created by the other 2 expert users. The resulting concatenation is displayed in the Start menu (see picture below.) Note that the expert user can only delete the user categories and the workbenches that he created. He cannot delete the user categories and the workbenches that were created at an upper level (in this example, at the corporate and at the organization level.) |
|
|
![]()
Workbenches and categories names can be translated into different languages.
To do so, associate a .CATNls file to each workbench name or to each category.
*.CATNls files must be stored in the \msgcatalog directory.
|
|
|
| CATNls file for a User Category | The CATNls file name must correspond to the name of the
category. The CATNls file must contain a string with the following
format: YourCategoryname.Title = "Name that you want to assign";
So, if you want to create a category called Design_Application, create a
CATNls file containing the following string: |
| CATNls file for a User Workbench | The CATNls file name must correspond to the name of the
user workbench. The CATNls file must contain a string with the following
format: YourWorkbenchname.Title = "Name that you want to
assign";So, if you want to create a workbench called
Business_Processes_Applications, create a CATNls file containing the
following string: |
![]()
You can associate icons (. BMP files) to workbenches or categories. To do
so, create a .CATRsc file for each workbench or category. *.CATRsc files must
be stored in the \msgcatalog directory. The icons must be stored in the
\icons\normal directory.
| Icons associated to a User Workbench | The CATRsc file must correspond to the name of the user
workbench and must contain 3 different sets of strings:
So, if you create a workbench called Design_Application, and you want to
associate an icon to this workbench, create a CATRsc file containing the
following strings: // Icons for the Welcome window (64x64 pixels) Icons for the Start menu (32x32 pixels) Icons for the workbench toolbar (24x24 pixels) |
| Icons associated to a User Category | The CATRsc file must correspond to the name of the
category and must contain a string with the following format:
     YourCategoryname.Icon = "I_Name of the associated icon without the
     .bmp extension"
So, if you create a category called
Design_Application, and you want to associate an icon to this category,
create a CATRsc file containing the following string: |
![]()