Note that the default installation path can be:
     C:\Program Files\Dassault Systemes\B18
     (Windows XP Pro)

     C:\Program Files\Dassault Systemes\B18 (64-bit code on Windows XP
     Professional x64 Edition)

     C:\Program Files (x86)\Dassault Systemes\B18 (32-bit code on Windows XP
     Professional x64 Edition)
Commands used for illustration purposes are for 32-bit Windows XP Pro.
where "MyProductLine" is:
CATIA
     C:\Program Files\Dassault Systemes\B18\intel_a\code\bin\catiaenv
     (Windows XP Pro)

     C:\Program Files\Dassault Systemes\B18\win_b64\code\bin\catiaenv
     (64-bit code on Windows XP Professional x64 Edition)

     C:\Program Files (x86)\Dassault Systemes\B18\intel_a\code\bin\catiaenv
     (32-bit code on Windows XP Professional x64 Edition)
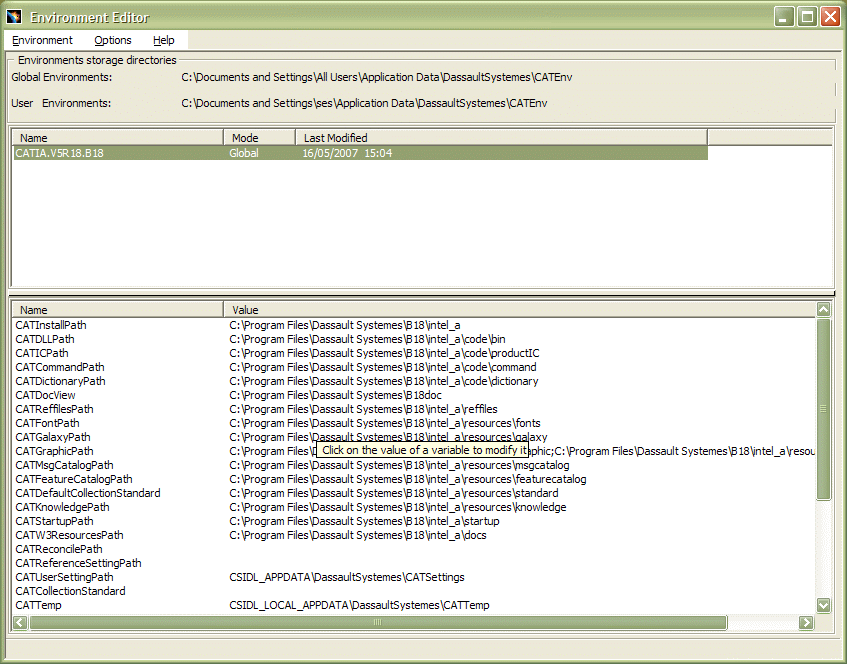
When an environment in the list is selected, click the right mouse to display a contextual menu of environment manipulation commands.
- User: indicates that the environment was set up using your userid, is visible to you and can only be accessed by you (you cannot see anybody else's user environments)
- Global: indicates that the environment was set up by somebody
belonging to the Administrators group, or who has the privileges assigned
to the Administrators group (you can see all the global environments on
your computer): this is what you will see after an initial installation
on your computer.
Only an administrator can modify global environments.
This means that you will only see in the Environment name list the names of environments you created, or which are common to all users. You can only edit environments which belong to you. Furthermore, if you select a global environment as end user, you will be able to display an environment, but not edit it.
The Environment storage directories area displays the current storage location for both global and user environments. This setting is the location you specified during installation.
Any environments created from now on will be stored in these locations.
You can use the storage directory settings to filter the list of environment names and types displayed. For example, if you created both global and user environments in the same user storage directory, selecting the user storage directory will now only display the user environments, and not the global environments.
For example, click the
CATIA.V5R18.B18 environment which is the name of the default
global environment
set up at installation.
This will be the only environment name in the list after a default installation. However, once you create new environments, these will also be displayed in the list.
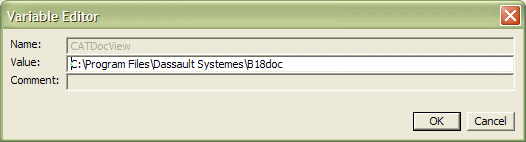
The variables and their values are displayed:
- the variable name is displayed on the left
- and the value (path) for the corresponding variable is displayed to the right.
The variable name and its corresponding value are highlighted:

C:\Program Files\Dassault Systemes\B18doc
However, you may have installed the online documentation in a different folder.
For example, you would type in the new path for the variable CATDocView. The value of the variable is reset in the Environment Variables field.
CSIDL Values in Environment Variable Paths
Consequently, CSIDL values are now part of paths pointed to by environment variables. The variables concerned are:
- CATUserSettingPath
- CATTemp
- CATReport
- CATErrorLog
- CATMetasearchPath
- CATW3PublishPath
What Is the DSKEY_TMPDIR Key?
The DSKEY_TMPDIR key points to the current temporary file path on your computer which is obtained as follows:
The software does not verify that the directory specified by the TMP or TEMP environment variables exists. The temporary file path is obtained as follows:
- the path specified by the TMP environment variable.
- the path specified by the TEMP environment variable, if TMP is not defined.
- the Windows directory, if both TMP and TEMP are not defined.
To create an environment using the New command
CATIA
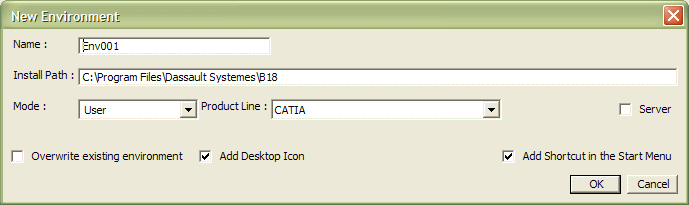
3. Enter the name of the environment to be created.
4. Enter the path of your installation folder.The default installation folder path is:
C:\Program Files\Dassault Systemes\B18\intel_a (Windows XP Pro)

     C:\Program Files\Dassault Systemes\B18\win_b64 (64-bit code on Windows XP
     Professional x64 Edition)

     C:\Program Files (x86)\Dassault Systemes\B18\intel_a (32-bit code on
     Windows XP Professional x64 Edition)
5. If you logged on as administrator, enter the environment mode.
The type can be user or global (global is available only for administrators only). If you are logged on as a normal end user, the type is set automatically to User.
6. Set the product line by choosing your product line from the list:
- CATIA
- ENOVIA V5 VPM
- ENOVIA 3d com
- ENOVIA DMU Navigator
- DELMIA
- DELMIA Automation.
7. Check the "Server" option if the environment is to be a server-type environment. This concerns ENOVIA V5 VPM and ENOVIA 3d com only.
8. Check the Add Desktop Icon option if you want to create a desktop shortcut and an entry in the appropriate Version 5 location of the Start->Programs menu.
9. Check the Overwrite existing environment option to overwrite an existing environment.10. Click OK to create the environment.
The environment is created in:
C:\Documents and Settings\User\Application Data\DassaultSystemes\CATEnv
where "user" is "All Users" for a global environment, or "myuserid" for a user environment.
To copy an existing environment using the New from... command
CATIA
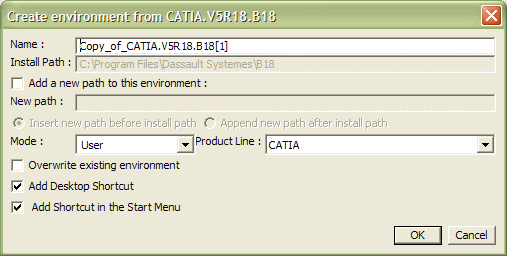
5. Enter the path of your installation folder.
The default installation folder path is:
C:\Program Files\Dassault Systemes\B18\intel_a (Windows XP Pro)

     C:\Program Files\Dassault Systemes\B18\win_b64 (64-bit code on Windows XP
     Professional x64 Edition)

     C:\Program Files (x86)\Dassault Systemes\B18\intel_a (32-bit code on
     Windows XP Professional x64 Edition)
6. Check Add a new path to this environment and specify where to insert the path (before or after the install path) using the appropriate options if required.
7. If you logged on as administrator, enter the environment mode.The type can be user or global (global is available only for administrators only). If you are logged on as a normal end user, the type is set automatically to "user".
8. Set the product line by choosing your product line from the list:
- CATIA
- ENOVIA V5 VPM
- ENOVIA 3d com
- ENOVIA DMU Navigator
- DELMIA
- DELMIA Automation.
9. Check the Add Desktop Icon option if you want to create a desktop shortcut and an entry in the appropriate Version 5 location of the Start->Programs menu.
10. Check the Overwrite existing environment option to overwrite an existing environment.11. Click OK to create the environment.
The environment is created in:
C:\Documents and Settings\User\Application Data\DassaultSystemes\CATEnv
where "user" is "All Users" for a global environment, or "myuserid" for a user environment.
Creating and deleting user-defined variables, and editing variables using the contextual menu
CATIA
2. To display the variables for any environment, click the environment name and confirm that you want to modify it.
3. Without selecting a variable, right-click on the variable list to see the contextual commands:
New VariableDelete VariableEdit Variable
4. To create a user-defined variable,
select the New Variable command to display the Variable Editor
dialog box:

and enter the variable name, its value, and a comment if required, then click OK.
5. To delete a user-defined variable,
select the variable, then select the Delete Variable command,
then click Yes to delete the variable.
Note that you can delete only user-defined variables created using the
New Variable command, and not official variables.
6. To edit any variable, select the
variable, select the Edit Variable command to display the
Variable Editor dialog box:
then enter its new value and click OK. Note that the variable name and comment field are not available if you are modifying an official variable. However, the name, value and comment are editable if you are editing a user-defined variable only.
7. Do not forget to save your
changes by selecting the Save command, also in the contextual
menu.
To create or customize an environment using the setcatenv command
The command is located in:
C:\Program Files\Dassault Systemes\B18\intel_a\code\bin
     (Windows XP Pro)

     C:\Program Files\Dassault Systemes\B18\win_b64\code\bin (64-bit code on
     Windows XP Professional x64 Edition)

     C:\Program Files (x86)\Dassault Systemes\B18\intel_a\code\bin (32-bit code
     on Windows XP Professional x64 Edition)
The full list of options for the command:
is as follows:
Operating Environment Options
- -cs: specifies the name
of the product line for which the environment is being created;
The value is CATIA (default) for the CATIA product line.
- -e: environment file name ; the "-e" option is mandatory
- -d: specifies an existing
directory in which the environment file will be created (it does not
create the directory if it does not exist);
if you do not specify "-d", the environment will be created in:C:\Documents and Settings\user\Application Data\DassaultSystemes\CATEnvwhere "user" is "All Users" for a global environment, or "myuserid" for a user environment
- -p: specifies the
installation folder, and is mandatory (by default, it is
set to the default installation folder:
C:\Program Files\Dassault Systemes\B18) - -server: creates an environment suited for server type environments. The CATUserSettingPath variable value differs between a server environment and an interactive environment. The "-e" option is mandatory when specifying server environments, and always overwrites an existing environment with the same name. Consequently, system administrator rights are required for using this option
- -cf:
specifies the name or path of an existing environment from which you
create a new environment.
For example, the command:
setcatenv -e MyNewEnv -cf
       CATIA.V5R18.B18
creates the new environment MyNewEnv from a copy of CATIA.V5R18.B18.
This allows you to inherit previous customizations without having to recreate them in the new environment.
For example, the CATReferenceSettingPath variable is frequently used to store settings locked by the administrator, and may concatenate several different levels of settings. Copying an existing environment saves you time because you do not having to customize the new environment.
Note that if you do not use the "-cf" option, all the variables are set with their default values in the new environment. If only the name is specified in the "-cf " option, the template environment is searched in the default storage directories (user or global).
Behavior Options
- -v yes/no:
- -v yes (default): verbose mode
- -v no: non-verbose mode.
- -new
yes/no:
- yes ( default): an environment with the same name (if it exists) is overwritten
- no: if an environment has the same name, this time it is not overwritten (nothing happens).
However, note that if no environment using the same name is detected, a new environment is created in both cases (whether you use "yes" or "no").
- -tools:
sets up the Tools menu containing the Environment
Editor V5R18, Nodelock Key Management
V5R18, Settings Management
V5R18, Software Management
V5R18, Batch
Management V5R18 and
Printers
V5R18 commands.
This is an exclusive option: run this command once like this:
setcatenv -tools -cs MyProductLine - -desktop yes/no: sets up the desktop representation of the environment, if it does not already exist. The default is "yes". Equivalent to "-icon yes" "-menu yes".
- -icon yes/no: creates a startup icon on the desktop; default is "yes"
- -menu yes/no: creates a startup icon in the Start menu; default is "yes"
Action Options
- -a user/global: specifies whether you are creating a user or global environment. The default value is "user". Note that you need administrator rights to create a global environment.
- -h: displays help.
The catenv.log log
file logs environment creation and modification operations. The log file is
created in the temporary folder in one of the following locations:
-
the path specified by the TMP environment variable
-
the path specified by the TEMP environment variable, if TMP is not defined
-
the current directory, if both TMP and TEMP are not defined.
- sets up Start->Programs->MyProductLine menu by adding the shortcut for your environment
- and creates the shortcut for your environment on the desktop.
cnext -env
     my_new_environment -direnv MyEnvDirectory
where "my_new_environment" is the name of the environment you created, and "MyEnvDirectory" is the name of the environment directory.
To delete an environment using the delcatenv command
![]()
- -e: environment file name ; the "-e" option is mandatory
- -d: specifies the directory containing the environment; the default is CSIDL_APPDATA\CATEnv.
- -a user/global: specifies whether you are deleting a user or global environment. The default value is "user". Note that you need administrator rights to delete a global environment.
- -desktop:
- -tools: deletes
the Tools menu containing the
Batch Management
V5R18, Environment Editor
V5R18, Nodelock Key Management
V5R18,
Settings Management
V5R18, Software Management
V5R18, and
Printers V5R18 commands.
This is an exclusive option: run this command once like this:
delcatenv -tools -cs MyProductLine - -cs [CATIA|ENOVIA_DMU_Navigator|ENOVIA_VPM|DELMIA|DELMIA Automation|ENOVIA_3d_com|ENOVIA_VPM_Navigator]: specifies the product line whose desktop tools you want to delete; the default is CATIA.
- -v yes/no:
- -v yes (default): verbose mode
- -v no: non-verbose mode
- -server: deletes an environment suited for server type environments. The CATUserSettingPath variable value differs between a server environment and an interactive environment. The "-e" option is mandatory when specifying server environments. System administrator rights are required for using this option.
- -h: displays help.
To list environments using the lscatenv command
lscatenv command to list
the names of all environments on your computer:
- -a user/global: lists user or global environments. You must specify one or the other.
- -d: specifies the directory containing the environment; the default is CSIDL_APPDATA\CATEnv.
- -h: displays help.
To read environments using the readcatenv command
- -e
:environment file name - -d: specifies the directory containing the environment; the default is CSIDL_APPDATA\CATEnv.
- -a user/global: specifies user or global environment. You must specify one or the other.
- -var: specifies a variable whose value is to be read; if you omit "-var", all variables will be displayed
- -h: displays help.
To modify environments using the chcatenv command
- -e
:environment file name - -d: specifies the directory containing the environment; the default is CSIDL_APPDATA\CATEnv.
- -a user/global: specifies user or global environment. You must specify one or the other.
- -var: specifies a variable whose value is to be modified.
The following syntax is allowed:
CATVariable = new_path
CATVariable = %CATVariable%; new_path
CATVariable = new_path; %CATVariable%If the path includes blanks, include the whole string in " ".
- -new: creates a new user-defined variable (specified by the "-var" option) with its corresponding value
Example:
chcatenv -e
       CATIA.V5R18.B18 -e global -var TOTO="%"TEMP"%" -new
- -del: deletes a user-defined variable
- -comment "text": adds a comment only to variables you created; the text must be added between " "
- -h: displays help.
Examples
readcatenv -e
     CATIA.V5R18.B18 -a
globalCATInstallPath=C:\Program Files\Dassault Systemes\B18\intel_a
CATDLLPath=C:\Program Files\Dassault Systemes\B18\intel_a\code\bin
CATICPath=C:\Program Files\Dassault Systemes\B18\intel_a\code\productIC
CATCommandPath=C:\Program Files\Dassault Systemes\B18\intel_a\code\command
CATDictionaryPath=C:\Program Files\Dassault Systemes\B18\intel_a\code\dictionary
CATDocView=C:\Program Files\Dassault Systemes\B18\intel_a\doc
CATReffilesPath=C:\Program Files\Dassault Systemes\B18\intel_a\reffiles
etc....
readcatenv -e
     CATIA.V5R18.B18 -a
global -var CATInstallPathCATInstallPath=C:\Program Files\Dassault Systemes\B18\intel_areadcatenv -e
CATIA.V5R18.B18 -d
C:\Documents and Settings\user\Application Data\DassaultSystemes\CATEnv
-var CATInstallPathCATInstallPath=C:\Program Files\Dassault Systemes\B18\intel_a
chcatenv -e
CATIA.V5R18.B18 -a user -var CATInstallPath=%CATInstallPath%;C:\TempCATInstallPath=C:\Program Files\Dassault Systemes\B18\intel_a;C:\Temp
chcatenv -e
     CATIA.V5R18.B18 -a user -var CATInstallPath=C:\Temp
CATInstallPath=C:\Temp
chcatenv -e
     CATIA.V5R18.B18 -a user -var NewVar=C:\Temp -new
NewVar=C:\Temp
lscatenv -d C:\Documents and Settings\user\Application
     Data\DassaultSystemes\CATEnv
CATIA.V5R16.B16.txt

CATIA.V5R18.B18.txtTo Set Up Two Environments With Different Licensing Settings
Each time you use one of the configurations, your licensing settings are stored in the same place. This means that when you start "Configuration 1", acquire the corresponding license, then exit your session, your licensing settings are saved. When you start "Configuration 2", your previous licensing settings are retrieved, so you must acquire the new license. Each time you exit, the previous licensing settings are overwritten by the new licensing settings.
This means that, when you use different configurations alternately, you have to continually reacquire the corresponding license each time you start.
You can avoid this problem by editing each environment. Let's assume that the two configurations are installed on an Intel computer running Windows, and that you are authorized to edit each environment. The two variables of interest are:
- CATReferenceSettingPath
- CATUserSettingPath
In the default environments created, let's assume each variable has the following values:
Environment 1
CATReferenceSettingPath   C:\Admin_License_Settings

     CATUserSettingPath          %CSIDL_APPDATA%\Dassault
     Systemes\CATSettings
For example, on Windows, CATUserSettingPath usually points to:
C:\Documents and Settings\user\Application Data\Dassault
     Systemes\CATSettings
where "user" is your userid.
Environment 2
CATReferenceSettingPath   C:\Admin_License_Settings

     CATUserSettingPath          %CSIDL_APPDATA%\Dassault
     Systemes\CATSettings
Note that, for the moment, the path pointed to by CATUserSettingPath is the same in both cases. Your licensing settings are saved here each time you use a configuration.
where "MyProductLine" is:
CATIA
C:\Documents and Settings\user\Application Data\Dassault
     Systemes\CATSettings_Config1
C:\Documents and
     Settings\user\Application Data\Dassault Systemes\CATSettings_Config2
Your license settings will now be stored in:
C:\Documents and Settings\user\Application Data\Dassault
Systemes\CATSettings_Config1
C:\Documents and
Settings\user\Application Data\Dassault Systemes\CATSettings_Config2
![]()