|
|
This task shows how to insert a
Point to Point operation in the program.
To create the operation you must define:
|
|
|
|
Open the
PrismaticMilling02.CATPart document, then select Machining >
Prismatic Machining from the Start menu. Make the Manufacturing
Program current in the specification tree. |
|
|
|
1. |
Select
Point to Point
A Point to Point entity along with a default tool is added to the program. The Point to Point dialog box appears directly at the
Strategy tab page
|
| 2. | Click
Goto Point Just double-click to end point selection. The first tool motion is defined and appears in the list in the Point to Point dialog box. |
|
| 3. | Click
Goto Position
|
|
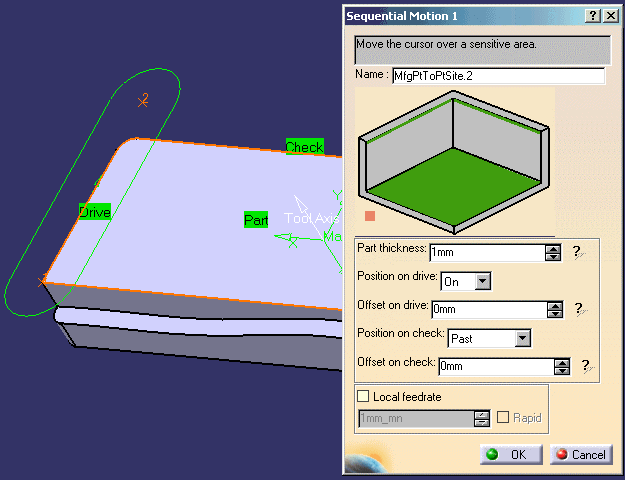 |
||
| 4. | Just click OK when you have specified the desired elements and conditions. The second tool motion is defined and appears in the list in the Point to Point dialog box. | |
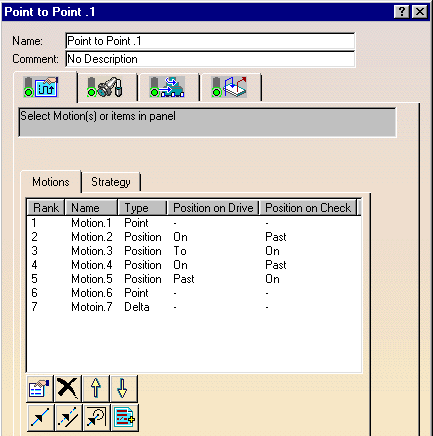
| 5. | Add other Goto Point, Goto Position and Go Delta motions
as shown in the figure below.
In the Point to Point dialog box you can:
|
|
| 6. | Select the
Strategy tab to specify
machining parameters. If needed:
|
|
| 7. | Select the Tool tab page
Select the Face Mill icon. A 50mm diameter face mill is proposed. You can adjust the parameters as required. See Edit the Tool of an Operation for more information about selecting tools. |
|
|
|
Check the validity of the operation by
replaying the tool path.
|
|
| 8. | Select the Feeds and Speeds tab
page |
|
| 9. | If you want to specify
approach and retract motion for the operation, select the
Macros tab page
The general procedure for this is described in Define Macros of an Operation. |
|
| 10. | Click OK to create the operation. | |
|
|
You can right click the motions displayed in the 3D view
to access contextual commands to insert or remove point positions and to
assign local feedrates. By selecting a circle, its center is taken as the point to machine. Points of an associated sketch can also be selected. Points can be defined by clicking on a user-defined indication plane. Points can be defined by entering X, Y, Z coordinates in the
motion editor. |
|
|
|
||