|
|
This task shows how to define the tool axis orientation by means of the Tool Axis dialog box. | |
|
|
1. |
Select the tool axis symbol in the machining operation editor's
machining strategy tab
The Tool Axis dialog box appears. |
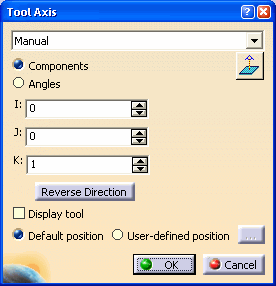
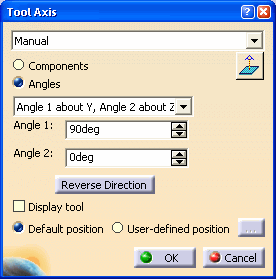
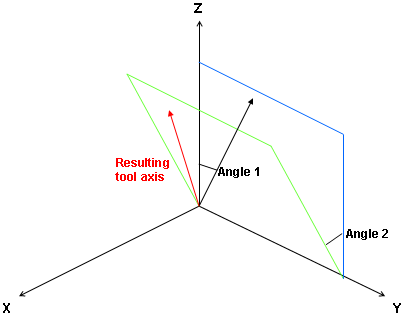
| 2. | Select one of the modes that are proposed for defining the tool axis. | |
Manual mode |
||
Select Manual from the list, then choose one
of the following:
|
||
Selection mode |
||
Select Selection from the list, then:
|
||
Points in the View mode |
||
| Select Points in the View from the list, then select two points in the 3D viewer to define the tool axis orientation. | ||
Feature Defined mode |
||
| Select Feature defined from the list, then select the machining feature in the 3D viewer. For example, if you select an axial machining feature then the axis of the feature is taken as the tool axis. | ||
Tool and Tool Axis Display capabilities |
||
|
The tool axis is visualized by means of an arrow. The tool
axis direction can be reversed by clicking Reverse
Direction in the dialog box. You can select the Display tool checkbox to display the tool and check that the tool is correctly orientated. You can also choose to display the tool at the Default position or at a User-defined position. For a user-defined position, click the [...] button and select the desired position in the 3D viewer. |
||
| 3. | Click OK to accept the specified tool axis orientation. | |
|
|
When a generic machine with one or two rotary axes on the head is referenced by the Part Operation, you can check machine accessibility when defining the tool axis of a machining operation. The Tool Axis dialog box includes more options in this case. Please refer to Check Machine Accessibility at Tool Axis Definition for more information. | |
|
|
||