Multi-Axis Curve Machining: Between 2 curves with Tool Axis Interpolation

task target This task shows how to insert a 'Between 2 curves' Multi-Axis Curve Machining operation in the program.
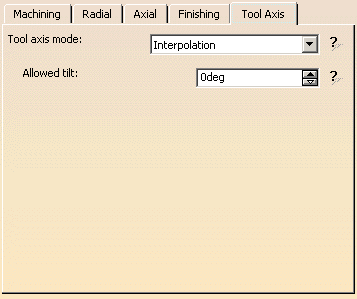
In this scenario the tool axis will be guided in Interpolation mode.

To create the operation you must define:

Multi-Edition

You can modify the parameters of two or more Multi-Axis Curve Machining operations in one shot by means of the Selected Objects > Definition... contextual command.
See
Editing Parameters of Several Multi-Axis Curve Machining Operations.

pre-requisites Open the MultiAxisMilling01.CATPart document, then select Machining > Advanced Machining from the Start menu.
Make the Manufacturing Program current in the specification tree.  
scenario
  1. Select the Multi-Axis Curve Machining icon .
    The Multi-Axis Curve Machining dialog box appears directly at the Geometry tab page
    This page includes a sensitive icon to help you specify the geometry to be machined.
    Set the Curve Machining mode to Between 2 curves.

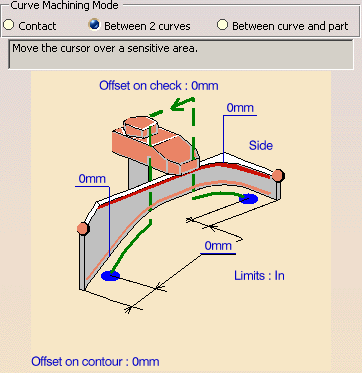
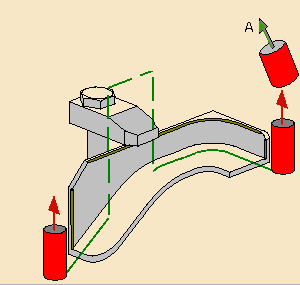
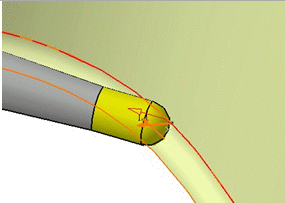
The top guiding curve in the icon is colored red indicating that this geometry is required for defining the operation.
All other geometry is optional. 

Set the Curve Machining type to Tip to drive the extremity of the tool.

 
  1. Click the top guiding curve in the icon, then select the five edges in the 3D window as shown in the figure below.
     

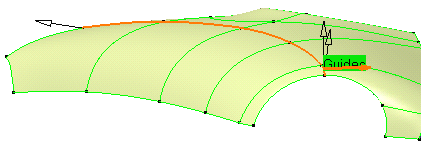
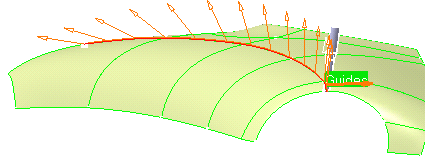
The guide elements of the icon are now colored green indicating that this geometry is now defined.
These are also indicated on the part.
  1. Select the Strategy tab page . You can then use the tab pages to set parameters for:

  1. Click the tool axis arrow (A) in the sensitive icon, then specify the reference tool axis direction for the operation.
    You can do this by selecting a surface. In this case the surface normal is used.

  1. Click one of the red interpolation axes in the sensitive icon.
    The Interpolation Axes dialog box is displayed.


    Click to add an interpolation vector:
    • The Interpolation Axes dialog box disappears.
    • Pick in the 3D viewer to indicate the position of this new interpolation vector.
      Its axis definition dialog box appears (it is described below).
    • Click OK in the dialog boxes when you are done.
    • The interpolation vector is displayed like this in the 3D Viewer.
    • Create as many interpolation vectors as necessary.
      They are listed in the dialog box with their position, direction and status.
    • Pick a vector in the dialog box. It is highlighted in the 3D viewer.

    Click to remove the interpolation vector selected in the dialog box.

    Click to edit the interpolation vector selected in the dialog box. The axis definition dialog box is displayed.
    or
    General information about this dialog box is available in
    Define the Tool Axis.
    In both modes, select the Display tool check box to display the tool in its real position

    Once Display tool is selected, the button Check Interferences becomes available. Click it to start checking those interferences.
    They are checked between the complete tool assembly and the part and check if any.
    If no interferences are found, the light on the left turns green.
    If interferences are found it turns red. They are displayed in red by the intersection of the tool with the surface in collision.


The Check Interferences button will not become available if the operation parameters are not coherent.

A tool is proposed by default when you want to create a machining operation. 
If the proposed tool is not suitable, just select the Tool tab page to specify the tool you want to use. 

This is described in Edit the Tool of an Operation.

 
  1. Select the Feeds and Speeds tab page to specify the feedrates and spindle speeds for the operation.

  2. Check the validity of the operation by replaying the tool path.

You can add approach and retract motions to the operation in the Macros tab page
This is described in Define Macros of an Operation.
  1. Click OK to create the operation.

end of task