Note that multiple Search dialog boxes can be open at the same time.
For detailed information on macros, refer to Recording, Running, and Editing Macros.
Run an Advanced Search for Specific Attributes
-
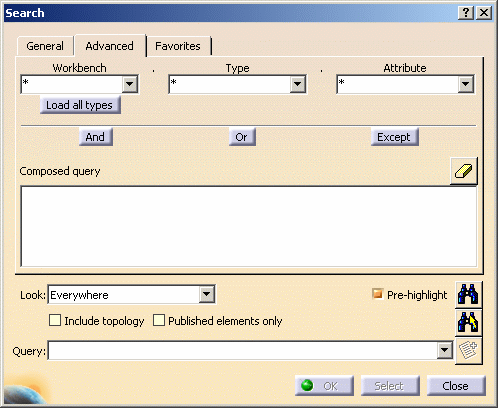
Press CTRL+F or select Edit > Search then click the Advanced tab:
-
Select the workbench Product Structure.
-
Select an attribute from the Attribute list. Each workbench corresponds to a list of types and each type corresponds to a list of attributes, among which:
- Name: indicate the name of the searched element
- Name In Graph: indicate the name of the searched element as displayed in the specification tree. This attribute is equivalent to the As displayed in graph option available from the General tab
- Color: select a color from the color chooser or
use the color of an existing element.
Note that inheritance is not taken into account and therefore, when searching for a product with a specific color, the search may return a result which seems to have a color different from the one you specified. The reason is that for Assembly objects, the color you see is not always the color that has been applied. For detailed information, refer to Displaying and Editing Graphic Properties - Set: a selection set indicating a numeric value with the corresponding unit of measure
- Visibility: indicate
if the searched object is visible, shown, invisible or hidden
- Visible
The visibility attribute is "true". One parent of the searched element can be invisible.
An object is said to be Visible if the Shown check box is selected in the Graphic tab of the Properties dialog box - Shown
The visibility attribute is "true" and the whole hierarchy of the searched element is also visible.
An object is said to be Shown if this object and each of its ancestors have the Visible status and if this object is in the visible space. No object can have both Invisible and Shown statuses - Invisible
The visibility attribute is "false" or one parent of the searched element is hidden.
An object is said to be Invisible if it is in the invisible space, i.e. if this object or at least one of its ancestors has the Invisible status - Hidden
The visibility attribute is "false". (Replaces the former attribute Hidden).
An object is said to be Hidden if the Shown check box is cleared in the Graphic tab of the Properties dialog box
- Visible
- Layer: indicate the layer of the searched element. Setting
this attribute to "None" means that you will search for any
object which is not assigned to a layer.
Note that the Layer and Visibility lists displayed here are identical to those displayed in the Graphic Properties toolbar.
The above mentioned attributes are permanent attributes, i.e. associated to any element type.
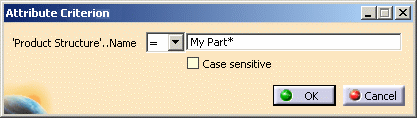
Depending on the value you select, the corresponding Attribute Criterion dialog box is displayed. In our example, select the attribute Name then enter the following value:
If you are searching for a character string whose value is empty, leave the box in the Attribute Criterion dialog box empty so that the query syntax looks something like this: 'workbench'.type.attribute=where"workbench" is the workbench in which you are performing your search
"type" is the type of the object containing the string you are searching for
"attribute" is the attribute containing the empty string.For instance:
'Product Structure'.Product.Product Description= -
Click OK then click Or .
-
Select the attribute Color from the Attribute list.
-
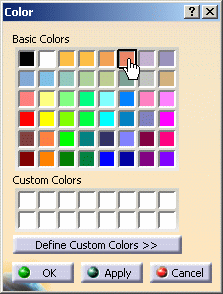
Click More Colors... at the end of the list then choose the color "Pink Salmon" as shown:
-
Click OK twice then click the Search
 button to run the search (you can also click the Search and Select
 button to run the search AND select automatically the objects that have
been found):
button to run the search AND select automatically the objects that have
been found):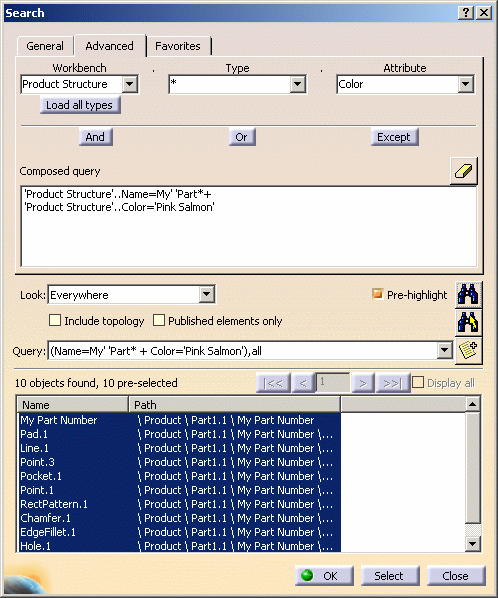
When running a query with a color as search criterion, you can either: - pick a color among the 16 colors available in the list
- or pick a color among the 48 colors available by default in the Basic Color area of the Color chooser (displayed when you click More Colors... at the end of the list)
- or pick a color among the 16 custom colors available in the Custom Colors area of the Color chooser
- or, if this color is one of the 48 colors available by default, enter directly its name in the Composed query box.
Each color displayed in the list or in the Basic Colors area is identified by a name.
For more information on the names assigned to these colors, refer to Color Palette. -
Click the
 button to delete your query.
You are now going to learn how to perform a search on specific attributes. -
Select the workbench Part Design then the type Hole.
-
Select the attribute Diameter then enter the value 10mm.
-
Select the operating sign in the list box then enter a value in the box. You can also use the default value (*) as a wildcard.
In our example, we selected the = operating sign and the value "5mm; 10mm" in order to search for any element whose diameter is comprised between "5mm" and "10mm".
The number of operating signs displayed in the list depends on the attribute you chose. Here is an exhaustive list of the available operating signs:- =
- != (different)
- <
- <=
- >
- >=
You can select Case sensitive check box if you want the search to be case sensitive. The attribute name appears then in capital letters in the query.
-
Click OK to validate then click the Search
button to run the search: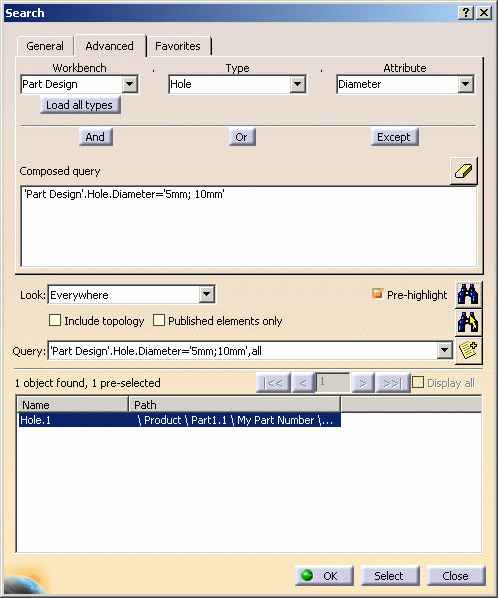
Depending on the attribute you select, the Attribute Criterion dialog box may display a list of attributes. The example below shows a list of criteria corresponding to a hole type: 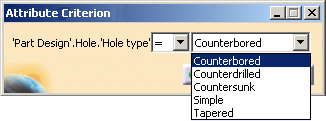
This dialog box may also let you choose a boolean attribute, in case you are searching for a threaded hole, for instance: 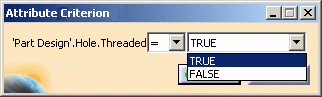

If you select the Drafting workbench, you can search for specific attributes such as dimensions by selecting Dimension in the Type box then entering your value or scale of value in the Attribute Criterion dialog box. For example:
Drafting.Dimension.Value<=140mm
searched for all objects created using the Drafting workbench, of type Dimension with a value equal to or lower than 140 millimeters
Drafting.Dimension.Value='137mm;138mm'
searches for all objects created using the Drafting workbench, of type Dimension with a value between 137 and 138 millimeters. These two values are separated by ";".
The Drafting workbench also lets you search for elements of type Geometry such as 2D lines, 2D curves and so on. Refer to "Edit/Search Dimension Status" in the Version 5 - Interactive Drafting User's Guide for detailed information.
-
Click OK to exit search mode.
![]()
Rung an Advanced Search for Dynamic Attributes
-
Press CTRL+F or select Edit > Search then click the Advanced tab:
-
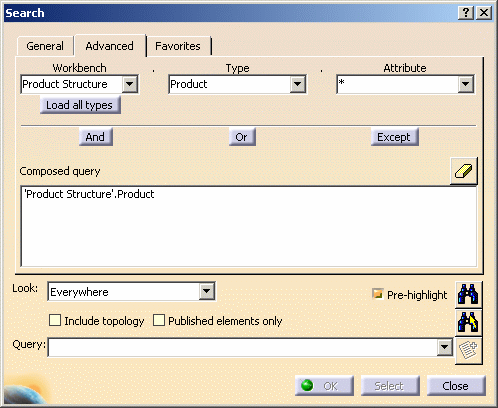
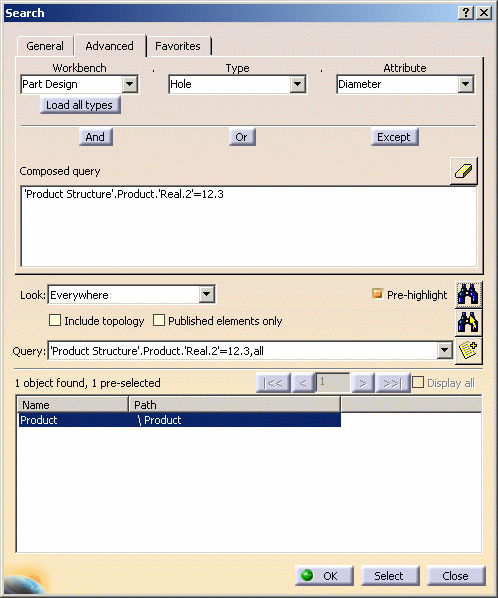
Select Product Structure in the Workbench box and Product in the Type box. The query syntax is displayed in the editor:
In our example, the product has the following user-defined attributes: 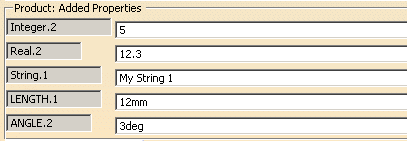
These attributes can be visualized by right-clicking the product in the specification tree then selecting Properties. -
Edit the query manually in the editor to add to search for the attribute Real.2. You can perform your search using four different queries:
'Product
               Structure'.Product.'Real.2'=12.3
means that you search for an attribute named "Real.2" with a value equal to 12.3
'Product
               Structure'.Product.'Real.2'='10;40'
means that you search for an attribute named "Real.2" with a value comprised between 10 and 40
'Product
               Structure'.Product.'Real.2'!='12;12.25'
means that you search for an attribute named "Real.2" with a value different from 12 and 12.25
'Product
               Structure'.Product.'Real.2'<13
means that you search for an attribute named "Real.2" with a value lower than 13.
-
Click the Search
button once the query is edited: -
Click OK to exit search mode.
![]()
Search Using a Combination of Search Criteria
-
Press CTRL+F keyboard shortcut or select Edit > Search then click the Advanced tab:
The three buttons And, Or and Except let you combine several search criteria and refine your query.
The query is displayed in the Composed query box and can be modified, for example to add brackets and group queries together.
-
In our example, we are searching for holes and pads created using the Part Design workbench or whose names end with "1".
-
To do so, select Part Design in the Workbench box, Hole in the Type box then Name in the Attribute box (enter the value
*1for the name). -
Click Or then select Pad in the Type box then Name in the Attribute box (enter the value
*1for the name).
The query syntax is displayed in the editor: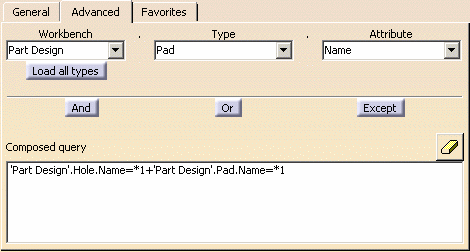
For more information on the search language, refer to the Using the Search Language task in this guide. -
Set the scope option in the Look list.
-
Click the Search
button to start the search.A list containing the search results is displayed at the bottom of the Search dialog box: 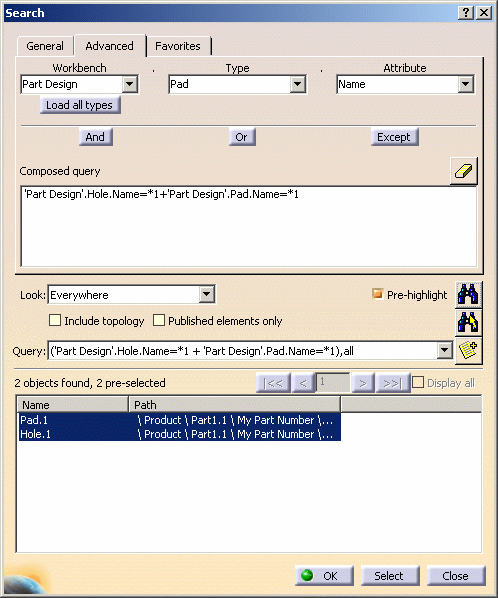
You can add your query to your favorites by clicking the Add to favorites...  button.
For more information on favorites, refer to the Searching Using the Favorites Mode.
-
Click Select to select the objects in the geometry area (note that you do not have to do this if you click the Search and Select
button to run your search). -
If you wish to modify the query, you can do it very quickly by typing a new query in the editor as shown below:
'Part Design'.Sketch.name!=*2or
'Part Design'.Sketch -
             name=*2
means that you search for all sketches except those whose names end with "2".
Another example:
'Part Design'.Hole.name=*1
             & 'Part Design'.Hole.Diameter<50mm
means that you search for all holes whose names end with "1" and whose diameters are lower than 50 mm.

You can copy one of the above-detailed queries, paste it directly to the query editor then start the search. -
Click the Search
button to start the search. -
Click OK to exit the search mode.
![]()
![]()