|
|
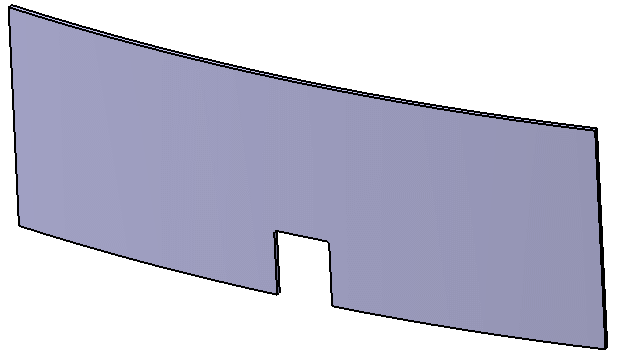
This task shows you how to
build a slot. This is usually done by an administrator. A slot is a closed contour. This closed contour is modeled using a user defined feature (UDF). |
||
|
|
A PKT license is required to
build user defined features. Starter models are provided to help in the creation of new slots. These templates are located in the following folder:
For more information and additional guidelines for defining slot geometry, see Defining Support Geometry. |
||
| The following explains how to create a basic
slot.
|
|||
|
|
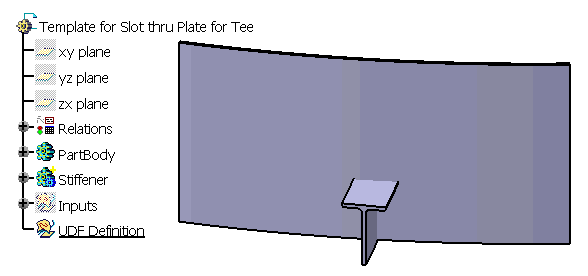
1. | Open the starter CATPart and
save it as a new CATPart.
This starter CATPart already contains the plate and shape that will assist you to define the slot contour.
For organizational purposes, it is recommended that you create all the features used to design the slot geometry under a geometrical set called UDF Definition. |
|
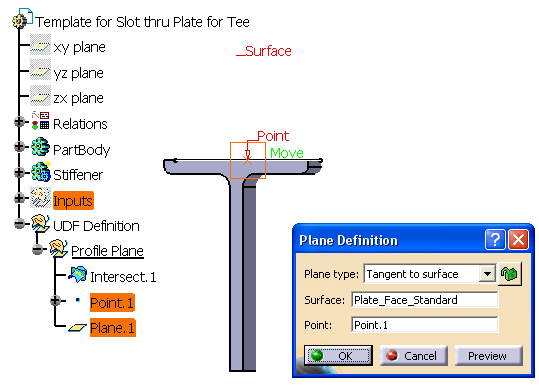
| 2. | Create a new geometrical set under UDF
Definition and rename it Profile Plane. Using the Intersection command
|
||
| 3. |
Create a point a the middle of this curve, then create a plane tangent to
Plate_Face_Standard at the midpoint.
|
||
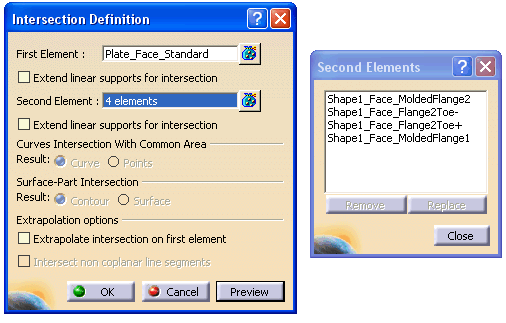
| 4. |
Create a new geometrical set under UDF Definition and rename
it Tangent Planes. Using the Intersection command, create four curves, intersections of Plate_Face_Standard with:
|
||
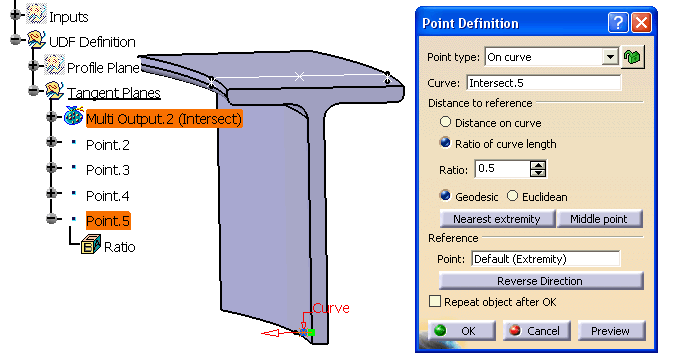
| 5. |
Using the Point
|
||
| 6. |
Using the Plane
|
||
| 7. |
Using the F(x) command, create a Length parameter.
Rename the parameter Clearance, and set its value to 20mm. You can view the new parameter in the specifications tree if you set Tools - Options properly.
|
||
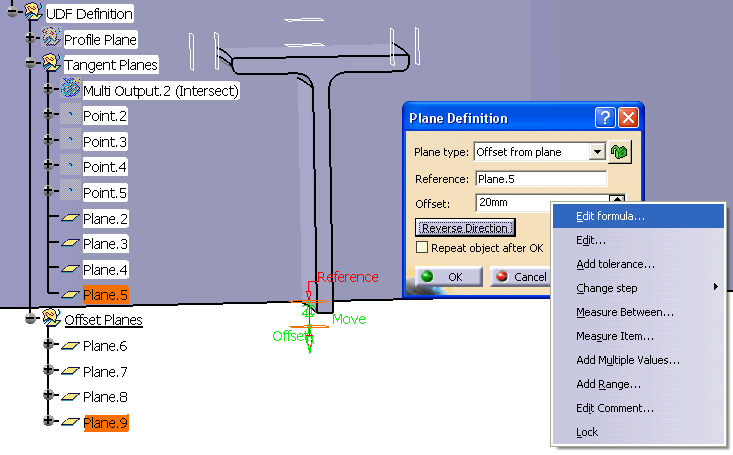
| 8. |
Create a new geometrical set under UDF Definition, and rename
it Offset Planes. Using the Plane command, create one Offset plane for each tangent plane. Each time you create an Offset plane, click Reverse Direction In the Plane Definition dialog box.
Define Offset by right-clicking the Offset field. Select Edit formula from the drop-down list and the Formula Editor dialog box opens. |
||
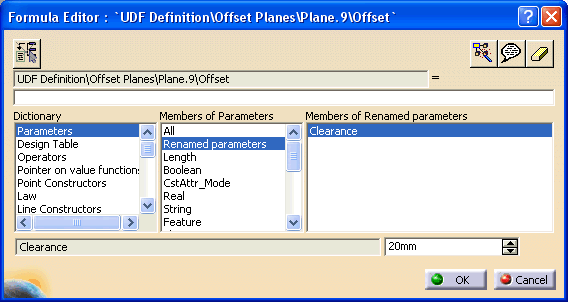
| 9. |
In the Formula Editor dialog box, select Clearance
by double clicking it in the Members of
Renamed Parameters box.
|
||
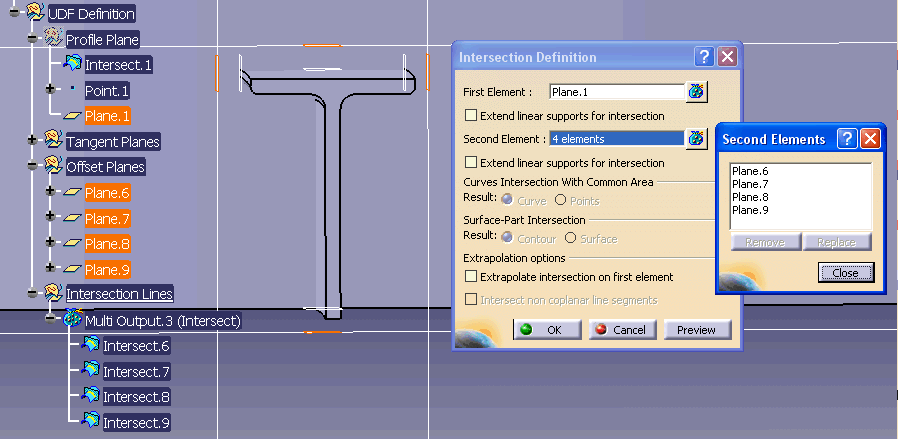
| 10. |
Create a new geometrical set under UDF Definition, and rename
it Intersection Lines. Use the Intersection command to create four lines, intersections of the plane in the Profile Plane geometrical set with each of the offset planes.
|
||
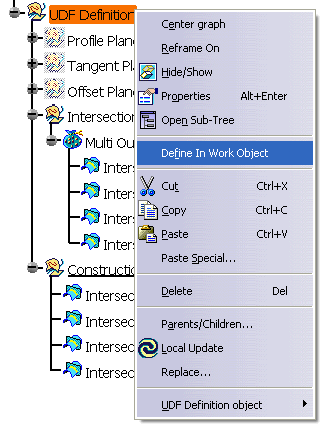
| 11. |
In the specification tree, right-click on UDF Definition. Select Define In Work Object from the drop-down list to activate this geometrical set.
|
||
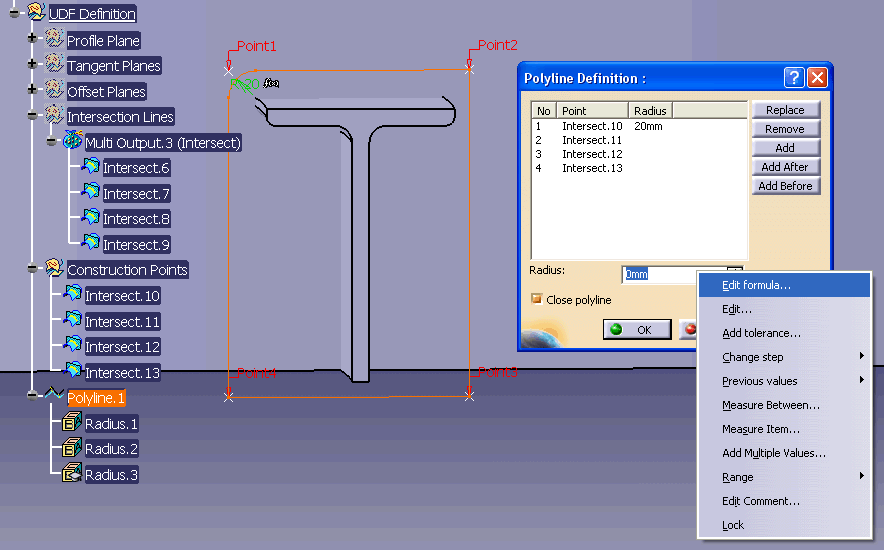
| 12. |
Using the Polyline command, select the four points
created in the previous step. Check the Close Polyline checkbox to close the
curve. Define a Radius for Point1 and Point2 by right clicking in the Radius field. Select Edit formula from the drop-down list and the Formula Editor dialog box opens. In the Formula Editor dialog box, select Clearance by double clicking it. |
||
 The slot profile is ready, and you can now create the UDF. |
|||
Naming Conventions for Section CharacteristicsWhen you define your slot UDF, follow these naming conventions: |
|||
Inputs corresponding to the profile (shape/stiffener) or the plate to be
cut have no index in there names. For example:
For a contextual slot, inputs corresponding to the penetrating object have an index in their names. For example:
For more information on naming conventions, see Defining Support Geometry. |
|||
Creating the Slot UDF |
|||
| 13. | Select Insert - UserFeature - UserFeature
Creation... from the menu bar to define the slot UDF.
The Userfeature Definition dialog box opens. Give the slot UDF a meaningful name. This is the name the user will see when he instantiates the slot in his design. Select the UDF Definition and Clearance parameter in the specifications tree. Do not forget to include formulas and rules, if any. |
||
|
|
|||
| 14. | Select the Inputs tab on the Userfeature Definition
dialog box.
If the starter model has been used, all the inputs should follow the naming convention. |
||
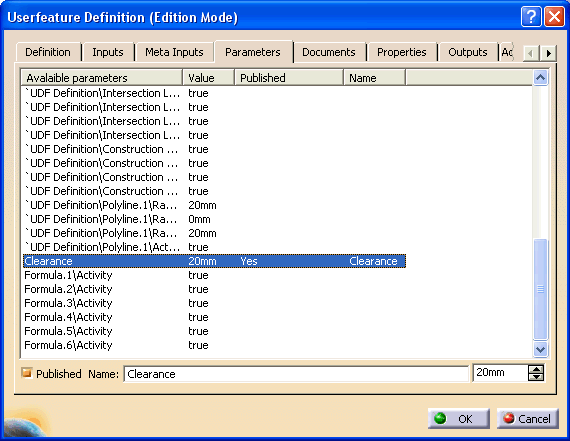
| 15. | Select the Parameters
tab. Publish the Clearance parameter by double clicking it.
NOTE: Only published parameters will be accessible when using this slot. |
||
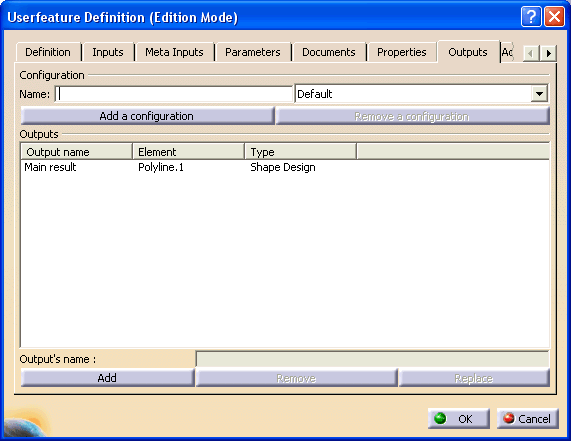
| 16. | Select the Outputs tab. Main Result is the Polyline
feature. It must display in the Output Name
column. If Main Result does not display, select Add,
Remove or Replace, and ensure that it does
display.
Click OK when done. |
||
| The slot UDF is created under the Knowledge Templates entry in the
specifications tree.
|
|||
| Store the slot UDF in the in the detailing features catalog. For more information, see Adding Slots, Endcuts and Small Assemblies Templates to a Catalog. | |||
Creating the Catalog Selection Preview Image |
|||
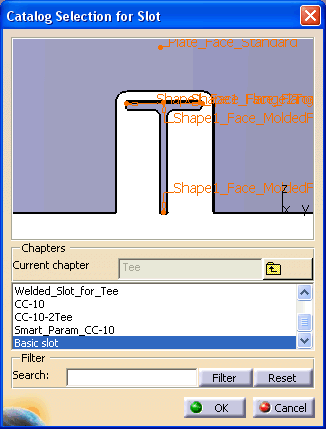
| When placing the slot in the Structure Design application,
a preview of this slot displays in the Catalog Selection for Slot dialog box.
Follow these steps to create a preview image that is representative of the actual slot.
It should look like this:
In the Structure Design application, when you place this slot, the preview in the Catalog Selection for Slot Cut dialog box looks like this:
|
|||
Creating a Bitmap Image |
|||
| When placing the slot in the
Structure Functional Design or
Ship Structure Detail Design
applications, the preview image of the slot is not used. Instead, a bitmap image displays in the
Slot dialog box.
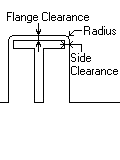
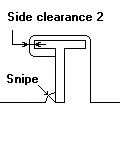
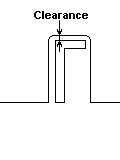
See Placing Slots. You must create an image for each new slot. The image must be a bitmap file (120 pixels wide by 160 pixels high) to properly fit in the frame of the user interface. It should clearly show the geometry so the user can select the correct detail. It should also clarify the parameters. The image name must match the UDF name. The location where these bitmap files are stored is defined by a specific PRM resource. This resource is described in List of PRM Resources. Sample bitmaps, like the ones below, are provided with the product.
|
|||
|
|
|||