How to display materials applied onto objects?
![]()
How to improve the material display?
![]()
You can:
- replace the environment image by an image with more contrast or with more vivid colors. This will impact the reflection of all the materials applied onto the model
- or if you want to modify only one material, you can define a specific environment image for this material. To do so, access the material properties then click the ... button next to the Reflectivity slider. Bear in mind that a Real Time Rendering 2 license is required in that case
- or if the material has a texture, you can play with the contrast of the texture image.
How to prevent the texture image from disappearing?
![]()
Standard OpenGL technology cannot visualize
a texture image and a reflection image simultaneously on the same material.
As a consequence, if the material reflectivity is set to a value lower than
0.2, the texture image is preferably displayed. Inversely, if the material
reflectivity is higher than 0.2, then the reflection image is preferably
displayed.
Note that using other types of materials, such as OpenGL shaders, lets you
display both effects simultaneously.
How to apply materials from a user-defined catalog?
![]()
How to visualize .cgr files correctly?
![]()
The .cgr files have to be regenerated because they are not updated. To do so:
- remove the existing .cgr files
- export the NO_LOAD_CGR=1 environment variable
- reload the model to re-create the .cgr files properly.
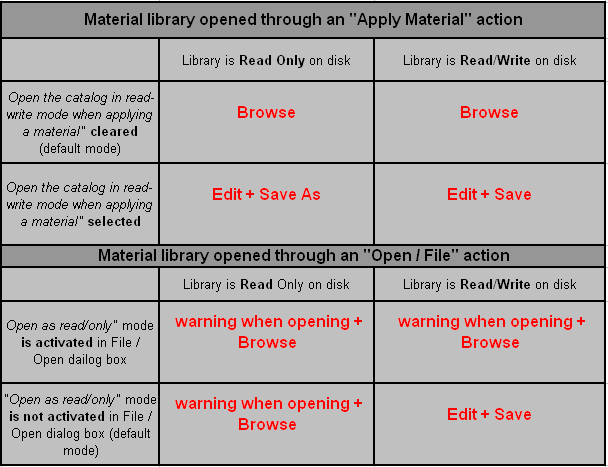
How to save a catalog opened in read-only mode?
![]()
By default, any material catalog you open in your Version 5 session opens in read-only mode for performance reasons.
To avoid loading a catalog in read-only mode and thus, be able to save it, select Tools > Options > Infrastructure > Material Library then in the Material tab, select the Applying a material opens the catalog in read/write mode check box.
How to modify the default environment image on reflective materials?
![]()
- enter the path of the user-defined environment image in the
Environment Image File box or click the
 icon to browse your folders to the desired location
 - or, when working with a Real Time Rendering 2 license, click the
 button to create a new environment image.
Note that you do not need to restart a Version 5 session to take the new environment image into account.
How to repair broken links to materials?
![]()
To correct this:
- select Tools > Options > General and access the Document tab
- in the Linked Document Localization area, make sure that the "Other folders" strategy is active (i.e. if "Yes" is displayed in the Active column). If it is not active, click the Activate button
- click the Configure... button
- in the Other Folders dialog box, select the folder containing your catalog in the Look in list
- click the Add button to add it to the search order.
How to find the material textures?
![]()
To correct this:
- select Tools > Options > General and access the Document tab
- in the Linked Document Localization area, check that the "Other folders" strategy is active (i.e. if "Yes" is displayed in the Active column). If it is not active, click the Activate button
- click the Configure... button to open the Other Folders dialog box
- select the folder containing your texture images in the Look in list
- click the Add button to add it to the search order.
How to find the catalog a material is originated from?
![]()
To do so, select Edit > Links to display the list of links between documents. As this list shows the entire path of each link, it will be easy to identify the name and location of the catalog containing the linked material.
Where is stored the material applied onto a product?
![]()
Let's take the following example:
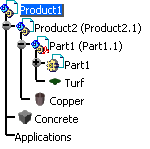
- "Concrete" is applied onto Product1
- "Copper" is applied onto Product2
- "Turf" is applied onto Part1.
Once the document has been saved, if you reopen each element individually (either using File > Open or the xxx object > Open in New Window contextual command), the result is as follows:
- when reopening Product1, the material applied onto it, i.e. "Concrete", is displayed
- when reopening Product2, no material is displayed because the
material applied onto Product2 ("Copper") is stored in the root product,
i.e. Product1 in our example.
However, you can store the material in Product2: to do so, first open Product2 in a new window then apply the material onto it.
As a consequence, if you want to be able to see the "Copper" material, you need to open Product1 - when reopening Part1, the material applied onto it, i.e. "Turf", is displayed because the material applied onto a part is stored in the part itself.
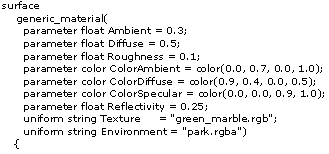
How to convert .isl files to .fx files?
When needed, you have
the ability to convert .isl files into .fx files. This conversion is
performed manually, i.e. you have to copy the necessary information from
the .isl file then insert them at the required location in the .fx file.
To do so, use the template file named
templateISLtoFX.fx provided in $CATStartupPath\startup\materials\shaders.
- In the .isl file, copy the input parameters defined in the .isl file
then paste them to the .fx file under the line //TWEAKABLES. You will
also need to modify the syntax in order to make it compliant with the
CgFX language.
Below is an example of an .isl file with the result in .fx file:
Original .isl file Result in .fx file
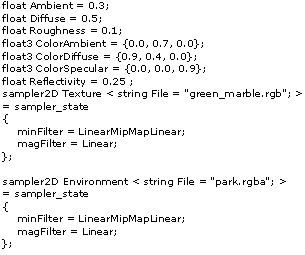
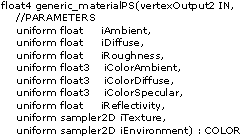
- In the .fx file under the line //PARAMETERS, define the parameters to be called by the pixel shader as follows:
- In the .isl file, copy the parameters related to the shader body then pasted it to the .fx file under the line //PIXEL SHADER and make the necessary syntax modifications:
Original .isl file Result in .fx file

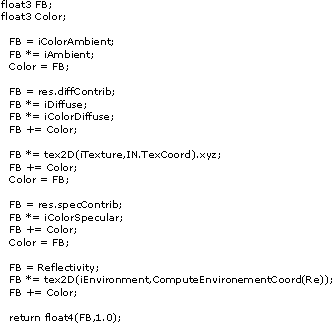
In addition to this, the roughness parameter has to be changed from:
infos.SpecExpon=32;
to
infos.SpecExpon=Roughness*100;
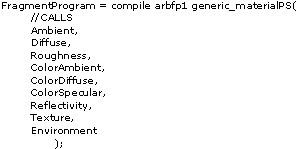
- In the .fx file under the line //CALLS, insert the following information to call the pixel shader's parameters:
Why are the rendering material properties grayed out in the Properties dialog box?
Depending on the rights' access on the .CATMaterial document and the setting specified in the Tools > Options > Infrastructure > Material Library, (Open the catalog in the read-write mode when applying a material check box), the properties are accessible or not accessible: