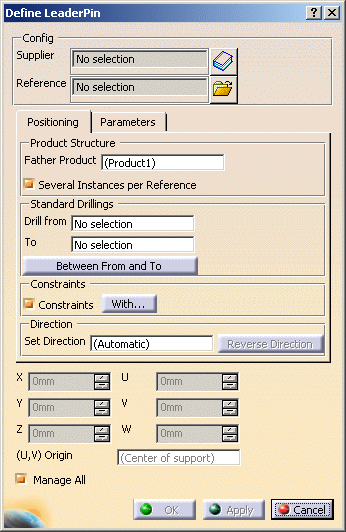
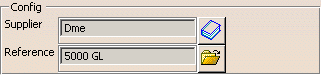
Config
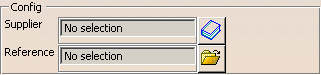
The catalog icon
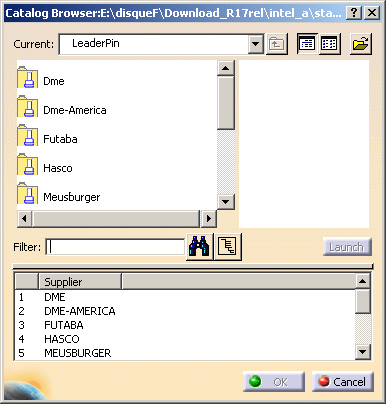
![]() starts the catalog browser to select a
Tooling
Component Template.
starts the catalog browser to select a
Tooling
Component Template.
The File Open icon ![]() starts the File Selection box to let you select your own
component.
starts the File Selection box to let you select your own
component.
Your selection is displayed in the Supplier and the
Reference text fields.
Product Structure

Father Product defines the position of the element in the
specification tree, either automatically, or as you define it.
- If the Drill From field is defined with an element, the Father Product is either the Father Product of that element or the active product if there is one.
- If the Drill From field is not defined and if the
corresponding product exists, the Father Product is defined by
the following rules:
- if the component is an Angle Pin, an Eye Bolt, an Inter lock or a Sprue Bushing, the Father Product is InjectionSide
- if the component is a Baffle, a Ring or a Plug, the Father Product is EjectionSide
- if the component is a Core Pin, an Ejector, an Ejector Sleeve, an Ejector Pin, a Flat Ejector, a Knock Out, a Puller, a Stop Disk or a Support Pillar, the Father Product is EjectorSystem
- if the component is a slider, the Father Product is Mold.
- For the edition and Add New Instance commands, the Father Product is the selected instance.
- Otherwise, the Father Product is the active product.
You can also select an element in the specification tree as the Father Product.
- You cannot select the Father Product in the 3D viewer.
- To ensure compatibility with DMU Kinematics, you are not allowed to change the Father Product of a slider.
- The value of Father Product is not modal, it is defined each time you enter a dialog box.
- All previewed instances are created under the same Father Product.
- All components created at the same time are created under the same Father Product.
- All instances of a single reference are created under the same Father Product.
- The Father Product of a component cannot be modified after the component has been instantiated.
Allows you to create
several instances of one reference component.
If you deactivate this option,
only one instance will be created per reference component.
This option overrides the same setting in Tools/Option and
is only applied to the current creation.
- if this check box is selected all the instances of the component that you create will have the
same reference:

The logical computations will be the same for each instance. - If this check box is not selected, each instance of the component
that you create will have its own reference:
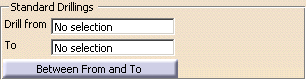
Standard Drillings
- in the Replace Reference command.
- for components with a detailed association.
- no drilling: the component instance has no association,
- drillings are set by the command Distributed Drill Component: The component instance has a detailed association.
- drillings are set by the Drill from, To Between From and To fields and the Drill Component command: the component instance has a standard association.
Drill from and To:
- used to define drillings,
- may be used to define the alignment direction.
To:
- used to compute the min, max of the filter for screw length.
Drill from:
- May be used to define constraining elements,
- Deduced from:
- the position plane in planar mode,
- the point selected to define point mode in point mode.
- Used to define position of the component instance in the specification
tree, after OK.
This applies to the case of creation of an instance based on a new reference only,
not to the case of an instance based on an already instantiated reference. - In planar mode, it is initialized by the positioning part.
It is not initialized in point mode.
Between From and To starts the Define All Component to
cross dialog box:
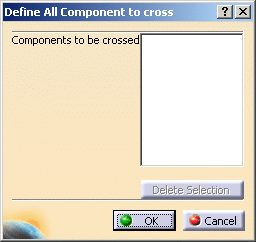
We
recommend to define the drillings for all previewed instances.
If this does not meet your needs, create the instances in several stages, or
edit them afterwards.
In the Add component and Add New Instances commands, the drillings are
defined for all previewed instances.
In the edition command, one instance is edited at a time, provided it does
not have a detailed association.
If it has sister instances, they are not
modified.
Constraints
![]()
The Constraints check box is selected by default.
The button With... starts the Constraining Components
dialog box
that lets you define the constraining components.
- The check box Constraints applies to all previewed instances.
- Modifying the constraint of one instance has no effect on the constraints of sister instances of the selected instance.
- Information displayed in this box is related to the current preview.
- Except for the Edition commands, constraints do not exist in the
tooling assembly in most cases.
They will be created when you click OK to exit the dialog box. - The nature of the constraint is not displayed.
- The element in the Tooling Component which is constrained (e.g. base
point … ) is not displayed:
- it does not exist yet in the Tooling Assembly in many cases, because you are often working with previews,
- you already know it: it is often the Tooling Component base point.
- Entering the planar mode or the point mode redefines the current constraints.
- In local mode, current constraints are defined by analogy with the ones of the selected instance, if any.
- Constraining elements can be replaced at any time with the With button, provided that only one constraint is displayed and that the rules are respected.
- In some cases, the requested constraints cannot be created, e.g. when the constraining product is different from the Father Product.
- If you have created constraints in the tooling assembly by a method other than Constraints and With... in this dialog box, those constraints are displayed in the Define Constraint Components dialog box, but will be deleted when you click OK in planar or point mode.
Direction
![]()
Direction defines the alignment direction.
- Direction is not accessible in the Replace Reference command.
- Direction is not accessible when it is not compatible with the component constraints.
- The alignment direction applies to all previewed instances.
- when you pick an axis, it becomes the alignment direction, and its name is displayed in the Set Direction field.
- if you pick another axis, it becomes the new alignment direction, and its name is displayed in the Set Direction field.
- if you do not pick an axis, the alignment direction is defined by default, and Set Direction displays (Automatic). See Adding Components.
- the definition of the alignment direction is finished when you pick a point or a face (see Working Modes)
Another possibility is to define the Drill from and the
To fields in Standard drillings
before any selection in the 3D viewer.
Reverse Direction lets you invert the direction.
Anchor Point Position
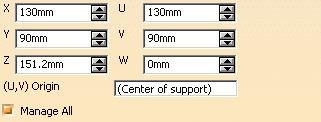
It is expressed in the compass coordinate system (X, Y, Z) and in the local axis system related to the dialog box (U, V, W). The local axis system remains the same until you close the dialog box.
By default:
- the (U,V) Origin is the center of the positioning plane,
- U and V directions are the main directions in the positioning plane,
- W is the alignment direction and its origin is equal to its intersection with the positioning plane.
You can modify the (U,V) Origin:
- by picking a line, an axis or an edge: its intersection with the positioning plane will define the (U,V) Origin.
- by picking any point, even outside the positioning plane: its normal projection on the positioning plane will define the (U,V) Origin.
The position of the anchor point can be changed using the manipulators in the 3D viewer (the dialog box is updated), or by direct input in the dialog box.
- selecting a 2D point will effectively select all of the other 2D points in the mold and create an instance of the component on each of them,
- selecting a dedicated 3D point will select all of the dedicated 3D points on the same face.
If the 3D points on the face have no specific names, they will not be selected in one shot.