Two types of curves are available for creation: freeform curves passing through all points you click, or isoparametric curves.
These curves must lie on the surface, but do not need to divide it.
Open the CurveOnSurface1.CATPart document.
-
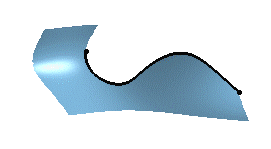
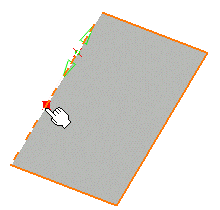
Select the surface on which the curve is to be created.
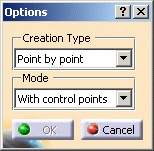
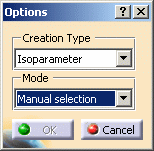
The Options dialog box is displayed letting you choose the curve type: an isoparametric curve, or a user-defined curve (Point by point).
Point by Point
If you choose the Point by point creation type, you need to define the curve creation mode: by interpolation or smoothing.
-
If you choose the With control points mode, the points you click are the control points of the resulting parametric curve, as if you were using the editing capabilities (see Using Control Points).
This is the default value. -
If you choose the Near Points mode, the resulting curve is a single-arc parametric curve, with a set degree and smoothed through the selected points.
-
Choose a mode and click anywhere on the selected surface.
In the illustration, the Auto detection mode is active to Snap On Edge icon ( from
the Dashboard), therefore clicking anywhere on the surface lets us define
a point on its edge.
from
the Dashboard), therefore clicking anywhere on the surface lets us define
a point on its edge.
A dot is displayed identifying the starting point location on the surface.

-
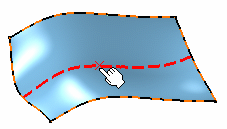
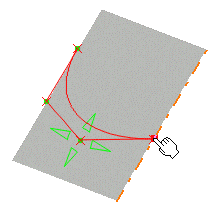
Click as many locations as you wish the curve to go through.
Dots are displayed where you clicked, and the curve is previewed as you move the pointer around.
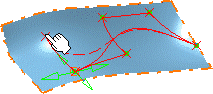
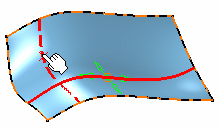
You can modify the shape of the curve at any time while it is being created.
For example, using the manipulators on the control points, you can move the pointer above any of the creation points and pull on the manipulators up to the surface edges.
Capabilities are available from the contextual menu when right-clicking a contact point.
-
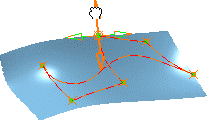
Double-click to create the end point of the curve the surface, or click OK.
The curve end point can be anywhere on a surface or on an edge.
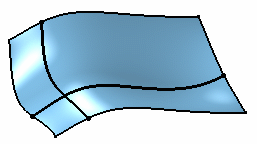
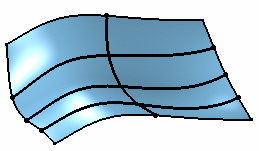
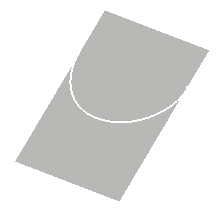
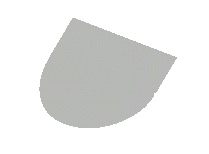
The curve has been created on the selected surface, following its shape.
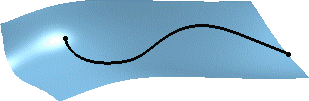
The surface can now be used for other purposes, such as trimming the surface, for instance.
-
Click the Break icon
 and select an area delimited by the curve to trim the initial surface
(see
Breaking Surfaces).
and select an area delimited by the curve to trim the initial surface
(see
Breaking Surfaces).
-
Any surface can be used, whether planar or previously deformed.
-
If you choose the Near Point option, check the Order option.
Isoparametric
-
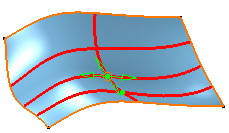
Manual selection: you can create as many isoparametric curves as necessary, in both U and V directions, while being in the command.
-
Run the mouse on the surface and click to create the curve.
-
Still in the command, perform the same operation to create the second curve.
-
Each created curve can be independently modified using the 3D manipulators.
-
Capabilities are available from the contextual menu when right-clicking a contact point.
You can select the Invert Parameter option to inverse the direction of the curve.
-
Click OK.
The curves have been created on the selected surface.
-
Automatic selection: you can create as many isoparametric curves as necessary, in both U and V directions, while being in the command.

-
Define the value for U and V directions.
-
Click the surface to preview the created curves.
-
Each created curve can be independently modified using the 3D manipulators.
-
Capabilities are available from the contextual menu when right-clicking a contact point.
You can select the Invert Parameter option to inverse the direction of the curve.
-
Click OK.
The curves have been created on the selected surface.
Creating a tangent curve:
-
Use the With control points option and click the first two points on the surface edge (parametric line).
-
Continue creating the curve as usual
-
if you wish to make it tangent on both sides of the surface, proceed by clicking two points on the other edge
-
finish as usual, by clicking the last point on the surface edge.
This is especially useful when breaking a surface. The surface edge presents a tangency continuity.
The resulting curves will always lie on the surface, even if you modify them using the control points capability after creation time.
Available capabilities from the Dashboard, and/or specified through the FreeStyle Settings, are: datum creation, auto detection, and contact points.