 |
-
Select one or more surfaces.
-
Click the Reflection Lines icon

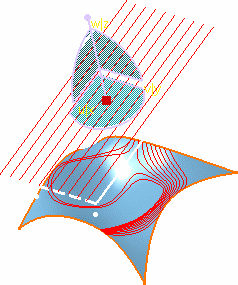
| The compass automatically is positioned above the surface and a grid
of neons is displayed. Each neon is represented by a red line. It is an
endless neon, and reflect lines are displayed in red over the surfaces. |
 |
| The Reflection Lines dialog box is displayed from
which you can define a number of parameters: |
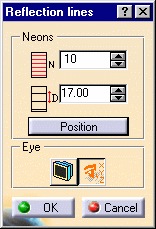 |
- The number of Neons and the spacing between any two neons.
- The position: this option automatically calculates the position of
the neon grid (according to the surfaces).
- The viewpoint:
- according to the current 3D viewer: reflect lines are re-computed
according to the new viewpoint when you are using standard viewing
manipulators.
- according to the user-defined viewpoint reflect lines do not move,
when you are using standard viewing manipulators, but you can
move the eye.
|
-
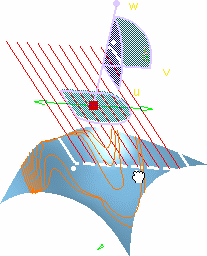
Move the grid using either the standard compass
manipulators, or the grid manipulators to display a rotation direction
and an axis.
-
Click the dot and still holding the mouse-key down, slide
the pointer about the rotation axis.
| Reflect lines on the surface evolve as you modify the position of the
grid of neons, allowing you to analyze the reflection onto the surface. |
 |
 |
Use the Edit angle step contextual menu on the
grid manipulators to allow the rotation of the grid by a value defined
within the Step dialog box.
In this case, clicking one of the grid manipulators rotates the grid by the
set value.
Press and hold the Shift key to rotate in the opposite direction. |
|
-
Once you are satisfied with your analysis, simply click
OK in the Reflection Lines dialog box.
 |
- You can select and deselect the analyzed surfaces, while applying the
analysis. The reflect lines will appear or disappear respectively.
- When you select the geometrical set as an input in the specification
tree, all the elements included in this geometrical set are automatically
selected too.
- When you click the User-defined Eye
icon
 ,
a dot is displayed (you need to zoom out to locate it) defining the eye
and its position. ,
a dot is displayed (you need to zoom out to locate it) defining the eye
and its position.
The reflect lines are frozen according to that direction, meaning that
you can move the geometry around while keeping the reflect lines static
according to that viewpoint.
You can moved the eye using manipulators, or using the Edit
contextual menu to precisely define its location.
- You can drop reflect lines onto the analyzed element. To do this,
simply choose the Keep this reflection line or Keep all reflection
lines from the contextual menu displayed when right-clicking either a
reflection line itself or one of the grid neons.
A curve corresponding to the reflection line is created.
- A Reflect Lines Analysis is created in the specification tree. You
can therefore create several such analyses on different set of surfaces
or on the same set of surfaces but using a different viewpoint.
- As reflect line analyses are objects as such, they can be edited
using the contextual menu in the specification tree.
You can transfer a reflect line analysis from an element to another, for
example. To do this:
- Double-click the reflect line analysis from the specification tree
- Select the surface on which you wish to apply the analysis. Reflect
lines are displayed on that surface provided the grid orientation is
adequate.
- Select the surface on which the analysis existed, to remove it.
- Click OK in the Reflection dialog box
|
|
|
Available capabilities from the dashboard are:
datum creation,
auto
detection, and
attenuation. |
|