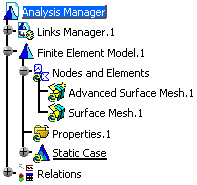
This task shows you how to enter the Advanced Surface Mesher workshop by:
-
Creating a new mesh part (using the Advanced Surface Mesher functionality)
Creating a Mesh Part
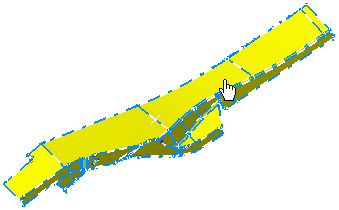
Open the sample06.CATAnalysis document from the samples directory.
-
Click Advanced Surface Mesher
 in the Meshing Methods toolbar.
 -
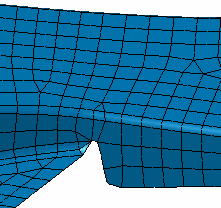
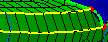
Select the geometry to be meshed.
The Global Parameters dialog box appears.
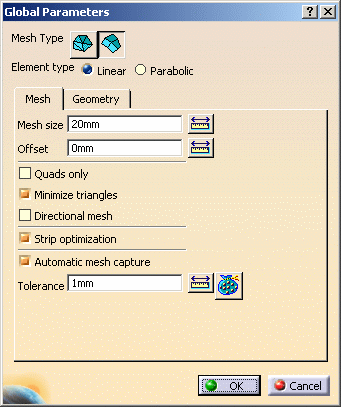
- Mesh type: lets you specify if you want
Triangle
 or
Quadrangle
or
Quadrangle
 elements.
 - Element type: lets you specify if you want Linear or Parabolic elements.
- Mesh tab: for more about this tab, refer to the Mesh tab description.
- Geometry tab: for more details about this tab, refer to the Geometry tab description.
Mesh tab
Triangle Method
- Mesh size: global size assigned to the mesh.
- Offset: value according to which both the geometrical simplification and meshing will be offset.
- Absolute sag: maximal gap between the mesh and the
geometry.
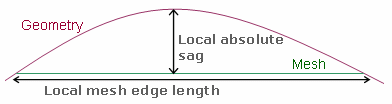
- Relative sag: is the ratio between the local
absolute sag and the local mesh edge length.
Relative sag value= (local Absolute sag value) / (local mesh edge length value).

-
Note that Absolute sag and Relative sag could modify the local mesh edge length value.
-
You can use both Absolute sag and Relative sag, the most constraining of the two values will be used.
-
- Min size: minimum value of the mesh size. Only available when you want to use Absolute sag or Relative sag.
- Automatic mesh capture: when activated, mesh capture
is performed dynamically on all the constraints (free edges,
internal edges, external edges) and after all constraints
modifications. You do not need to select all the constraints one
after the others.
Note that there is a capture tolerance, you can decide to impose or not a limitation to edge control neighborhood. Automatic capture is automatically performed using condensation. Meshing is then captured within the mesh part that belongs to the same CATAnalysis document, geometrically speaking.
Mesh can only be captured on updated mesh part.
- Tolerance: maximum distance for mesh capture.
- Mesh Part Selection
 : for
more details, refer to
Filtering Mesh Parts.
: for
more details, refer to
Filtering Mesh Parts.
Quadrangle Method
- Mesh size: global size assigned to the mesh.
- Offset: value according to which both the geometrical simplification and meshing will be offset.
- Quads only: lets you generate automatically surface meshes with quads only
when it is possible (without eliminating manually triangles).
If you select this check box, the following options are no more available: Minimize triangles, Directional mesh and Strip optimization.-
To avoid triangle creation, the number of nodes must be even on each connected component of the boundary. However, if an odd number of nodes is imposed on one or several connected components (either by capture, nodes distribution specifications, or because all domains around are already meshed), the mesh may contain one or several triangles.
-
Selecting Quads only check box can lead to very bad meshes or even to invalid meshes near the boundary (for example: if this boundary contains acute angles, inhomogeneous distribution, ...), and in some cases, it can be impossible to create meshes.
-
- Minimize triangles: minimum number of triangles in
the mesh.
This option is not available if you selected the Quads only option. - Directional mesh: produces a regular mesh based on a
privileged direction of the domain.
This option is not available if you selected the Quads only option.Option not selected
Option selected

- Strip optimization: optimizes mesh along strips in
order to obtain a more regular mesh.
This option is not available if you selected the Quads only option.Option not selected
Option selected

- Automatic mesh capture: when activated, mesh capture
is performed dynamically on all the constraints (free edges,
internal edges, external edges) and after all constraints
modifications. You do not need to select all the constraints one
after the others.
Note that there is a capture tolerance, you can decide to impose or not a limitation to edge control neighborhood. Automatic capture is automatically performed using condensation. Meshing is then captured within the mesh part that belongs to the same CATAnalysis document, geometrically speaking.Mesh can only be captured on updated mesh part.
- Tolerance: maximum distance for mesh capture.
- Mesh Part Selection
: for
more details, refer to
Filtering Mesh Parts.
Geometry tab
Triangle Method
and Quadrangle Method
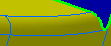
- Constraint sag: constraint is created along the edge
of a face to avoid creating elements across this edge (the element
sag would be higher than the specified value). This does not
guarantee that the whole mesh respects the sag value but helps
creating constraints. For a given mesh size, the lower the
constraint sag value, the more numerous the constraints are
created, and vice versa.
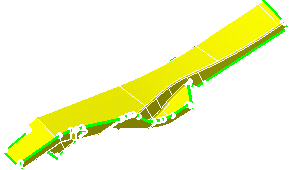
For example:
Due to the sag value (too high), the edges are not constrained (blue colored).
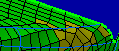
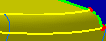
Due to the sag value (low enough), the edges are constrained (yellow colored).
- Constraint reference size
independent from mesh size: lets you keep simplified geometry
while modifying global mesh parameters after simplifying the
geometry or editing simplification.
If this option is deactivated, the Mesh size value will be the reference value for the topological regrouping.
If you activate this option, you have to specify a reference value. By default, the reference size is initialized using the Mesh size value. - Angle between faces: angle computed between the two normals corresponding to neighbor faces.
- Angle between curves: angle computed between two tangents on a contour.
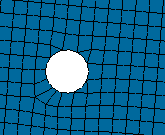
- Min holes size: sets the diameter for automatic hole
deletion.
- Merge during simplification option: allows optimizing the position of the nodes in tight zones in order to improve the quality of the elements.
- Min size
- Automatic curve capture: if selected, this option
lets you find out all external curves located near the mesh part
geometric support (under a given geometric tolerance) and project
them automatically in order to create external constraints.
When performing automatic curve capture algorithm, projected geometries are chosen among the list of selected geometries. If the list is empty, projected geometries are chosen among all existing mesh parts geometric supports defined in the current analysis. In this case, the list is automatically updated with the geometries chosen for automatic curve capture.
Then each time you update the mesh part (due to design change for example), projected geometries will be only chosen among this list of authorized geometries.This list is built only with updated geometries.
- Tolerance: maximum distance for curve capture.
- Geometry Selection
: for
more details, refer to
Filtering Geometries.
- Mesh type: lets you specify if you want
Triangle
-
Select the desired parameters in the Global Parameters dialog box.
-
Click OK.
The geometrical simplification is now launched.
An Advanced Surface Mesh.2 object appears in the specification tree.

You enter the Advanced Surface Mesher workshop.
You can now:-
Access the global parameters at any time.
-
Define local specifications of the advanced surface mesher.
-
Launch the simplification geometry or the mesh execution.
-
Perform manually modifications.
-
Exit the Advanced Surface Mesher workshop at any time.
-
Editing an Existing Mesh Part
Open the Sample06.CATAnalysis document from the samples directory.
-
Update the Advanced Surface Mesh.1 mesh part.
This will launch both the geometry simplification and the mesh execution.
-
Double-click the Advanced Surface Mesh.1 mesh part in the specification tree.
The Global Parameters dialog box appears.
For more details, refer to the description of the Global Parameters dialog box. -
Click OK without any modification.
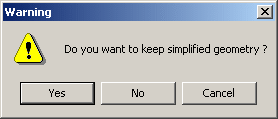
The following warning message appears:
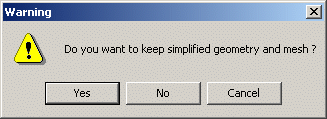
-
Click Yes.
You enter the Advanced Surface Mesher workshop.
You can now:-
Access the global parameters at any time.
-
Define local specifications of the advanced surface mesher.
-
Launch the simplification geometry or the mesh execution.
-
Perform manually modifications.
-
Exit the Advanced Surface Mesher workshop at any time.
-
-
Click Remove Mesh
 and leave the Advanced Surface Mesher
workshop.
and leave the Advanced Surface Mesher
workshop.You return in the Advanced Meshing Tools workbench.
-
Double-click the Advanced Surface Mesh.1 mesh part in the specification tree.
The Global Parameters dialog box appears.
-
Click OK without any modification.
The following Warning message appears:
-
Click Yes in the Warning message.
You enter again the Advanced Surface Mesher workshop.