This task shows how to impose nodes (as mesh specifications) either on free edges or on constrained edges.
Open the sample07.CATAnalysis document from the samples directory.
-
Enter the Advanced Surface Mesher workshop.
For more details, refer to Entering the Advanced Surface Mesher Workshop.
-
Click Imposed Elements
 in the Local Specifications toolbar.
The Imposed Elements dialog box appears.
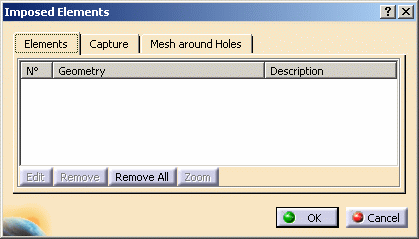

The last selected tab in which you performed a modification and a validation using the OK button is saved in settings.
That means that this tab will be displayed next time you will launch the Imposed Elements functionality.If you select one element in this dialog box switch buttons become selectable:
- Edit: you can display the Edit Elements Distribution dialog box and, if needed, modify the values.
- Remove: you can remove one node distribution you previously created using this dialog box.
- Remove All: you can remove all the node distributions you previously created using this dialog box.
- Zoom: you can zoom in on the node distribution that
is currently selected in this dialog box.
Note that you can use edge selection by path.
Distributing Nodes
This Imposed Elements dialog box will display information on the nodes you are going to distribute.
Nodes can be distributed both on external and internal curves. -
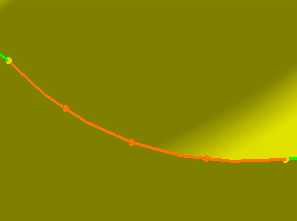
Select the geometry on which you want to distribute nodes.
You can select several edges on the condition they are continuous to each others.
The Edit Elements Distribution dialog box now appears with given default values.
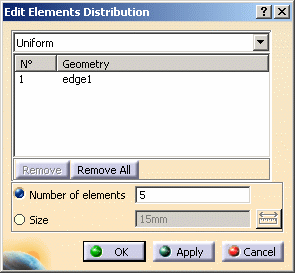
- Distribution type:
- Uniform: the distance between all the distributed nodes will be the same.
- Arithmetic: the distance between the distributed
nodes will be defined by a common difference computed with the
following parameters.

Note that you have to specify two and only two parameters among the four.
- Number of Edges: lets you specify how many edges you want.
- Size 2 / Size 1: lets you specify the ratio between the lengths of the last and the first distribution edge.
- Size at node 1: lets you specify the length of the first edge of the distribution.
- Size at node 2: lets you specify the length of the last edge of the distribution.
- Symmetry: lets you specify if the distribution should be symmetric or not.
- Geometric: the distance between the distributed
nodes will be defined by a common ratio computed with the
following parameters.
Note that you have to specify two and only two parameters among the four.
- Number of Edges: lets you specify how many edges you want.
- Size 2 / Size 1: lets you specify the ratio between the lengths of the last and the first distribution edge.
- Size at node 1: lets you specify the distance between the two first nodes of the distribution.
- Size at node 2: lets you specify the distance between the two last nodes of the distribution.
- Symmetry: lets you specify if the distribution should be symmetric or not.
- User Law: the distance between the distributed
nodes will be defined by a knowledge law previously defined in
the Product Advisor workbench.
For more details about the user law, refer to the Infrastructure User's Guide - Advanced Tasks - Using Knowledgeware Capabilities.
-
A user law must have been defined.
-
The user law distribution defined using the Imposed Elements command in the Local Specifications toolbar will be associative. This means that you can retrieve, edit and modify this distribution after launching or removing the geometry simplification and the mesh execution.
- Law: lets you select the desired law.
- Number of edges: lets specify how many edges you want.
- Reverse direction: this button lets you reverse the direction of distribution.
-
- Selected elements: lets you visualize the selected elements.
Multi-selection is available.- Remove: lets you remove a selected element in the list.
- Remove All: lets you remove all the elements of the list.
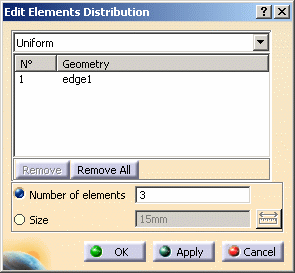
- Number of elements: lets you define the number of the nodes you want to distribute on the currently selected geometry.
- Size: lets you define the size on which a given nodes will be uniformly distributed.
- Distribution type:
-
If needed, modify the number of the nodes or size. In this case, enter 3 as new value (Number of elements).
-
Click OK in the Edit Elements Distribution dialog box.
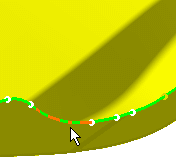
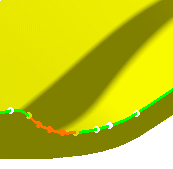
The nodes appear on the geometry.
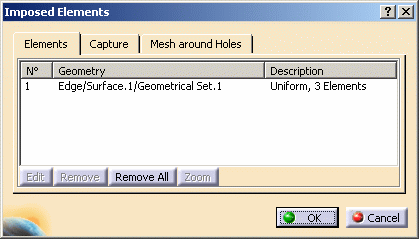
The Imposed Elements dialog box is automatically updated.
-
Click OK.
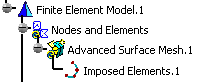
An Imposed Elements.1 object appears in the specification tree under the Advanced Surface Mesh.1 mesh part.
Capturing Nodes
Open the Sample30.CATAnalysis document from the samples directory.
-
Enter the Advanced Surface Mesher workshop.
To do this, double-click the Advanced Surface Mesh.2 mesh part in the specification tree.
For more details, refer to Entering the Advanced Surface Mesher Workshop.
-
Click Imposed Elements
in the Local Specifications toolbar. -
Select the Capture tab.
-
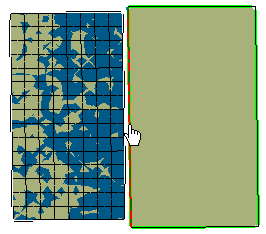
Select the edge you want to be imposed nodes (also called Receiver edge).
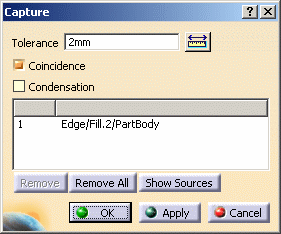
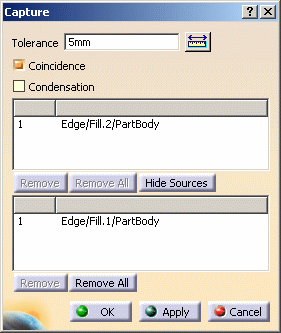
The Capture dialog box now appears as shown here:
Note that you can use edge selection by path.
- Tolerance: the source edge will be found automatically relatively to the selected tolerance.
- Coincidence: you can decide that you will have the nodes from both edges superimposed.
- Condensation: you can decide that the nodes from both edges (receiver and source) are single nodes.
- Receivers: the edge on which the source will be projected.
- Show Sources: a switch that lets you select the mesh
edges to be projected onto the receiver.
Be careful: mesh can only be captured on updated mesh part.
-
Enter the desired Tolerance value.
In this particular example, enter 5mm as Tolerance value.
-
Click Apply in the Capture dialog box.
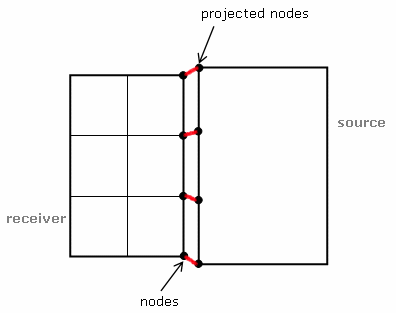
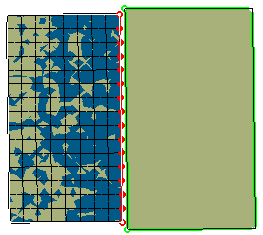
The nodes from a source edge at a 5mm from the receiver edge now appear.
You might also decide that you want to explicitly select the source edge. To do this:
-
Click Show Sources.
-
Click in the Sources field and then select the desired edge on the model.
The Capture dialog box now appears as shown here:
The nodes from the selected source edge now appear on the receiver edge.
-
Click OK in the Capture dialog box.
The Imposed Elements dialog box is updated:
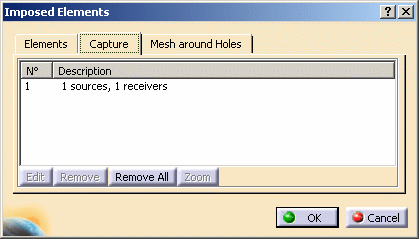
-
Click OK in the Imposed Elements dialog box.
-
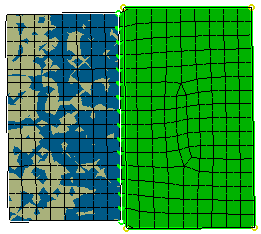
Launch the mesh operation.
For more details, refer to Meshing the Part.You can visualize the capture mesh:
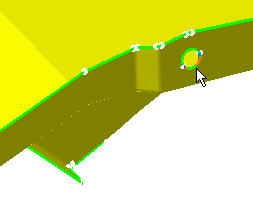
Mesh around Holes
Open the sample07.CATAnalysis document from the samples directory.
-
Enter the Advanced Surface Mesher workshop.
For more details, refer to Entering the Advanced Surface Mesher Workshop.
-
Click Imposed Elements
in the Local Specifications toolbar. -
Select the Mesh around Holes tab and the hole you want to be imposed nodes.
Note that whatever the number of curves making out the holes, multi-selection is automatic. You do not need to select each curve making out the hole.
The Mesh Around Holes dialog box now appears.
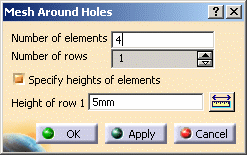
- Number of elements: lets you enter the number of elements you want to create around the selected hole.
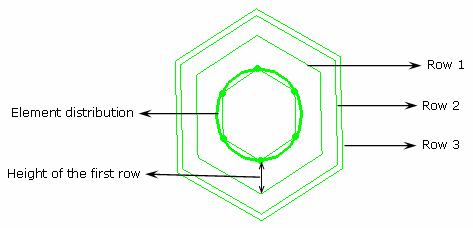
- Number of rows: lets you select the number of rows around the hole (one, two or three rows).
- Specify heights of elements: lets you specify the
height of the three first row around the hole.
If this option is deactivated, the mesh around the selected hole will be automatically done by the algorithm.
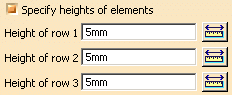
- Heights of row 1: lets you specify the height of the first row.
- Heights of row 2: lets you specify the height of the second row.
- Heights of row 3: lets you specify the height of the third row.
-
Enter the desired number of elements in the Mesh Around Holes dialog box.
Note that you can specify the height of the row, if needed.
-
Click OK in the Mesh Around Holes dialog box.
Both the Imposed Elements dialog box and the model are updated.

Hole and Nodes Before
Hole and Nodes After:
-
Click OK.