This task shows you how to launch the mesh operation for a
surface part.
This functionality is available both in the Surface Mesher
workshop and in the Advanced Surface Mesher workshop.
The FEM Surface (FMS) lets you automatically handle
the mesh of complex geometries with advanced control on specifications. The
meshes are fully associative with design changes. You can define
specifications in order to simplify the geometry.
However, the referenced geometry is never modified in the whole meshing
process. The mesh deals with the exact replica of the geometry as a clone:
it respects all the geometry characteristics, and adapt those to the mesh
needs, without impacting the original geometry design. You get an automatic
simplified interpretation of the meshed geometry.
For example, you can mesh over holes and gaps. In the same way, it is possible to eliminate small faces such as stiffeners or flanges for meshing. You can achieve an accurate and smart elimination of details such as fillets. Different types of finite elements and meshing methods are available: quadrangles or triangles, advancing-front or mapped meshers.
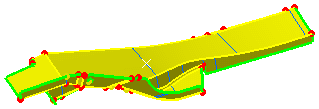
- Open the sample06.CATAnalysis document from the samples directory.
- Enter the Advanced Surface Mesher workshop or the
Surface Mesher workshop.
-
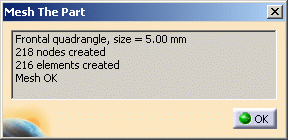
Click Mesh The Part
 in the Execution toolbar.
The Mesh The Part dialog box appears and provides you a summary on the surface mesh.
-
Click OK.
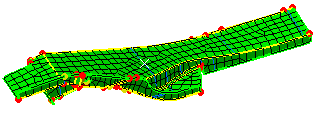
The surface part is meshed:
Any modification you will then manually apply to the meshed surface will not be saved for example if you edit the mesh. In other words, each time you will apply manual modifications (Adding/Removing Constraints (Modifications), Imposing Nodes (Modifications), Re-meshing Domains, Mesh Editing), these modifications will only be saved on the condition you launch the mesh operation again.
![]()