The mapping property lets you apply in one shot finite element properties to all the elements of a part (1D elements, 2D elements or 3D elements).
The identification of each element and the associated property
characteristics are listed in an XML (Extensible Markup Language) file. This
file must respect a particular syntax and format.
Each time the property is updated (using the Compute command) the
whole file is parsed and the properties are applied to elements.
Two approaches are proposed for the element identification:
- an associative identification based on mesh part names, group names and geometrical feature names,
- a spatial identification based on the coordinates of the
geometrical center of each element.
To identify the element coordinates, you can use the Generate Mapping File contextual menu.
For more details about this contextual menu, refer to Generating a Mapping File.
You can use both approaches in the same XML file.
To know more about finite element properties, refer to the Physical Properties chapter in the Finite Element Reference Guide.
Only available with the ELFINI Structural Analysis (EST) product.
- The syntax and the format of the xml files will comply with
the "Extensible Markup Language (XML) 1.0 (Third Edition)" rules as published
in the World Wide Web Consortium (W3C).
For more details, refer to http://www.w3.org/TR/2004/REC-xml-20040204/. - Only analysis User Material can be referenced
in the XML file.
For more details about analysis user material, refer to Creating User Material.
Mandatory Elements of the XML Mapping File
You can find here the mandatory elements for the mapping file.

where:
-
the first line is necessary at the beginning of the file.
|
|
Make sure that encoding format of the XML file is the
UTF-8.
|
-
ListOfProperties is the XML root element.
It contains all the other elements corresponding to the properties, units and default values. -
The PropertyMappingRules.xsd file contains the description of the mapping file elements.
Any difference between the xml file syntax and the .xsd description (spelling error, missing mandatory attribute, ...) generates an error message when you launch an update or a computation.You can find here an example of error message that appears when you launch a Mesh only computation:
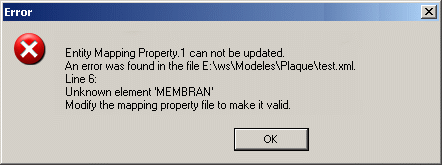
In this case, the XML file contains a spelling error (on the MEMBRANE keyword).
The decimal point used in the XML file depends on the regional settings of your operating system. It can be either a full stop or a comma (for example: 0.001 or 0,001). No other symbol is supported.
A warning message is displayed when you launch a Mesh Only computation if the decimal point used in the XML file does not correspond to the regional settings of your operating system.
Moreover, the syntax of the .xsd file name also depends on the regional settings of your operating system:-
If the chosen decimal point is a full stop, the .xsd file name must be: PropertyMappingRules.xsd
-
If the chosen decimal point is comma, the .xsd file name must be: PropertyMappingRules-fr.xsd
-
Global Parameters
You can find here the global parameters (tolerance, default axis and units) you must specify in the XML file.
![]()
where:
-
DEFAULT_VALUES: lets you set the tolerance value and a default axis system.
-
TOL is the default tolerance value that will be used in the spatial identification of elements. You have to fix this value.
For more details, refer to the tolerance description in the Spatial Identification paragraph.
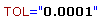
The authorized syntax for values is: 5, -5, 0.5, -0.5, .5, -.5, 1e5, -1e5, 1e-5, -1e-5.
The 5. syntax is not valid in the XML file. -
AXIS is the default axis system that is kept as reference axis system for the spatial identification of elements.
This axis system must be orthonormal.
You have to specify the default axis system using the axis coordinates or the name of the axis system (given in the specification tree).
For example:-
0;0;0;1;0;0;0;1;0: the three first values are the origin coordinates, the next three values are the X-axis coordinates and the last three values are the Y-axis coordinates.
-
Axis Systems\Axis.1: the axis must belong to the part you referenced.

Do not use the \ character in the name of the axis system. This character can only be used to define the path of the axis system.
-
-
-
UNITS: lets you set the units of length and angle value in the XML file.
Note that the syntax of the units will be the same as specified in the Tools - Options - Parameters and Measure - Units tab.-
LENGTH: lets you specify the length unit you will use in the XML file.
-
ANGLE: lets you specify the angle unit you will use in the XML file.
-
Element Identification
Two approaches are available:
- spatial identification
- associative identification
You can mix both identification approaches in the same XML file.
Spatial Identification
The spatial identification lets you capture elements on which you will apply a property (using the element coordinates) and define properties for orphan meshes.
![]()
where:
-
X, Y and Z are the three coordinates of the element.
You can use the Generate Mapping File contextual menu to identify
the element coordinates.
For more details, refer to Generating Mapping File.
You can also define a tolerance as optional attribute:
-
TOL: the tolerance value allows you to capture the element that is the closest to the specified coordinates in the given tolerance.
If you do not add this optional attribute, the tolerance defined in the global parameters will be taken into account.
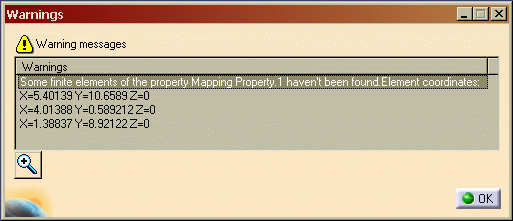
If no element is found, a warning message appears
when you launch an update or a computation.
This is an example of the displayed warning message:
Associative Identification
The associative identification lets you capture elements on which you will apply properties using the following criteria:
-
BELONG_TO:
-
BELONG_TO_MP: lets you select elements that belong to a specified mesh part

-
BELONG_TO_GROUP: lets you select elements that belong to a specified group

You can only use the geometrical groups and boundary groups (belonging to the Groups set or created under a mesh part) in the associative identification.
-
For groups belonging to the Groups set, you just have to give the name of the group (for example: "Line Group.2", "Surface Group by Boundary.1").
-
For groups created under a mesh part, you have to specify the name of the parent mesh part (for example: "Surface Mesh.1\Line Group.2", "Surface Mesh.2\Surface Group by Boundary.1").
-
-
BELONG_TO_GEOM: lets you select elements that belong to a specified geometry:

- Not available for the solid property definition.
-
-
SHARE_WITH: this criterion is used to filter the result of a BELONG_TO identification.
You cannot use the SHARE_WITH criterion as single associative identification.-
SHARE_WITH_MP: lets you filter elements that share at least one node with a specified mesh part

-
SHARE_WITH_GROUP: lets you filter elements that share at least one node with a specified group

You can only use the geometrical groups and boundary groups (belonging to the Groups set or created under a mesh part) in the associative identification.
- For groups belonging to the Groups set, you just have to give the name of the group (for example: "Line Group.2", "Surface Group by Boundary.1").
- For groups created under a mesh part, you have to specify the name of the parent mesh part (for example: "Surface Mesh.1\Line Group.2", "Surface Mesh.2\Surface Group by Boundary.1").
-
SHARE_WITH_GEOM: lets you filter elements that share at least one node with a specified geometry:

-
Identification by Intersection
You can use intersection of geometries or groups to identify finite elements. To do this, you have to separate geometries, mesh parts or groups using the ; symbol (no space around the ; symbol). The result of the selection is the intersection of all the selected geometries or groups.
The intersection is possible with all the keywords except with BELONG_TO_MP.
![]()
![]()
![]()
![]()
![]()
Identification by Union
-
You can combine the BELONG_TO and SHARE_WITH keywords to refine your selection. For example:

means that you will first capture elements that belong to the intersection of Fill.1 and Fill.2 geometries and then, filter the captured elements with elements that share at least one node with the Line Group.2 group. -
Use the spatial identification when more than one element is bounded by four geometries.
If no element is found with the associative identification (using the BELONG_TO and SHARE_WITH criteria), a warning message appears when you launch an update or a computation.
Properties Definition
You have to associate a property to an element.
- 1D properties:
- 2D properties:
- 3D properties:
Beam Property
In addition to the element identification, you have to specify mandatory attributes:
-
BEAM
-
MAT: lets you specify the material associated to the beam property.
You must reference an analysis User Material.

-
AREA: lets you specify the area of the cross section.

-
INERTIA: lets you specify the three components of the inertia matrix of the beam, expressed in the principal axis of the beam (Ixx, Iyy, Izz).

-
Orientation: lets you choose between three types of orientation. The orientation algorithm is the same as in the 1D Property definition.To know more, refer to Creating 1D Property.
-
ORIENTATION_VECTOR: you have to specify the vector coordinates expressed in the default axis system .


-
ORIENTATION_POINT: you have to specify the point coordinates expressed in the default axis system .


-
ORIENTATION_SURFACE: you have to specify the path of the surface.

-
You can also define optional attributes:
-
SHEAR_CENTER: lets you specify the y-coordinate (Cy) and the z-coordinate (Cz) of the shear center in the section axis, centered at the center of gravity of the section.
If you do not specify this optional attribute, the default coordinates of the shear center is (0;0).

-
SHEAR_RATIO_XY: lets you specify the ratio of the Y shear area over the cross-sectional area.
If you do not specify this optional attribute, the default value is 0:

-
SHEAR_RATIO_XZ: lets you specify the ratio of the Z shear area over the cross-sectional area.
If you do not specify this optional attribute, the default value is 0:

-
OFFSET: lets you specify the offset values at each end of the beam.
The three first values are the components of the offset vector for the start node of the beam and the last three values are the components of the offset vector for the end node of the beam. This vector is defined in the local axis of the beam.

-
DOF_START: you have to specify if you want to release or not degrees of freedom of the start node of the element.
If you want to release the first translation and the second rotation degrees of freedom, the attribute value will be:

The value is 0 if you want to release a degree of freedom. -
DOF_END: you have to specify if you want to release or not degrees of freedom of the end node of the element.
If you want to release the third translation and the third rotation degrees of freedom, the attribute value will be:

The value is 0 if you want to release a degree of freedom.
Then, a beam property applied to a particular element is described in the XML mapping file as shown below:
![]()
Variable Beam Property
In addition to the element identification, you have to specify mandatory attributes:
-
BEAM_V
-
MAT: lets you specify the material associated to the beam property.
You must reference an analysis User Material. -
AREA: lets you specify the area of the cross section.

-
INERTIA: (six values) lets you specify the six components of the inertia matrix of the beam, expressed in the principal axis of the beam (Ixx1, Iyy1, Izz1, Ixx2, Iyy2, Izz2).

-
Orientation: lets you choose between three types of orientation. The orientation algorithm is the same as in the 1D Property definition. To know more, refer to Creating 1D Property.
-
ORIENTATION_VECTOR: you have to specify the vector coordinates expressed in the default axis system .
-
ORIENTATION_POINT: you have to specify the point coordinates expressed in the default axis system .
-
ORIENTATION_SURFACE: you have to specify the path of the surface.
-
You can also define optional attributes (you can refer to beam property for more details):
-
OFFSET: lets you specify the offset values at each end of the beam.
The three first values are the components of the offset vector for the start node of the beam and the last three values are the components of the offset vector for the end node of the variable beam. This vector is defined in the local axis of the beam.
-
SHEAR_RATIO_XY: lets you specify the ratio of the Y shear area over the cross-sectional area (one value for each node).
If you do not specify this optional attribute, the default value is (0;0):

-
SHEAR_RATIO_XZ: lets you specify the ratio of the Z shear area over the cross-sectional area (one value for each node).
If you do not specify this optional attribute, the default value is (0;0):

-
DOF_START: you have to specify if you want to release or not degrees of freedom of the start node of the element.
If you want to release the first translation and the second rotation degrees of freedom, the attribute value will be:
The value is 0 if you want to release a degree of freedom. -
DOF_END: you have to specify if you want to release or not degrees of freedom of the end node of the element.
If you want to release the third translation and the third rotation degrees of freedom, the attribute value will be:
The value is 0 if you want to release a degree of freedom.
|
|
In case of multi-selection of elements (associative identification), a linear interpolation of values is made between the start and end elements for the AREA, INERTIA, SHEAR_RATIO_XY and SHEAR_RATIO_XZ attributes. |
Then, a variable beam property applied to a particular element is described in the XML mapping file as shown below:
![]()
In case of Beam Property and Variable Beam Property:
-
OFFSET attribute
If several elements are found during the associative identification, a linear interpolation is made to make the offset characteristic variable.
You can also use the spatial identification of elements and define offset values for each element to make the offset characteristic variable. -
DOF_START and DOF_END attributes
If several elements are found during the associative identification, all the nodes between the start node and the end node are fixed. -
To find the Start node and the End node, you can visualize the implicit orientation of 1D elements imposed by the mesh part.
To do this, generate a Local axis symbol image under the Nodes and Elements set.
The X-direction determines the Start node and the End node as shown below: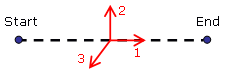
Bar Property
In addition to the element identification, you have to specify mandatory attributes:
-
BAR
-
MAT: lets you specify the material associated to the beam property.
You must reference an analysis User Material.
-
AREA: lets you specify the area of the cross section.
Then, a bar property applied to a particular element is described in the XML mapping file as shown below:
![]()
Shell, Membrane and Shear Panel Properties
In addition to the element identification, you have to specify mandatory attributes:
-
the 2D property
-
SHELL
-
MEMBRANE
-
SHEAR_PANEL
-
-
MAT: lets you specify the material associated to the beam property.
You must reference an analysis User Material. -
TH: lets you specify the thickness.

The thickness value must be strictly positive.
Then, a shell property applied to a particular element is described in the XML mapping file as shown below:
![]()
A membrane property applied to a particular element is described in the XML mapping file as shown below:
![]()
A shear panel property applied to a particular element is described in the XML mapping file as shown below:
![]()
Shear panel properties are only available with linear quadrangle element (QD4).
Inhomogeneous Composite Properties
Inhomogeneous composite properties correspond to a Composite Property with a ply approach.
In addition to the element identification, you have to specify mandatory attributes:
-
the inhomogeneous composite property
-
COMPOSITE_SHELL
-
COMPOSITE_MEMBRANE
-
COMPOSITE_SHEAR_PANEL
-
-
LAMINA:

where:-
MAT: is the material associated to the beam property.
This attribute is required. -
ANGLE: is the angle of each lamina.
This attribute is required.

-
TH: is the thickness of each lamina.
This attribute is optional if the Cured thickness value has been already set in the Properties dialog box (double-click a user material to open the Properties dialog box and select the Composite tab).
-
POSITION: lets you define several layers with the same characteristics but with a specific order.
This attribute is required.

-
You can also define optional attributes:
-
COMPOSITE_AXIS:

If this optional attribute is not specified, the default axis system is the one defined in the global parameters (at the beginning of the XML file).
|
|
Then, an inhomogeneous composite shell property applied to a particular element is described in the XML mapping file as shown below:
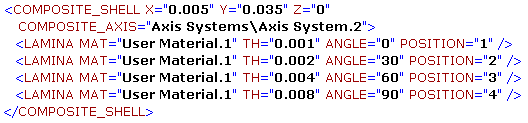
Or if several lamina has the same characteristics but with specific order:

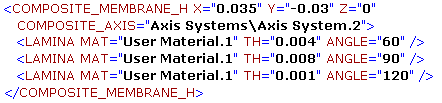
Homogeneous Composite Properties
Homogeneous composite properties correspond to a Composite Property with a zone approach.
In addition to the element identification, you have to specify mandatory attributes:
-
the homogeneous composite property
-
COMPOSITE_SHELL_H
-
COMPOSITE_MEMBRANE_H
-
COMPOSITE_SHEAR_PANEL_H
-
-
LAMINA:
where:-
MAT: is the material associated to the beam property.
This attribute is required. -
ANGLE: is the angle of each lamina.
This attribute is required.
-
TH: is the thickness of each lamina.
This attribute is optional if the Cured thickness value has been already set in the Properties dialog box (double-click a user material to open the Properties dialog box and select the Composite tab).
-
MULTIPLICATION_FACTOR: lets you define several layers with the same characteristics.
This attribute is optional if the associated value is equal to 1.

-
You can also define optional attributes:
-
COMPOSITE_AXIS:
If this optional attribute is not specified, the default axis system is the one defined in the global parameters (at the beginning of the XML file).
|
|
Then, an homogeneous composite membrane property applied to a particular element is described in the XML mapping file as shown below:
An homogeneous composite shear panel property applied to a particular element (with a multiplication factor) is described in the XML mapping file as shown below:

Solid Property
In addition to the element identification, you have to specify mandatory attributes:
-
SOLID
-
MAT: lets you specify the material associated to the beam property.
You must reference an analysis User Material.
|
|
The BELONG_TO_GEOM identification is not available for solid property definition. |
You can also define optional attributes:
-
AXIS: lets you specify an axis system to orient the orthotropic material.
The X, Y and Z coordinates are not transformed by this axis system. Those coordinates are interpreted in the global axis system in the XML file. -
AXIS_TYPE: lets you specify the axis system type (Cartesian, Cylindrical or Spherical).
-
CARTESIAN:

-
CYLINDER:

-
SPHERICAL:

-
Then, a solid property applied to a particular element is described in the XML mapping file as shown below:
![]()