Using the Auto Grasp  

ascenari.gif (1364 bytes) The procedures that describe how to use the commands in the Manikin Hand Grasp toolbar.

These functions automatically generate a grasp posture of the hand by checking the collision between the hand and one or several objects to be grasped, thereby decreasing the time it takes to create accurate postures.

This automatic grasping function is based upon the combination of collision detection and the automated Hand Grasp of the Standard Pose dialog box.

More specifically, this functionality will reuse the existing Hand Grasp feature, and induce an automatic motion of the hand (in forward kinematics), until a collision is found.

See also Keeping the Settings of a Hand grasp

Your manikins and a object to grab must already have been inserted, with collision set up if required via the Human Builder workbench.

The typical scenario when using the auto-grasp is to carry out the steps in the following order:
  • Manually position the hand near the object(s) to grasp.  This may be done using a combination of the existing positioning tools: Forward Kinematics, Inverse Kinematics Mode, Reach Mode, Place Mode, etc.
  • Select the type of grasp to perform.  There are three types of grasp: cylindrical , spherical and pinch
  • Select the hand to perform the grasp. The grasping hand, when selected, is highlighted in a characteristic color (green, in the snapshots).
  • Select the object(s) to grasp. The object to grasp may be selected by a simple mouse click: multiple objects may be selected, using the CTRL button on the keyboard.
  • Execute the grasp, by pressing the Execute Auto Grasp  icon.  This icon becomes available only when one or multiple objects are selected.
  • Fine-tune the grasp.  Once the grasp is performed, you may fine-tune the grasping posture by moving some fingers, in forward kinematics  for example, and pressing the execute  icon again.  Furthermore, if some fingers of the grasping hand are multi-selected using CTRL, these fingers will be considered as part of the 'objects to grasp' and will not move during the next grasp execution.
  • Undo the grasp.  To choose to undo the grasp (i.e. reopen all fingers), by selecting again, one of the grasp type icons.  This brings you back to the second bullet. The following snapshots illustrate a cylindrical grasp.


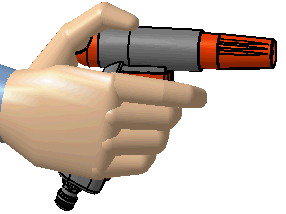
The snapshots below illustrate a pinch grasp.  The pinch grasp is performed by the thumb and index fingers
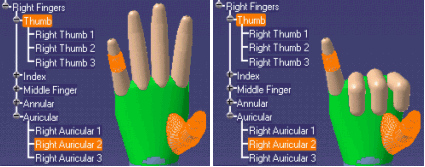
 only.


Collision Detection

The collision detection is calculated between the active hand (i.e. the one colored in green) and the selected (highlighted) objects.  Thus, by selecting specific phalanges (as in the snapshot below) or by selecting complete fingers (i.e. thumb selection), these selections will remain unmoved, as they will appear to enter in collision with
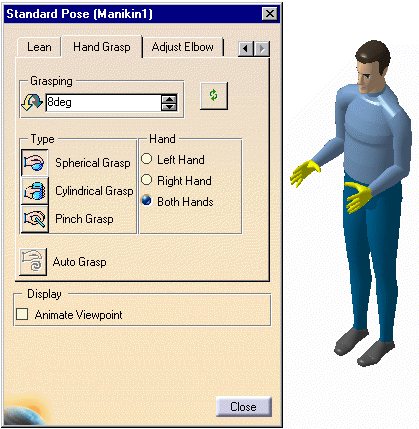
 themselves.

The net result is that every segment in green will be considered for the motion, whereas every object highlighted will not move.

Automatic Grasp in Standard Pose

The automatic grasp feature is also integrated into the Standard Pose dialog box.  The existing Hand Grasp tab has been enhanced to integrate the grasp icons, as well as the execute button.  The interaction required to perform an auto-grasp from the Standard Pose panel is very similar to the one occurring when using the Manikin Auto Grasp toolbar.  The same steps as those appearing above may also be used here.

Select the Standard Pose dialog box then select a manikin or a manikin segment.  If the segment selected is a hand or a finger, the Standard Pose dialog box will open and display the Hand Grasp tab directly.


Using the Execute Auto Grasp with the Tools > Option / General, Locking segments

Setting this option will keep the highlighted segment(s) stationary when applying the AutoGrasp function. This option is useful when an alternative position of a segment other than the default is desired. Segments should be free of collisions before using the AutoGrasp. This option will not resolve collisions of locked segments.

Without the option highlighted


With the Option highlighted and the thumb segments repositioned and highlighted.