Create Connectors
|
|
This task shows you how to create a connector. Connectors can only be created on objects that have existing geometry that satisfies the rules of connector creation. If existing geometry is not present, you will have to create the geometry. | |
|
|
1. | If the resource is not active, make it active by double-clicking in the specifications tree. |
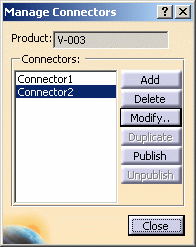
| 2. | Click the Build Connector button. This will bring up the Manage Connectors dialog box. | |
|
|
You will not be able to add a connector on
the instance of a standard part (a 'non-unique' part) using the Build
Connector command. You need to use the Define Connectors
sub-command in the Create Part dialog box. If you try to add a
connector to a standard part using the Build Connector command
then you will get an error message. The Build Connector command can be used to add connectors to a part that is unique - meaning it has one reference and one instance only. The Manage Connectors dialog box will list all connectors on the selected part. To see a connector and its associated geometry on the part, select a connector from the list. Adding a connector is explained below; Delete, Modify and Duplicate are explained elsewhere in this section. To Publish a connector means you are allowing people who do not have write access to your document to establish a connection. This is explained further in Using Work Packages. You can Publish or Unpublish connectors using the two buttons.
|
|
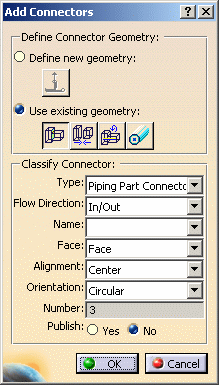
| 3. | Click the Add button. The Add
Connectors box displays. NOTE: The Define Connector Geometry options will
not be available if you are placing a connector on a light object. For more
information see Creating Connectors on Light
Parts. Select the type of connector - piping, HVAC, etc. In some applications the flow direction field will be available. The piping (or tubing) part connector has flow direction built in and you must select a flow direction also from the drop down menu. The mechanical part connector has no flow direction. Another type of connector - the nozzle connector - will be available if you are placing a connector on a nozzle. A nozzle connector must be placed on the end of the nozzle that connects to equipment. A part connector is placed on the end that connects to the pipe or duct. An electrical part connector should only be placed on a socket. The electrical part connector should be placed on the end of the socket that connects to equipment. A cableway part connector should be placed on the free end of the socket that does not connect to equipment. When you are placing a connector on a Bendable, such as a bendable pipe, you must use the Define New Geometry option. You must not use existing geometry to place the connector. You can name each connector by selecting in the Name field. This is useful for some functions, such as designing using a schematic. See Customizing 2D and 3D Connector Names for more information. The concept of Publishing or Unpublishing a connector is explained above. Check the checkbox as necessary. Face, orientation and alignment are explained below. |
|
|
|
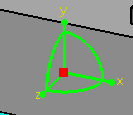
The orientation,
alignment and face must be defined correctly before a connector can be
created. To explain what these are, the face is the surface to which you
attach a connector. As an example, if you want to attach a clock to your
office wall, the wall is the face. You want the numeral "12" to be up, so
you orient the clock accordingly. This is the orientation. The alignment is
the direction in which the clock face is pointed - normally it would be
perpendicular to the wall. When creating a connector, the alignment always
has to be perpendicular to the face.
The connector must always be created pointing out of the part. Do not
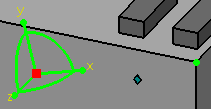
create a connector where the alignment vector points into the part. The face is generally defined using a face of the part, such as the end of a pipe. Alignment is usually defined using a line, such as the not-shown line along the centerline of a pipe. Orientation is defined using the xy plane, or another plane or face to define an "up" direction. In the illustration below the Z axis indicates the alignment of the connector. It also indicates the direction in which routing will occur. The X and Y axis together define the orientation. They are useful when attaching two resources.
It is necessary to select geometry in the part to which you want to attach a connector so that these three characteristics are correctly defined. If the part does not have the necessary geometry then you must create it. |
|
| 4. | If you want to create a connector using the
part's existing geometry click the Use existing geometry option.
You can display the part construction geometry, if there is any, to make it easier to select existing geometry. Do this by:
|
|
| 5. | The fields under Classify
Connector will become available after you have successfully selected the
geometry explained in Step 4. Click on the down arrows to make your
selection.
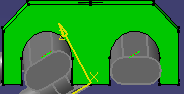
Select a type. For Flow direction, select In, Out, InOut or None. Select the Face type. A Hole connection allows a routable to pass through it - it is useful for placing parts like clamps along a run without cutting a tube. A Face connection will stop a routable and not allow it to pass through. Select an alignment. Choose an orientation: Circular will allow the connector to attach to another connector at any orientation; round ducts and pipes, for instance, do not need a well-defined "up" direction because they can rotate. A Rectangular orientation is used for parts like rectangular ducts; they do not have a strict ''up" direction. Up allows the connector to attach to another connector or part in the up position: horizontal trays, for instance, require a well-defined "up" position. You can also use the "up" orientation for a hole connector. In the image below, the connector on the right has the up orientation, the connector on the left does not.
The number in the Number field is assigned by the application. This can be significant because when you are creating a new connector, you have the option of using the alignment and orientation used in the previous connector after you select the face. You can choose to do this, or select a new alignment and/or orientation. |
|
| 6. | Click OK. The new connector will be listed in the Manage Connectors box. | |
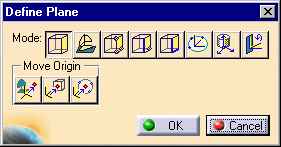
| 7. | To
define new geometry for placing a connector, select the option
Define new geometry, then click on the Select plane button
|
|
| 8. | Use the functions provided by the
Define Plane box to reposition the connector, if necessary, as explained
below. (The colors of the buttons may be slightly different in some
applications.)
Use the Move Origin buttons to define the plane.
|
|
| 9. | Click OK. The connector will be placed and the Add Connector dialog box will display again.< | |
| 10. | Make your selections in the fields under Classify Connector as described in Step 5. Click OK. | |
|
|
||