This release provides the following sample files that follow the naming rules for automatic association:
- For 2D Equipment:
ConnectorNames.txt, located in
...intel_a\startup\EquipmentAndSystems\DiscreteValues. - For 3D Equipment:
- Equipment-ConnectorsNames.txt, located in ...intel_a\startup\EquipmentAndSystems\Equipment\General\DesignRules\DiscreteValues
- ElectricalEquipment-ConnectorNames.txt, located in ..intel_a\startup\EquipmentAndSystems\Equipment\Electrical\DesignRules\DiscreteValues
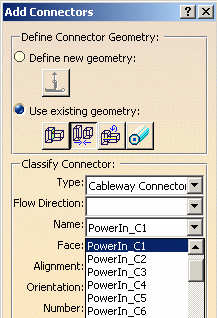
The contents of these files become available to users through the
Add Connectors dialog box, as shown in the following diagram at left,
or the Name Connector dialog box (for 2D connectors) shown at
right, which users can access immediately after placing a connector by
right-clicking and selecting Rename from the menu that displays.
| 3D Dialog Box | 2D Dialog Box |
 |
 |
When users design using a schematic, the connectors are associated using the following rules:
- If the 3D equipment contains one connector only, that connector is associated with the 2D connector.
- If the there is more than one connector on the 3D equipment, that connector is associated with the identically named 2D connector.
- If there is no identically named 2D connector, the first 3D connector
that contains the same prefix as the 2D connector is associated with that
2D connector.
An underscore must separate the prefix from the rest of the connector name. - One or more 2D connectors can be associated with one 3D connector, however, one 2D connector cannot be associated with multiple 3D connectors.
Examples:
2D Connector Name(s) 3D Connector Names Resulting 2D/3D Association PowerIn, PowerOut PowerIn, PowerOut PowerIn and PowerIn
PowerOut and PowerOutPowerIn_C1, PowerIn_C2 PowerIn Both PowerIn_C1 and PowerInC2 are associated with PowerIn PowerIn_C1, PowerIn_C2 PowerOut, PowerIn_C4 PowerIn Both PowerIn_C1 and PowerInC2 are associated with PowerIn_C4 PowerIn_C1, PowerIn_C2 PowerOut
PowerIn PowerIn_C1PowerIn_C1 and PowerIn_C1
PowerIn_C2 and PowerInPowerIn_C1, PowerIn_C2 PowerOut
PowerOut_C1None
Users can view and confirm the association between the 2D and 3D
connectors using the Associate Cables button
![]() .
.
![]()