- Display the ENOVIA LCA interoperability toolbar
- Check ENOVIA LCA and DMU Space Engineering Assistant display
- Establish the DMU Space Engineering Assistant/ENOVIA LCA connection
- Customize DMU Space Engineering Assistant Settings
- Send an ENOVIA LCA document into CATIA V5
- initialize connection to DMU Space Engineering
Assistant
We assume in this User's guide that you performed all preliminary installation steps. Read DMU Space Engineering Installation Guide.
How to display the ENOVIA LCA
interoperability toolbar?
-
In CATIA V5, select:

The ENOVIA LCA toolbar looks like this: 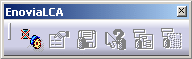
How to check ENOVIA LCA and DMU Space
Engineering Assistant (Spy) toolbars display?
-
Select View > Toolbars from the menu bar. Then, make sure Spy and ENOVIA LCA items are selected

How to establish the DMU Space Engineering
Assistant/ENOVIA LCA connection?
-
In CATIA V5 (you are in the Product Structure workbench), click Connect to LCA
 to establish a connection
between CATIA V5 and ENOVIA LCA.
to establish a connection
between CATIA V5 and ENOVIA LCA. The Enovia toolbar looks like this now: 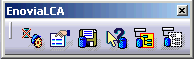
How to customize DMU Space Engineering Assistant Settings?
-
In CATIA V5, select Tools->Options->Digital Mock-up from the menu bar and select DMU Space Engineering
The DMU Space Engineering tab lets you customize the following: -
Select Digital Mockup->DMU Space Analysis category, to access another option necessary for DMU Space Engineering Assistant
For more information, read Customizing section
How to send an ENOVIA LCA document into CATIA V5?
-
Load your Product Class Root (referred to as PRC throughout this guide) from ENOVIA in CATIA V5, using the Send To > CATIA V5 commands accessible from the contextual menu (all you need to is right-click the desired PRC in the Product Class Editor).
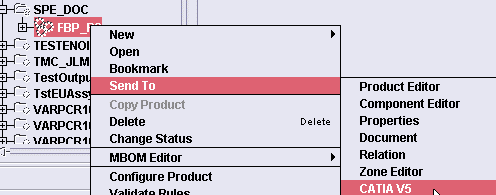

To create a PRC, refer to the appropriate ENOVIA LCA documentation (Engineering LifeCycle User's guide)
How to initialize connection to DMU Space Engineering Assistant?
-
In CATIA V5, click Connect/Disconnect
 from the DMU Space Engineering toolbar:
The icon becomes active  ,
the connection is established for the product loaded in your CATIA
session.
,
the connection is established for the product loaded in your CATIA
session. You are now ready to work with DMU Space Engineering Assistant and perform operations such as: - Modifying existing parts or,
- Creating new parts.
Each time, you need to run an interference analysis, click  to force
the calculation: each and every part modified since last computation
is sent to DMU Space Engineering server. An hourglass appears on the
icon when the calculation is launched
to force
the calculation: each and every part modified since last computation
is sent to DMU Space Engineering server. An hourglass appears on the
icon when the calculation is launched
![]()